Emerging Revolutionary War is honored to welcome back historian Katie Turner Getty. Biography of Ms. Getty is below the post.
On April 19, 1775, the placid farm of fifty-eight-year-old Jason Russell of Menotomy erupted into carnage when he, along with eleven other Americans, were shot and bayonetted by British soldiers in his home and yard.
Jason Russell House (author collection)
As American militia and minutemen poured in from surrounding towns, the British—fatigued yet furious—found themselves under increasingly heavy musket fire. As they pulled back from Concord and retreated to Boston, the main column passed near Russell’s house which stood near the battle road. Russell had just returned home after secreting his family at a nearby farm. Unbeknownst to him, American minutemen and British soldiers would soon converge upon his property and a desperate battle would occur within the walls of his own house.
Earlier that day, twenty-six-year-old Gideon Foster had set off from Danvers with a company of minutemen. The men had set a scorching pace and made the sixteen mile journey to Menotomy in four hours, running half the way.[1] Upon arriving, Foster’s men joined others from Lynn, Beverly, Salem, Dedham, and Needham.[2] Some took cover behind trees and others in Russell’s yard, where a breastwork was constructed out of shingles.
The Fight at the Jason Russell House, bicentennial painting by Ruth Linnell Berry (1974). Appearing with permission from the Arlington Historical Society.
The men focused their attention on the approaching main column of British troops and fired upon them. Capt. Israel Hutchinson, a seasoned French and Indian War veteran, warned that flank-guards would likely be traversing the fields alongside the road[3], helping the main column to pass unmolested. But before the men could reconsider their position or move to a more defensible location, the flank-guard was upon them, trapping the men against the main column.
In a frantic search for cover, many of the men bolted into Russell’s house. Jason Russell, too, attempted to dash inside but was slowed by his lame leg.[4] He was shot twice and fell on his doorstep. The soldiers tore inside the house in hot pursuit of the men, bayonetting Jason Russell’s body eleven times as they passed.
Once inside the house, the Americans had no choice but to fight for their lives in rooms with no egress, in very close quarters, against raging, bayonet-wielding soldiers. It was a bloodbath. With two rooms on the bottom floor, a narrow stairwell, and two rooms on the top floor, Jason Russell’s house offered very little refuge. Soldiers outside the house hailed musket fire into the windows.
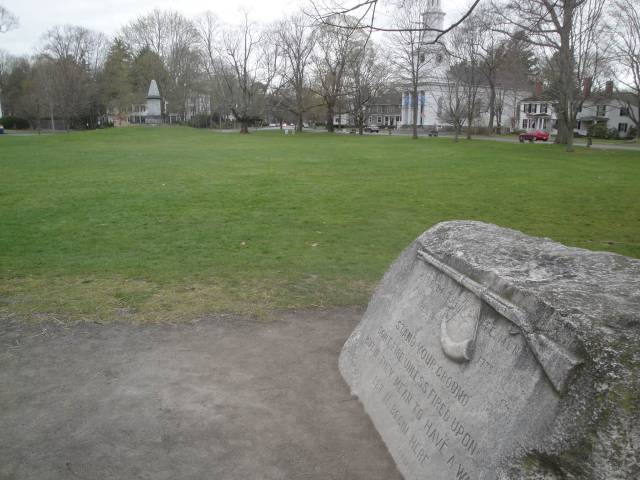
Sign depicting what happened at the Jason Russell House on April 19, 1775
With nowhere else to go, several men rushed into the cellar. What at first would seem to be an ill-advised hiding spot turned out to be the only sanctuary that Russell’s home could offer. Taking position near the bottom of the stairs, the men raised their muskets and shot dead the first soldier who descended.[5] Any other soldiers who attempted to follow were met with blazing musket fire. Holes left by musket balls are still visible in the stairwell, attesting to the firestorm.
Soon, the house grew quiet. All of the men who had sought safety in the house had been killed, with the exception of the men who took refuge in the cellar. The British ransacked the house then left.[6]
In 1835, sixty years after the bloodbath at Russell’s house, a memorial was erected in Danvers to commemorate the townsmen who lost their lives in Menotomy that day. Danvers lost the second highest number of men, after Lexington[7], and all of them at Jason Russell’s house. Foster, the commander of the company of minutemen who had ran halfway to Menotomy, was by then the last surviving Danvers veteran of the war. Aged eighty-six, he addressed the crowd assembled for the dedication of the monument and recounted the events of April 19th:
On that morning, more than one hundred of my townsmen hastened to the field of battle…ready to offer their lives on the altar of their liberties. Seven of those who thus started in the prime of life and vigor of manhood, ere that day’s sun descended in the west, were numbered with the dead.[8]
Foster called the dedication of the memorial “One of the happiest days and most pleasing events of my life.”[9]
In total, twelve Americans were killed at Jason Russell’s house. Jason’s wife, Elizabeth, returned home to find her husband dead. He and the other fallen Americans, their bodies riddled with musket balls and slashed by bayonets, had been laid out on the floor in the kitchen, the blood from their wounds pooling around them. Elizabeth later said that “the blood in the room was almost ankle deep”.[10]
Musket ball damage to the staircase of the Russell House
*Biography: Katie Turner Getty is a lawyer, history enthusiast, and lifelong resident of Boston. She holds an A.A. from Bunker Hill Community College in Charlestown, Massachusetts, a B.A. in History from Wellesley College, and a J.D. from New England Law Boston. She can often be found exploring historic sites both on and off the Freedom Trail.
In southeast Pennsylvania on September 11, 1777, the largest battle, by number of combatants, was fought between the British forces under Lord General William Howe and the Continental and militia forces under General George Washington. After the day long engagement, one of the bloodiest of the entire American Revolution, approximately 1,900 men were killed, wounded, or captured. Washington lost 8% of his entire force that day, Howe 4%.
Brandywine, A Military History of the Battle that Lost Philadelphia but Saved America, September 11, 1777
Yet, the Battle of Brandywine has been eclipsed by the history that followed shortly thereafter the bloody engagement. Fifteen days after the battle along Brandywine Creek, Howe’s British and Hessian forces will capture Philadelphia and Washington’s army will spend the pivotal 1777-1778 winter at Valley Forge. Although the battle has been the subject of a few histories and folded into larger campaign studies, Michael C. Harris’s book-length treatment is the first to take an analytical and discerning eye to the engagement and separate myth from fact. Published by Savas Beatie, LLC, in 2014 in hardcover, the book has now been released in paperback. Continue reading “Review: Brandywine, A Military History of the Battle that Lost Philadelphia but Saved America, September 11, 1777 by Michael C. Harris”→
A special thanks to Stacey Fraser at the Lexington Historical Society for the update on the new exhibit described below.
If one asked what a buzzword for 21st century communication would be today, what would be your answer?
Text? Tweet? Snap?
(courtesy of Lexington Historical Society)
What if the follow up question was that some of the same buzzwords of the 21st century could describe the 18th century? Thanks to the Lexington Historical Society at Buckman Tavern, you can see the similarities yourself.
Opening on April 8th, the interactive exhibit is part of the admission ticket to the tavern. Titled #Alarmed! 18th Century Social Media “explores how news went viral 250 years ago” in addition to letting “visitors imagine how colonials might have made use of modern media tools to kick start a revolution. Continue reading “#Alarmed”→
Emerging Revolutionary War is honored to welcome back historian Katie Turner Getty.
“Mr. Malcom, I hope you are not going to strike this boy with that stick.”[1]
George Robert Twelves Hewes portrait, entitled “The Centenarian” by Joseph G. Cole, 1835.
The speaker was 31-year-old Boston shoemaker and Tea Party participant, George Robert Twelves Hewes. Hewes had been walking along Fore Street in Boston on the afternoon of January 25, 1774 when he came across 50-year-old Loyalist and Customs officer, John Malcom, furiously shaking a large, heavy cane at the head of a small boy.
Five weeks earlier, on December 16, 1773, Hewes had “dressed [himself] in the costume of an Indian, painted [his] face and hands with coal dust in the shop of a blacksmith”[2] and participated in the Tea Party. Appointed boatswain, he and his company boarded one of the three ships and proceeded to soak 342 chests of East India Company tea in Boston Harbor. After dumping the tea that night, the men “quietly retired to [their] several places of residence… No disorder took place… and the stillest night ensued that Boston had enjoyed for many months.”[3]
Hewes had encountered no trouble when destroying the tea that night. But on this frigid Tuesday afternoon in January, trouble had found him—and was brandishing a cane.
Malcom turned his attention from the small boy to the shoemaker and exclaimed, “You are an impertinent rascal! It is none of your business!”[4]
Undeterred, five-foot, one-inch Hewes further protested Malcom’s rough treatment of the boy. Malcom called Hewes a “vagabond” and further declared that Hewes “should not speak to a gentleman in the street.”[5]
Hewes replied that he was “neither a rascal nor a vagabond, and though a poor man, was in as good credit in town as [Malcom] was.”[6] The exchange between the two men became even more heated.
Malcom called Hewes a liar and Hewes then retorted, “be that as it will, I never was tarred and feathered any how.”[7]
Malcom, overcome with fury, then struck Hewes in the head with his heavy cane, opening a bloody gash in the shoemaker’s forehead and causing him to fall to the ground unconscious.
John Malcom was one of the few people in the American colonies who had been tarred and feathered. Before this night was through, he would earn the dubious distinction of having been tarred and feathered twice.
“A New Method of Macarony Making, as Practised at Boston”, 1774.
Malcom’s first encounter with a sticky suit of tar and feathers was in October of 1773 in Falmouth (now Portland, Maine). While working as a Customs officer, Malcom had overzealously seized a ship called the Brothers for not having a register. Once aboard the ship, he “heartily damned the sailors, menaced the mate, [and] threatened to sheath his sword in the bowels of any one who dared dispute his authority.”[8]
So enraged were local sailors by Malcom’s behavior, that he was “disarm’d of Sword, Cane, Hat & Wig”[9], tarred and feathered over his clothes, and paraded through the streets for about an hour before being released.
This episode was common knowledge in Boston. In a letter to the Earl of Dartmouth, Massachusetts Governor Thomas Hutchinson indicated that Malcom had complained to him on several occasions of “being hooted at in the Streets for having been tarred and feathered”[10] Clearly, the Boston populace was not sympathetic to Malcom. And after his assault on Hewes, they would become even less so.
When Hewes regained consciousness, he found himself surrounded by a crowd of onlookers who urged him to visit the prominent Boston physician, Dr. Joseph Warren, to have his wound treated. In the meantime, Malcom had “contrived to get a weapon in his hand and keep [the crowd] at bay, till he could flee to his house”[11] on Cross Street.
When Hewes visited Dr. Warren at his office on Hanover Street, the doctor made a cheerful comment relating to the fortuitous thickness of Hewes’s skull. He said, “you are the luckiest man I know of, to have such a skull—nothing else could have saved you.”[12]
Word of Malcom’s assault on Hewes had quickly spread through Boston and people had started gathering outside his house. Far from being cowed by the unfriendly crowd, Malcom “bullied the people”[13], slinging verbal taunts and threats. In response to jeers, Malcom shouted “You say I was tarred and feathered, and that it was not done in a proper manner, damn you let me see the man that dare do it better!”[14]
Even 243 years later, Malcom’s defiance of the crowd is astonishing. From inside his house, he ran his sword out through the window and inflicted a flesh wound on an unlucky bystander named Waddel. He threatened the crowd with pistols and proclaimed that he would receive a thirty pound reward for every person he killed[15]. The formidable Malcom was eventually removed from his house “amidst the huzzas of thousand[s]”[16] He was dragged on a sled to King Street, site of the Boston Massacre, and was stripped of his clothes.
In Falmouth, during his first tar and feathering in 1773, the tar was splashed onto his clothes. This time, Malcom’s clothing was torn off, exposing him to the frigid winter air. The tar was poured over his bare flesh. He was then transferred to a cart and gleefully hauled to various points across town.
Sixty years later, Hewes reflected upon the event in his biography. “Then they drove to Liberty Tree—to the gallows on the Neck—back to the Tree—to Butcher’s Hall again—to Charlestown Ferry—to Copp’s Hill—flogging the miserable wretch at every one of these places.”[17] Four hours later, he was unceremoniously deposited at the doorstep of his house, frostbitten and senseless.
The reader may feel a slight twinge of disappointment, or perhaps even a grudging respect, upon learning that throughout his ordeal, John Malcom comported himself with “Great Fortitude and Resolution”.[18] Malcom’s recovery was lengthy. When frostbite caused his tarred and feathered flesh to peel off in strips, Malcom packed the skin in a box to preserve it and present to the King as proof of his service and sufferings.[19]
In May, 1774 Malcom sailed for England (presumably with his box of tarred flesh and feathers). Once in England, Malcom embarked on a letter-writing campaign to request redress for all of the suffering and expense he endured in America in furtherance of his service to the King.
In 1776, Malcom wrote a letter to the Lords of the Treasury. In referencing the altercation with Hewes in Boston and his subsequent tarring and feathering, Malcom stated that in “endeavoring to do my Duty in getting the Tea landed, [he] was barbarously and inhumanely treated…[and] was obliged to quit America”.[20]
Also in the letter, he accused his former Customs supervisor in Falmouth, Francis Waldo, of various misdeeds. Waldo had strongly disagreed with Malcom’s seizure of the Brothers and the two had never reconciled.
Waldo’s ire is still palpable 240 years later as, in response, he meticulously dismantles Malcom’s claims in a letter to the Lords of the Treasury, point by painstaking point:
“Mr Malcom went to Boston and brought upon himself a second Taring [sic] and Feathering…which happened some time after the India Companys Teas were destroyed and was occasioned by his beating a Boy in the Street in such a manner as to raise a Mob”[21]
Many factors probably contributed to the second tarring and feathering of Malcom, but any efforts he might have made to land the tea were not among them. As Waldo pointed out, the tea had been destroyed over a month before Malcom was tarred. Malcom was already unpopular in town due to objectionable past actions such as the Brothers seizure. He was a particularly overzealous and aggressive Customs officer. And the man he assaulted was a Patriot and tea party participant.
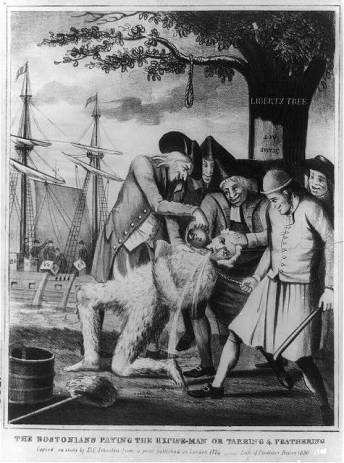
“Bostonian’s Paying the Excise-Man, or Tarring and Feathering”, attributed to Philip Dawe, London, 1774.
Additionally, Bostonians felt a simmering resentment toward the authorities. When some men tried to persuade the crowd to stop tormenting Malcom, they refused to relinquish him.[22] They believed the government would fail to punish him for his wrongs—assaulting the boy and Hewes, threatening the populace, and sticking Waddel with his sword. Instead, the crowd chose to maintain possession of Malcom and mete out the justice that they believed the government would not.
Malcom was in England barely a year before he demonstrated a desire to return to Boston. In a petition to the King, Malcom states that he “long[s] to be sent out to my Family in Boston and to my Business in the Customs in the Boston Government…I would Humbly Implore your Majesty let Me be soon sent from London to Boston…”[23]
In the end, Malcom was assigned to the Independent Company of Invalids at the Plymouth Garrison. He penned several more letters and petitions asking for additional compensation from the British government.
In 1782, the Commissioners on American Loyalist Claims reviewed his case and decided to allow him another 60 pounds per year on account of his having been tarred and feathered, but in no small part because “he appears to be in some degree insane.”[24]
Malcom lived out the rest of his days in England, passing away in 1788 at age 65. He never went back to Boston, nor ever saw his wife or children again.
Hewes lived to be 98 years old. In 1775, after war broke out, he escaped from Boston in a fishing boat and went to Wrentham, Massachusetts. He served in the militia until the end of the war. Eventually he moved to upstate New York. He was married for 70 years until his wife, Sally, passed away at the age of 87. By all accounts, he was lively and spry until the end. On the 4th of July, 1840, he was preparing to attend a celebration as a special veteran guest. On that day, George Robert Twelves Hewes stumbled while stepping into a carriage and suffered a serious injury. He died that November.
*Sources
[1]Boston-Gazette and Country Journal, 31 January 1774. The Annotated Newspapers of Harbottle Dorr Jr., Massachusetts Historical Society http://www.masshist.org/dorr/volume/4/sequence/522 Hereinafter cited as Boston-Gazette.
[2] A Citizen of New York [James Hawkes], A Retrospect of the Boston Tea-Party, with a Memoir of George R. T. Hewes, a Survivor of- the Little Band of Patriots Who Drowned the Tea in Boston Harbour in 1773 (New York: S. Bliss, printer, 1834), 38. https://archive.org/details/retrospectofbost00hawk Hereinafter cited as Hawkes.
[8] Boston-Gazette and Country Journal, 14 February 1774, quoted in Frank W.C. Hersey, Tar and Feathers: The Adventures of Captain John Malcom, reprinted from the Transactions of the Colonial Society of Massachusetts, volume XXXIV, (Boston: D.B. Updike, The Merrymount Press, 1943), 440.
[9] Boston-Gazette and Country-Journal, 15 November 1773, quoted in Hersey, 440.
[10] Governor Thomas Hutchinson letter to Earl of Dartmouth, 28 January 1774, quoted in Hersey, 448.
[11] A Bostonian [Benjamin Bussey Thatcher], Traits of the Tea Party; Being a Memoir of George R. T. Hewes, One of the Last of Its Survivors; With a History of That Transaction; Reminiscences of the Massacre, and the Siege, and Other Stories of Old Times (New York: Harper & Brothers, 1835), 128. https://archive.org/details/traitsteapartyb00thatgoog Hereinafter cited as Thatcher.
[18] John Rowe, Anne Rowe Cunningham, Edward Lilly Pierce, Letters and diary of John Rowe: Boston merchant, 1759-1762, 1764-1779, (Boston: W.B. Clark Co., 1903), 261.
Emerging Revolutionary War is honored to welcome guest historian Derek Maxfield as the author of this post. A biography of Mr. Maxfield is at the end.
A trek to Conesus, NY, to pay my respects to Capt. Daniel Shays – who is buried in Union Cemetery – resulted in a revolutionary discovery: Groveland Ambuscade Park and Monument. Set atop the western ridge overlooking Conesus Lake is an obelisk dedicated to the memory of a group of scouts from Gen. Sullivan’s army who were ambushed there in 1779.
Monument commemorating the ambush (author collection)
Quite off the beaten track, the park has seen better days. In 1901 The Livingston County Historical Society erected a large monument commemorating the ambush of American troops near that spot. A small park, complete with a pavilion and picnic area was added – though these amenities are no longer present. More recently a wooden stairway was added leading up to the monument, which stands on high ground.
Gen. John Sullivan, under orders from Gen. Washington, mounted a punitive raid against the Iroquois in Western New York in 1779. When Sullivan’s army sought to cross the inlet at the southern end of Conesus Lake, they stalled while engineers worked to create a reliable bridge across the mire. Wishing to know the location of the British and Indian army, under Col. Butler and Chief Joseph Brant, Sullivan sent a scouting party over the western ridge. Leading the scouting party of Lt. Thomas Boyd, who was assisted by a Native American scout named Han Yost.
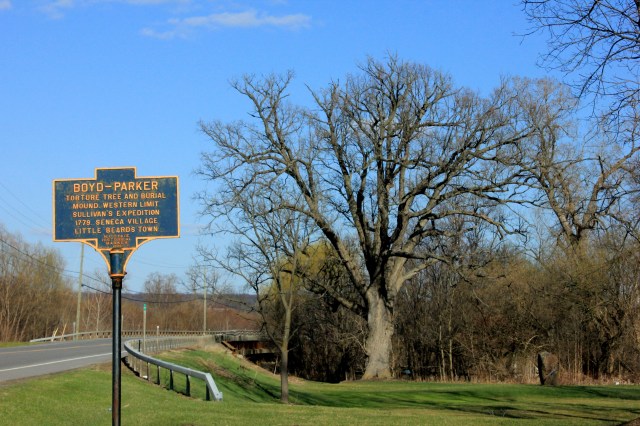
Boyd and his men were lured into a trap and ambushed on September 13th, 1779. Only a handful survived to bring word back to Sullivan. In subsequent days Boyd’s body was found in a Native American village mangled and mutilated. Boyd and Sargent Michael Parker had been captured and interrogated, but gave up little information. This resulted in their torture – fingers and toes removed, they were disemboweled and beheaded. Finally, their entrails were flung over tree branches. This tree, still standing – nearly 300 years old, now is a monument to the brave Continental soldiers who died at the hands of the Seneca. The “Torture Tree” was designated a National Historic Landmark in 2009.
The “Torture Tree” (author collection)
Sixteen of Sullivan’s men were killed at Groveland plus Han Yost, the Native American guide. The scene of the ambush would prove to be the western limit of Sullivan’s penetration into the Iroquois homeland.
Seemingly just a footnote in the history of the Revolution, it is nice to see that this courageous band that died so ingloriously is remembered today.
*Derek Maxfield is an associate professor of history at Genesee Community College in Batavia, NY, where he is also coordinator of the college’s Civil War Initiative. For his work with the Initiative, Maxfield was awarded the SUNY Chancellor’s Award for Excellence in Scholarship and Creative Activities in 2013.
Maxfield holds a Bachelors of Arts degree from SUNY Cortland and a Master of Arts degree from Villanova University. He is also a PhD candidate at the University of Buffalo, where he is ABD (all but dissertation). Among Maxfield’s research interests are 19th century politics and culture, especially Victorian death ways and the Civil War.
Maxfield lives in Churchville, NY, with his wife, Christine, two children—Quincy, 13, and Jesse, 11—a basset hound, three cats and a tortoise.*
Emerging Revolutionary War is honored to welcome guest historian Katie Turner Getty. A short biography is at the bottom of the post.
In terms of historical significance, few American cities rival Boston, where shades and shadows of the Revolution can be found around every corner. By walking the city’s famous Freedom Trail, one can follow in the literal footsteps of the inhabitants who left such an indelible mark on the city. Indeed, many heroes of revolutionary Boston—Revere, Adams, Otis—lie in their eternal repose in burying grounds mere steps from busy thoroughfares.
The presence of those revolutionaries still looms large in Boston and many of their old stomping grounds still stand. Several buildings located on the Freedom Trail played unforgettable parts in the revolution. From the fiery speeches at Old South Meeting House on the eve of the tea party to the blood shed by those massacred outside the Old State House*, these sites are popular and are frequently visited.
But there is one site not located on the Freedom Trail that is yet imbued with great historical import. Indeed, it is the site of the 1768 arrival of British warships in Boston Harbor and the troops who first took those fateful steps into Boston for the purposes of occupying the city.
East-facing view of Long Wharf and John Hancock’s office and counting house, built in 1763, and now the Chart House restaurant.
The name of this site, so often overlooked, is Long Wharf.
Long Wharf has stretched into the Atlantic from Boston for 300 years, serving as the world’s great doorway to the city. It was the longest wharf in Boston, extending 1,586 feet into the deep water of the harbor allowing up to 50 ships to dock at one time[1]. It would have been a place of great bustle—the loading and unloading of cargo by longshoremen, transporting of such cargo to the busy warehouses and shops that lined the wharf, and then the purchase of such goods by local people.
West-facing view toward Boston, from the end of Long Wharf. The Town House (now known as the Old State House), built in 1713, is in the distance.
On Friday, September 30, the Beaver, the Senegal, the Martin, the Glasgow, the Mermaid, the Romney**, the Launceston, and the Bonetta anchored in the harbor. On board the ships were “the 14th and 29th Regiments, a detachment from the 59th regiment, and an artillery train”.[2] The next day, Bostonians warily watched as “the war ships maneuvered closer to the town and ranged themselves as if for a siege.”[3] Then, carried off the warships by small boats, British troops stepped onto Long Wharf and into American history.
These ships and troops had arrived in the port of Boston as a response to colonial opposition to the Townshend Acts which were enacted by Parliament in 1767 in an effort to enforce their sovereignty over the colonies and raise revenue. The Townshend Acts imposed a tax on imports such as tea, glass, paper, and paints, as well as instituted a Customs board to help enforce British trade regulations and deter smuggling activity. Many Bostonians were opposed to the Townshend Acts and protested by gathering in mobs and harassing officials.
View of the Atlantic Ocean from the very end of Long Wharf.
Paul Revere immortalized the landing of the troops in an engraving entitled “A View Of Part of the Town of Boston In New England And Brittish [sic] Ships of War Landing Their Troops! 1768”. The image depicts the eight British ships of war arrived in the harbor, with smaller boats carrying red-coated soldiers to Long Wharf. Some troops are already amassed on the wharf, gathering into formation.
“A View of Part of the Town of Boston In New England And Brittish [sic] Ships of War Landing Their Troops! 1768” (courtesy of American Antiquarian Society http://www.americanantiquarian.org/Inventories/Revere/b2.htm )Revere’s engraving also shows many buildings running along the north side of Long Wharf in an uninterrupted line toward the town. They were warehouses, counting houses, shops, and dwellings. One of these buildings was John Hancock’s Counting House, which still stands on Long Wharf today. Currently incarnated as a restaurant called the Chart House, it is the oldest extant building on Long Wharf, built in 1763. John Hancock’s original wall safe is actually still set in the red brick wall of the second floor dining room. The safe is not off-limits; visitors may freely open and close the safe’s inner and outer doors or even run a hand over the smooth metal.
John Hancock’s original safe, still fixed in the wall of his Counting House.
When standing at the wall safe, take a few steps to the right and look out the front windows of the building. Look down to the ground level to see the path of the troops as they passed right by Hancock’s Counting House, “with insolent parade, drums beating, fifes playing, and colours flying, up King Street” as they headed down the wharf and into the town. The soldiers were marching to the Town House, at the base of King Street. And beyond that, to Boston Common.
View out a second floor window of Hancock’s Counting House, a few steps from the wall safe. The viewer is looking down at Long Wharf where the British troops marched past on October 1, 1768.
Long Wharf at the time (as it is today) was really just an extension of King Street, which ran all the way from the Town House (later to become the site of the Boston Massacre), down to the shoreline, then continued along in the form of a wharf, out into the harbor. After the Revolution, King Street was (perhaps appropriately) renamed State Street and is known by that decidedly more American moniker today.
The soldiers’ route may be traced today by any perambulating history enthusiast. Walk out past Hancock’s Counting House, to the terminus of Long Wharf and stand where the British soldiers disembarked. As you gaze out across the cold gray Atlantic, feel the stiff sea breeze rolling in off the water just as they did. Then turn your gaze away from the Atlantic and look back toward the city. The view is the same as in 1768—the Town House will be in your direct line of sight. As the soldiers marched down the wharf in a straight line, they too would have seen the Town House quite clearly.
A pamphlet published by the Boston Redevelopment Authority in the 1980s reveals that although the wooden timbers of Long Wharf are experiencing decay, the 17th and 18th century granite bulkheads beneath the wharf are still intact.[4] It is a thrill for any revolutionary history enthusiast to walk out to the end of Long Wharf, knowing that deep beneath his or her feet are the very same granite blocks, impervious to time and history, that bore silent witness to the arrival of the British soldiers who stepped onto Long Wharf and into history when they came to occupy Boston.
*The building known today as the Old State House was known in the 1770s as the Town House.
**The Romney actually arrived in Boston Harbor in May 1768 to help enforce customs and discourage the flouting of trade regulations, attempting to seize John Hancock’s ship, Liberty.
*Katie Turner Getty is a lawyer, history enthusiast, and lifelong resident of Boston. She holds an A.A. from Bunker Hill Community College in Charlestown, Massachusetts, a B.A. in History from Wellesley College, and a J.D. from New England Law Boston. She can often be found exploring historic sites both on and off the Freedom Trail.
[2] Paul Revere, A View of Part of the Town of Boston in New England and Brittish [sic] Ships Landing Their Troops! 1768, circa 1770, engraving, 26 x 40.5 cm, American Antiquarian Society, Worcester, Massachusetts http://www.americanantiquarian.org/Inventories/Revere/b2f1.jpg
[3] Richard Archer, As If An Enemy’s Country (Oxford: Oxford University Press 2010), xiv.
Recently, I had the chance to head to New England to take photos for an upcoming publication in the Emerging Revolutionary War Series. While thereI ventured to Salem, Massachusetts and New Castle, New Hampshire. Two great places filled with American history and also what could have been even more American history.
The shooting war that became the American Revolution began in Lexington and Concord, Massachusetts on April 19, 1775. Yet, these two places; Salem, Massachusetts and Fort William and Mary in New Hampshire, almost, caused the war to begin.
Here is what happened.
On December 14, 1774, local militia raided the British post garrisoned by six men at Fort William and Mary near Portsmouth, New Hampshire. Faced with over 400 militiamen the garrison proved obstinate and did not accept surrender and when faced with an assault, actually fired three cannon shots at the charging militia. Open combat ensued but no deaths occurred before the militia gained the fort.
Entrance to the fort, with the plaque commemorating the events in December 1774 to the right of the entrance.
During the afternoon, the militia would deprive the fort of over 100 barrels of precious gunpowder. By the next day, over 1,000 militiamen had arrived to lend support and within a few days, British General Thomas Gage had dispatched a small force on a British naval vessel but by the time they arrived, the commotion at Fort William and Mary had subsided.
Three months later and located approximately 50 miles south of Fort William and Mary is Salem where the following incident took place. Thomas Gage ordered 240 men of the 64th Foot Regiment under Lt. Col. Alexander Leslie on February 27, 1775 by water to the town. Upon arrival the force hovered off the coast waiting for the residents to attend their regular Sunday sermon. Soon after, the 64th Foot began to make the five mile march to Salem. A column of nearly 250 British regulars brought a lot of attention and soon riders were riding ahead to Salem to warn them of the approaching British. The men in Salem began to remove the cannon and hide them in the countryside. The main objective for Leslie was a blacksmith shop on the north side of the North River. Here is where it was reported that the ship cannons were being refitted for field use.
Historic Marker commemorating the spot of armed resistance at the Salem Bridge on February 27, 1775.
The issue at the river was a draw bridge was the only way across and as the British approached, several men raised the drawbridge so the British could not cross. By this time militia was on the opposite banks of the North River. An armed confrontation, one of many this winter, between colonials and Royal troops ensued. Leslie demand that the bridge be lowered so he could cross but the militia would not budge. Meanwhile, the cannons Leslie was looking for were being dispersed. Leslie threatened to fire on the militia, but Leslie’s senses got the best of him as he recognized hundreds of townspeople were now turned out and watching. He did not want to have blood on his hands this day. Plus the safety of his own men became in doubt as the day was getting long and he knew he had to extricate himself somehow.
Soon a local minister proposed a compromise, the bridge would be lowered and the British could cross and march to the blacksmith forge just a hundred yards beyond the bridge. If no cannon were found (which by now, they were all removed) then Leslie would turn around and march his men back to the ships on the shore. To Leslie, this was an honorable compromise as his orders were to cross the river and investigate the blacksmith forge and shop. Soon after the British crossed the North River, they re-crossed and marched back to their ships. Open rebellion was again thwarted. But a deadly precedent was set, the militia learned that the British did not intend to fire on them and such the bravery of each militia unit at each alarm was amplified.
Both of these affairs did not start the war. Both could have. We may never know why. But, what we do know is that they were example of how close the war was to starting. Lexington and Concord became the tipping point.
Emerging Revolutionary War is honored to welcome guest historian Daniel Welch to the blog. A brief biography of Mr. Welch is at the bottom of the post.
Several weeks ago I decided to take my usual weekend off of visiting American Civil War battlefields to take a moment to explore some American Revolutionary War historic sites just several hours down the road. Since it was a rather last minute decision, I was not completely prepared before visiting other than some basic historical context and a vague idea of operating hours and things to do while at these historic sites. So, if you want to follow the Continental Army during their experiences in the fall and winter of 1777-1778 read on to help plan a great weekend day trip.
Battle of Brandywine
Sandy Hollow, Brandywine Battlefield
If you want to follow these events as they happened, and in chronological order, began your day at the Brandywine Battlefield Park Associates site. Walking the site is free, but there is a charge if you want to go through the museum or on a tour of one of two historic homes on the property. Their hours are constantly changing so make sure you check their website. (click here), before you plan your visit. To go on a house tour, view the film, and go through the museum there is an $8.00 charge; the museum and film alone is $5.00. I would suggest, if you have the time, to take in the film and museum. The film lasts approximately twenty minutes while a thorough look of the museum could take one an additional forty minutes. Between the film and museum, a firm foundation to the events of September 11, 1777 will be in place before you head out to other locations associated with the battle. The house tour is a guided tour through Washington’s headquarters on the property and is conducted by a volunteer at the site. The tour took over an hour and a half, and considering that the home had burned to the ground nearly 100 years ago and has been rebuilt and filled with modern reproductions, your time would be better spent going to other sites associated with the battle.
Birmingham Friend’s Meeting House plaque
Before leaving, make sure you pick up driving directions from the employees at the counter to get to Birmingham Friend’s Meeting House, and Sandy Hollow, the American’s second line of defense during the battle. Also, make sure to purchase the driving tour map of the battle of Brandywine. This map will take you to numerous other historic sites and homes within the Brandywine Valley that witnessed the events of that day. The cost is a mere $2.95. Plan an additional three to four hours to complete the driving tour.
Ultimately the battle proved to be an American defeat. Although he was defeated on the field, Washington and his generals were able to get large portions of the army to the rear through Polish General Pulaski’s assistance in covering the retreat. Despite the best maneuvers to save his army, Washington was unable to save Philadelphia and the city fell to the British just two weeks later on September 26, 1777. The British remained until June 1778.
Lunch
By now a late lunch would be in order. A great spot is the Black Powder Tavern. A tavern since 1746, it has a great Revolutionary War history, including a supposed visit by Washington himself. The restaurant’s name is related to a historical legend that none other than Von Steuben had ordered the tavern turned into a secret black powder magazine during the army’s pivotal winter at Valley Forge. The food here was great, as was the service and beer selection.
Valley Forge National Historical Park
Following the defeat at Brandywine in September, and another engagement at White Marsh in early December, General Washington looked to put his army into a more secure camp for the coming winter. Active military campaigning for 1777 in Pennsylvania was over. Just twenty miles northwest of Philadelphia, the Continental Army faced numerous challenges here including a lack of food and shelter. Disease also spread during their time at Valley Forge. By February 1778, approximately 2,500 soldiers had perished.
General Anthony Wayne Statue, Valley Forge National Historical Park
To begin your visit here, start at the visitor center. The museum has its challenges. There is no discernible narrative to the exhibits; rather, numerous cases with laminated pieces of paper hanging on the side with corresponding images and item descriptions. Although there are some unique items on display, if it is busy you could wait at a particular case for the laminated cards to know what you are looking at. After a perusal of the museum, take in the free film. Although it is rather dated it provides a great overview of the winter encampment, its challenges, and outcomes. Between the film and museum, plan on spending an hour at the visitor center.
If you have additional time, take in the one and only National Park Service Ranger program offered. It is a rather short program, in length and walking distance, from the visitor center to the reconstructed Muhlenberg Hut sites. The program also echoes what is presented in the film. Before leaving the visitor center, I recommend getting the auto tour cd, as well as any updates on road closures. The park is currently under a significant amount of construction that has closed some roads and altered the driving tour route. The suggested driving tour cd is two hours in length. This would be a time allotment for those visitors who do not stop at each site, get out of the car, and explore all the stops along the route. You will want to get out and explore monuments such as those to the New Jersey troops, National Memorial Arch, von Steuben, and Patriots of African American Descent. You will also want to explore the several historic homes within the park that were used during the encampment, such as Varnum’s Quarters, Washington’s Headquarters, and the Memorial Chapel. My explorations, coupled with the driving tour cd, lasted nearly five hours.
George Washington’s Headquarters (Isaac Potts House) at Valley Forge National Historical Park
Although it would be a long day, it can be done in one; however, if you wish to slow the pace of your visit, each site could be done on a separate day during your weekend. There is plenty of lodging in the area to accommodate this schedule. By visiting both of these historic areas and learning about the events of the fall through early spring 1777-1778, a greater picture can be viewed gleaned of military situation during the time period, as well as the tough composition of the Continental Army despite their defeats.
*Dan Welch currently serves as a primary and secondary educator with a public school district in northeast Ohio. Previously, Dan was the education programs coordinator for the Gettysburg Foundation, the non-profit partner of Gettysburg National Military Park, as well as a seasonal Park Ranger at Gettysburg National Military Park for six years. During that time, he led numerous programs on the campaign and battle for school groups, families, and visitors of all ages.
Welch received his BA in Instrumental Music Education from Youngstown State University where he studied under the famed French Hornist William Slocum, and is currently finishing his MA in Military History with a Civil War Era concentration at American Military University. Welch has also studied under the tutelage of Dr. Allen C. Guelzo as part of the Gettysburg Semester at Gettysburg College. He currently resides with his wife, Sarah, in Boardman, Ohio.
On Wednesday, June 8, a signing ceremony marked the beginning of an agreement between First Parish in Concord, owner of the Wright Tavern, and the Concord Museum. Starting this fall, the Concord Museum will provide educational programming to school groups in the Wright Tavern and open the historic building to the public for commemorative events in October and April each year. On hand for the signing were representatives of the Concord Museum and First Parish as well as members of the Wright Tavern Exploratory Committee (WTEC), appointed last fall to develop a sustainable, strategic plan to showcase the Wright Tavern as a National Historic Landmark.
Plaque on the Wright Tavern (ERW collection photo)
“Opening the historic Wright Tavern to public and educational access will provide a true sense of place when learning about the historical events of the American Revolution,” said Mel Bernstein, member of WTEC and Chairman of the American Revolution Round Table of the Minute Man National Historical Park.
No building in this historic community was of greater consequence to the beginnings of the American Revolution than the Wright Tavern, built in 1747. The First Provincial Congress met in Concord at the Wright Tavern in October 1774, electing John Hancock as the Congress’s president and making provision for the collection of taxes. The Second Provincial Congress met there again in March and April 1775. Presided over by John Hancock with Samuel Adams and Dr. Joseph Warren in attendance, the Provincial Congress met in defiance of Royal and Parliamentary authority — creating a Massachusetts army, raising taxes, and performing other roles necessary to form its own government, independent of British authority. Then, in the early hours of April 19, 1775, Concord’s Minute Men assembled in the Wright Tavern before setting off to repel the advancing British troops at the North Bridge.
Since 1886, First Parish in Concord has owned and maintained this historic structure. “The Wright Tavern is certainly one of the most important Revolutionary War-era buildings in Concord,” explained Tim Jacoby, Chair of the First Parish Trustees of Parish Donations. “Although the building is owned by the church, we truly feel it belongs to the people of Concord and to the American people. This agreement with the Concord Museum will establish greater public accessibility to the Tavern.”
In 1961, the Wright Tavern was designated a National Historic Landmark by U.S. Secretary Fred Seaton, declaring it “an historical site of exceptional value in commemorating and illustrating the history of the United States.”
Margaret Burke, Executive Director of the Concord Museum, said: “The Museum is thrilled with this partnership to bring the importance of the Wright Tavern to the fore. Concord is home to invaluable historical and cultural resources, and this is a wonderful example of how organizations within the town are working together to promote this history and make it relevant to residents and visitors.”
Leah Walczak, the Concord Museum’s Director of Education and Public Programs, explained the role the Wright Tavern will play in educating visiting school groups: “The Museum currently provides specialized programming to over 10,000 school children each year. Along with hands-on history education using objects from the Museum’s collections, this agreement will allow us to provide programs within the setting of one of the finest historic buildings in Concord.”
This partnership was brought about through the work of the Wright Tavern Exploratory Committee, which convened from September 2015 through January 2016. Members included: John Boynton, Chair of the Exploratory Committee and a First Parish Trustee; Doug Baker, Sacristan and Curator of First Parish; Mel Bernstein, Chair of the American Revolution Round Table of Minute Man National Historical Park; Jim Cunningham, Project Manager for Barrett Farm Restoration, and Treasurer of Save Our Heritage; Sue Gladstone, Director of Development for the Concord Museum; Jayne Gordon, Public Historian for Robbins House, Thoreau Farm, and the Concord Museum; Tim Jacoby, Chair of the First Parish Trustees; Bob Morris, Chair of the Friends of Minute Man National Historical Park; and Tom Wilson, First Parish Treasurer.
A generous gift to the Museum from John and Johanna Boynton is funding this historic partnership.
*About the Concord Museum The Concord Museum is where all of Concord’s remarkable past is brought to life through an inspiring collection of historical, literary, and decorative arts treasures. Renowned for the 1775 Revere lantern and Henry Thoreau’s Walden desk, the Concord Museum is home to a nationally significant collection of American decorative arts, including clocks, furniture, and silver. Founded in 1886, the Museum is a gateway to historic Concord for visitors from around the world and a vital cultural resource for the town and the region. Visit www.concordmuseum.org.*
*For More Information, contact:
Barbara Rhines, Director of Marketing and Public Relations
978-369-9763, ext. 229
Email: brhines@concordmuseum.org


