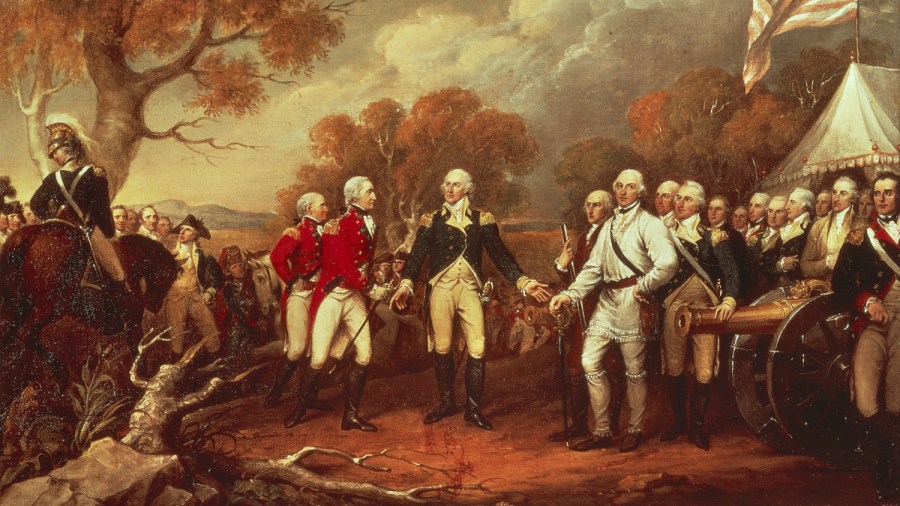
Although the New York Campaign of 1776 was not General Nathanael Greene’s finest moments during the American Revolutionary War, he did rebound and become one of the premier military strategists by the end of the conflict. His views, learned on the field of battle, the bustle of various headquarters, and the countless miles of riding and marching on campaign was summed up when he wrote the following.
“Don’t be surprised if my movements don’t correspond with your Ideas of military propriety. War is an intricate business, and people are often saved by ways and means they least look for or expect.”
Military strategy, tactics, and the war that unfolded will be the topic of discussion on our Facebook page for Sunday, July 26, and the next “Rev War Revelry.” If you miss it, check out our YouTube and podcast channels as the program will be uploaded there next week. This program will also mark the debut of the newest full-time contributor and historian with Emerging Revolutionary War, Ben Powers. Although this “Revelry” will be taped, we wanted to give a bit more background about Ben, what he has written and projects moving forward. That way you can fill the comment section with questions about both military strategy and our newest blog historian. Ben had the following to say.
“I’m honored to share a few exciting milestones in my work with Emerging Revolutionary War.
Over the past several months, I’ve had the privilege of contributing a growing body of research to ERW, including:
• “Nathaniel Greene: Washington’s Strategist or Pioneering Operational Artist” (November 2025) • “The Attack and Defense of the Chew House: British Professionalism at Germantown” (March 2026) • “Brave, Meritorious, Unrewarded Kirkwood”: Unrecognized Valor in the Continental Army (April 2026) • Review of The Wandering Army: The Campaigns That Transformed the British Way of War by Huw J. Davies (April 2026) • “Embattled Farmers or Continentals?” (July 19, 2026)
In June, Emerging Revolutionary War welcomed me as a regular contributor. I am grateful to the editors and readers for the opportunity to participate in the outstanding scholarship and public history the organization produces.
I’m also pleased to be working with the ERW team on an upcoming volume to the Emerging Revolutionary War Series that will center on Race to the Dan/Guilford for the 250th. This is a long-term project, but I am looking forward to the journey.
Whether you’re interested in Revolutionary War history, military leadership, or operational art, I hope you’ll join us for the conversation.
Thank you to everyone who has read, shared, commented on, or challenged my work. As we celebrate America’s 250th anniversary, I look forward to continuing to learn, write, and contribute to the field.”
In March 1776, a quiet hill overlooking Boston Harbor became one of the first turning points of the American Revolutionary War. Dorchester Heights, rising above the southern approaches to Boston in what is now South Boston, played a decisive role in forcing the British Army to evacuate the city. The dramatic occupation and fortification of the Heights by American forces under General George Washington transformed a long, grinding siege into a strategic victory that reshaped the war’s momentum.
After the battles of Lexington and Concord in April 1775 and the bloody clash at Bunker Hill in June, British forces under General Thomas Gage and then William Howe found themselves effectively trapped in Boston. Surrounding militia units from Massachusetts and neighboring colonies formed a loose ring around the city, beginning what became known as the Siege of Boston. When George Washington arrived in July 1775 to take command of the newly formed Continental Army, he inherited a force that was determined but poorly supplied and short on artillery.
Throughout the fall and winter of 1775–1776, Washington searched for a way to break the stalemate. A direct assault on Boston would have been costly and risky. Instead, he looked to geography. Dorchester Heights, commanding sweeping views of the harbor and the city, offered a strategic advantage. If American forces could fortify the Heights with cannon, they would threaten both the British fleet and the troops stationed in Boston. Control of this high ground would make the British position untenable. The British Navy had encouraged British General Howe (now commanding the British forces in Boston) to take the position due to the Navy’s vulnerability if the Americans were able to command the heights with artillery. Howe underestimated the importance of the heights and also believed the Americans lacked the proper artillery and strength to hold it.
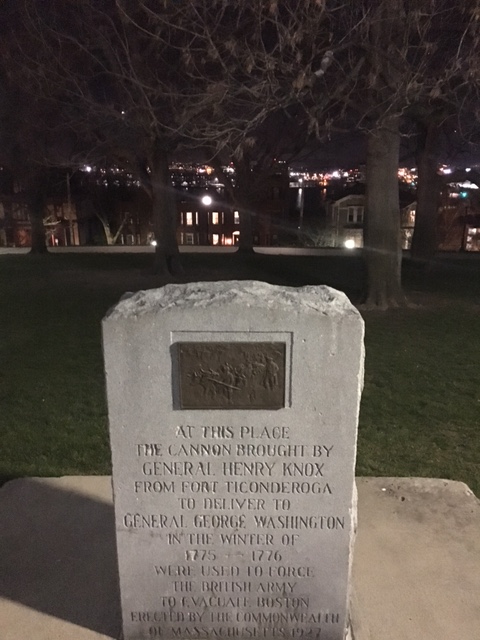
Knox marker on Dorchester Heights
The key to Washington’s plan lay in artillery. In late 1775, Colonel Henry Knox undertook an audacious mission to transport heavy cannons captured from the British at Fort Ticonderoga in upstate New York. Over the winter, Knox and his men hauled approximately 60 tons of artillery—an operation later dubbed the “Noble Train of Artillery”—over 300 miles of frozen rivers and snow-covered terrain to Cambridge, Massachusetts.
These cannons provided Washington with the firepower necessary to implement his strategy. By early March 1776, conditions were ripe. The ground was still frozen, making it easier to move heavy equipment and but would challenge their skills at building fortifications.
On the night of March 4, American troops moved silently toward Dorchester Heights. Under the cover of darkness and diversionary bombardments from other positions, they began constructing fortifications with remarkable speed. Using pre-prepared materials—fascines (bundles of sticks), chandeliers (wooden frames filled with earth), and hay bales—they built defensive works capable of withstanding British cannon fire.
By dawn on March 5, the anniversary of the Boston Massacre, British sentries were stunned to see formidable American fortifications atop the Heights, bristling with cannon aimed at the city and harbor. General Howe reportedly exclaimed that the rebels had accomplished more in one night than his army could have done in months. The strategic implications were clear. From Dorchester Heights, American artillery could rain fire down on British ships and troop positions. The Royal Navy, essential to British supply and mobility, was now vulnerable. Remaining in Boston was a risk that Admiral Molyneux Shuldham was not willing to take and pushed Howe to respond quickly.
General Howe initially planned a counterattack to dislodge the Americans. However, a fierce storm on March 6 disrupted preparations and made an amphibious assault difficult. Also, Washington got word of the planned British assault and increased his manpower on Dorchester Heights to nearly 6,000. The memory of heavy British casualties at Bunker Hill also weighed heavily. Dorchester Heights were even stronger and more defensible than Breed’s Hill had been the previous year.
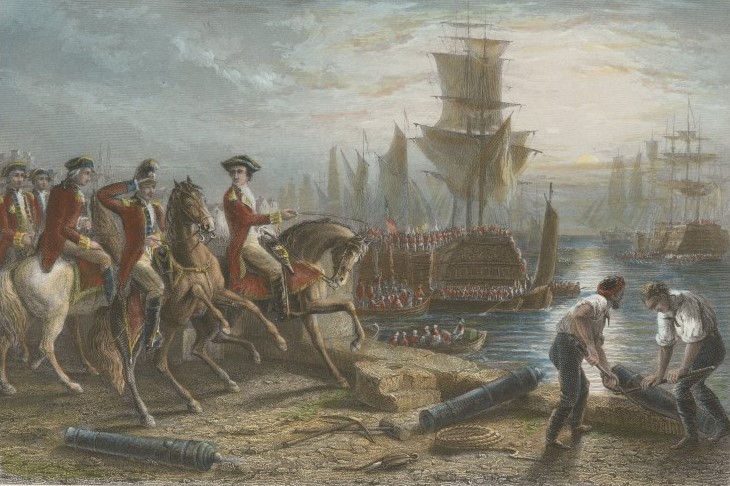
Howe evacuating Boston, courtesy New York Public Library
Facing the prospect of severe losses and an increasingly precarious situation, Howe reconsidered. Negotiations—informal and indirect—suggested that if the British evacuated Boston without destroying the town, American forces would not attack during the withdrawal.
On March 17, 1776, British troops and Loyalists began evacuating the city. More than 11,000 soldiers and nearly 1,000 Loyalists boarded ships and sailed to Halifax, Nova Scotia. The Siege of Boston was over, and the city was firmly in American hands for the remainder of the war.
The occupation of Dorchester Heights marked the first major strategic victory for the Continental Army under Washington’s leadership. It demonstrated the effectiveness of coordinated planning, logistical ingenuity, and the intelligent use of terrain. Rather than launching a costly frontal assault, Washington had leveraged geography and artillery to compel the enemy’s withdrawal.
This victory also boosted American morale at a critical time. The war was far from won—indeed, it would intensify dramatically later in 1776 with British campaigns in New York—but the successful eviction of British forces from Boston showed that the Continental Army could achieve meaningful results.
Moreover, Dorchester Heights solidified Washington’s reputation as a capable commander. His cautious but decisive approach, combined with Knox’s logistical triumph, set a pattern for future operations. The event underscored the importance of high ground in military strategy, a lesson that had already been evident at Bunker Hill but was applied with even greater effect in March 1776.
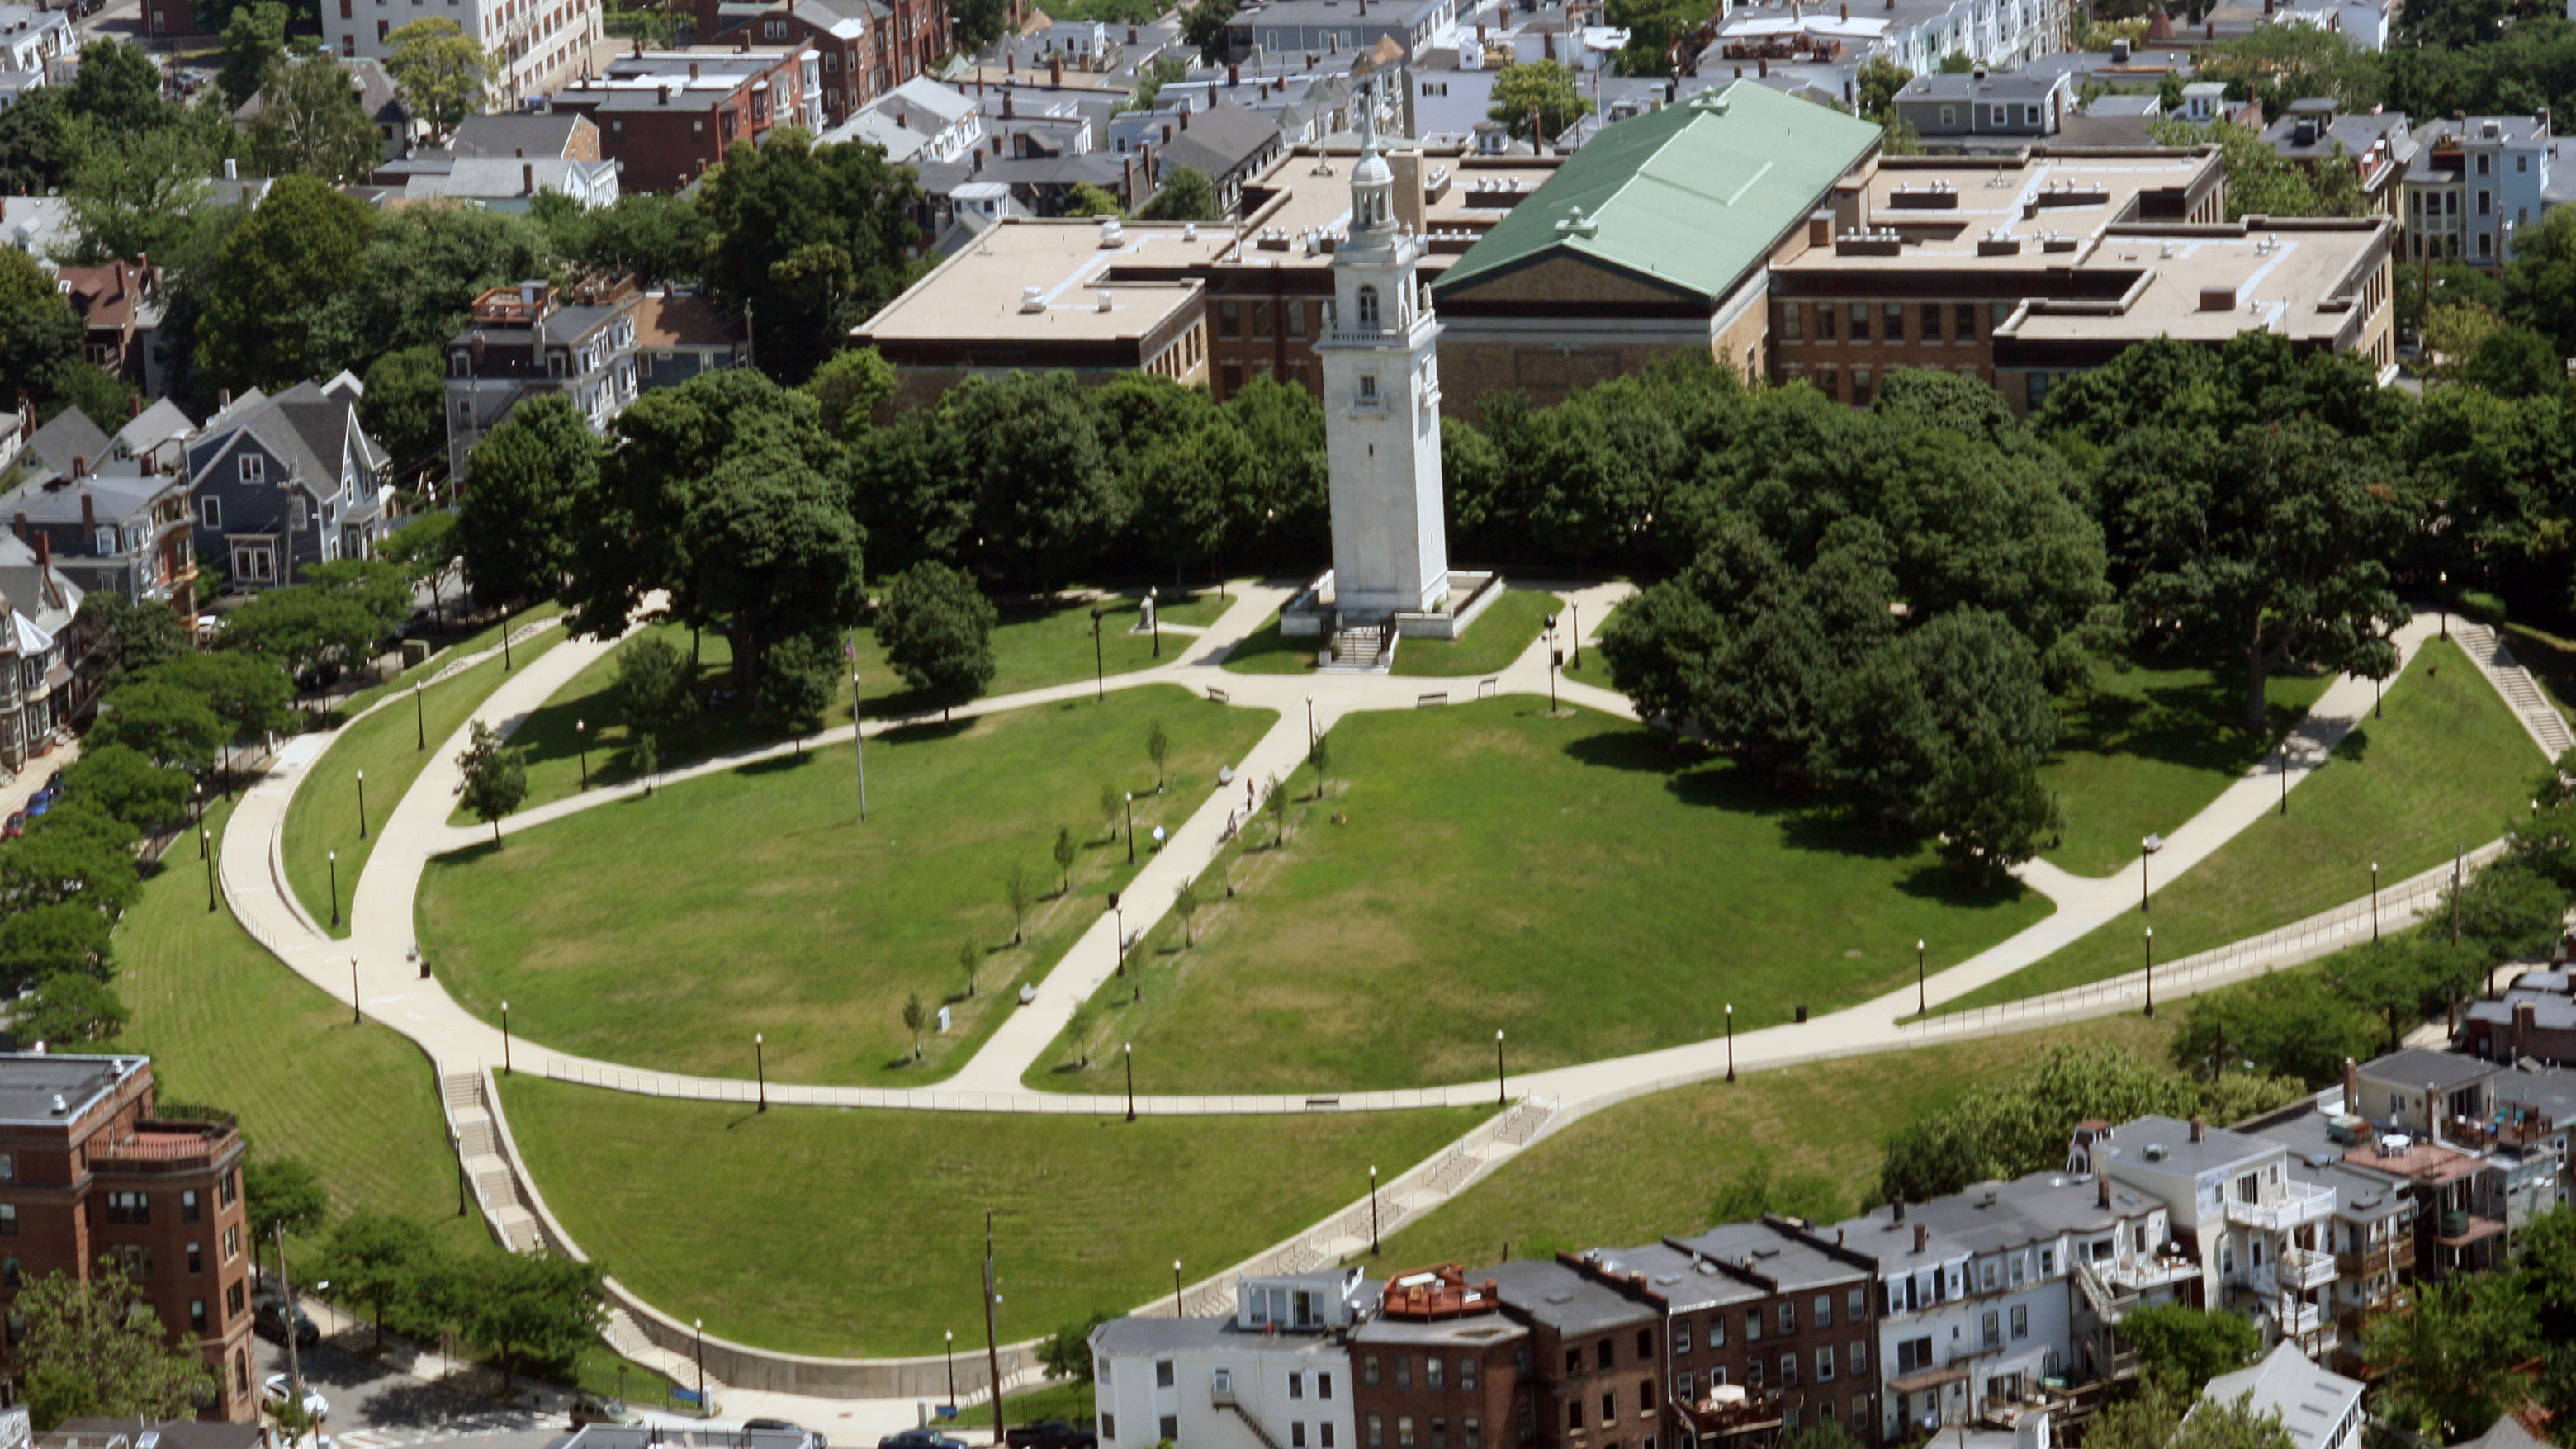
Dorchester Heights and the 1902 monument today, part of the Boston National Historical Park, courtesy of NPS
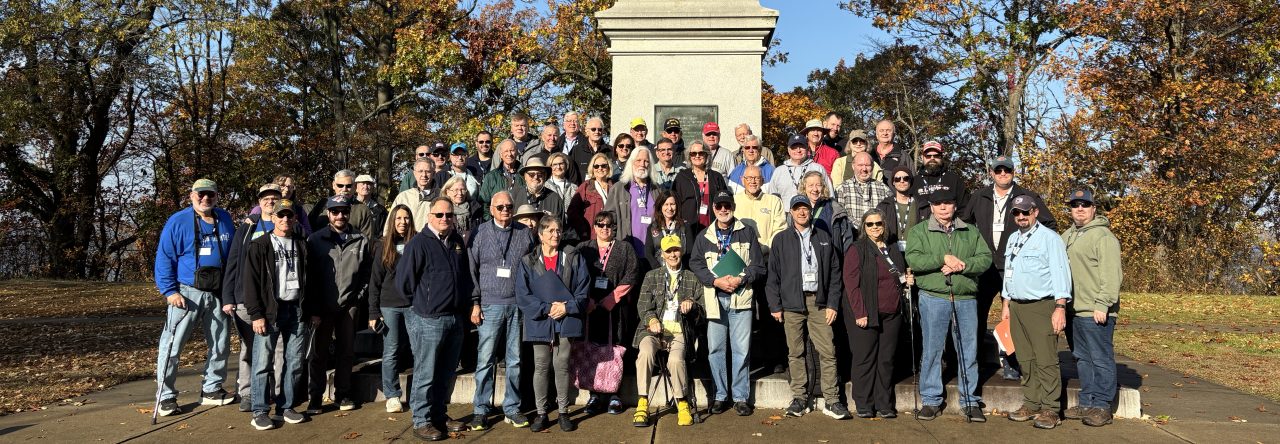
This year will mark our SIXTH Annual ERW Bus Tour. In past years we walked in the footsteps of history at Trenton/Princeton, Monmouth/Valley Forge, Charleston/Eutaw Springs, Lexington/Concord, Brandywine/Paoli. Each year our tour has grown, our first tour coming out of COVID had a hearty 45 souls, but in recent years our tours have sold out. Our 2026 tour we will cover the battles and surrender of Saratoga (Freeman’s Farm, Bemis Heights) on October 9-11, 2026.
As in years past, we do an early release of our next bus tour to those who have been on past bus tours. Then on January 1st, we open the tour to everyone. Well this year, our past customers have been so satisfied that we have SOLD OUT our 2026 bus tour already to just our early bird customers! We could not be more honored by this and it shows the excitement around America’s 250th.
Though the tour is sold out, we want to create a wait list in case people who have already registered have to withdraw. To get your name on the waitlist, please email us at: emergingrevolutionarywar@gmail.com. The tour details are below.
Once again, thank you to all of you have gone on our tours in the past and made the decision to join us in 2026. If you have not been on one of our tours before, please email us to get on our waitlist!
This Army Will Not Retreat: The Battles of Saratoga Bus Tour
October 9-11, 2026
Join Emerging Revolutionary War historians on a bus tour of the 1777 battles in Saratoga, that turned the tide of the war. Program includes Friday night lecture, tour all day Saturday and half day Sunday. Lunch included on Saturday.Tour fee is $250 per person, does NOT include hotel accommodations. Host hotel is the Gideon-Putnam in Saratoga Springs, NY.
In honor of the 250th anniversary of the Battle of Quebec, we reshare guest historian Scott Patchan’s post on Daniel Morgan during the Canadian Campaign of 1775. This post originally posted in December 2015.
When the situation deteriorated to outright rebellion against the crown, Morgan raised a regiment of crack riflemen from Frederick County, and marched them to Boston in twenty-one days to take part in the siege of Boston. There, he served under his former commander from the French and Indian War, General George Washington. Morgan learned the hard way that orders must be followed. He once allowed his riflemen to exceed orders in firing upon British positions at Boston. Washington called Morgan on the disobedience, and Daniel thought that he would be cashiered from the army. Washington, however, relented the next day, but Morgan had learned a valuable lesson about following orders.
Daniel Morgan in the American Revolution
In the fall of 1775, Washington sent Morgan as commander of three companies of Continental riflemen on a mission to capture Quebec from the British. Morgan’s command marched with the column of Colonel Benedict Arnold. They traversed the Maine wilderness, rowing up stream to the “Great Carrying Place,” where carried their canoes and bateaux for great distances overland to another series of streams and lakes that took them to Quebec. As the cold weather set in, sickness and hunger overtook the column and Arnold sent those unfit for duty back to the rear. After covering 350 miles, the American arrived in front of Quebec in early November, surprising the British.
Although Morgan wanted to attack immediately and utilize the element of surprise, he was overruled and the small American force besieged Quebec, waiting for another column under General Richard Montgomery to arrive from the Hudson Valley. When a British party sallied forth and captured one of Morgan’s riflemen on November 18, Arnold believed the British would come out and fight in the open. As such, Arnold drew up his army in front of the fortifications to meet them. They declined his offer and instead looked down on the ragamuffin Americans from the ramparts and exchanged taunts and catcalls. The overall situation frustrated the irascible Morgan, and when his men complained that Arnold was not giving the riflemen their fair share of rations, the “Old Wagoner” violently argued with Arnold, and nearly came to blows with the future traitor. Morgan departed Arnold, leaving him with angry warning about poor treatment of the riflemen. From that time forward, Morgan’s command always received their fair share of the army’s rations.
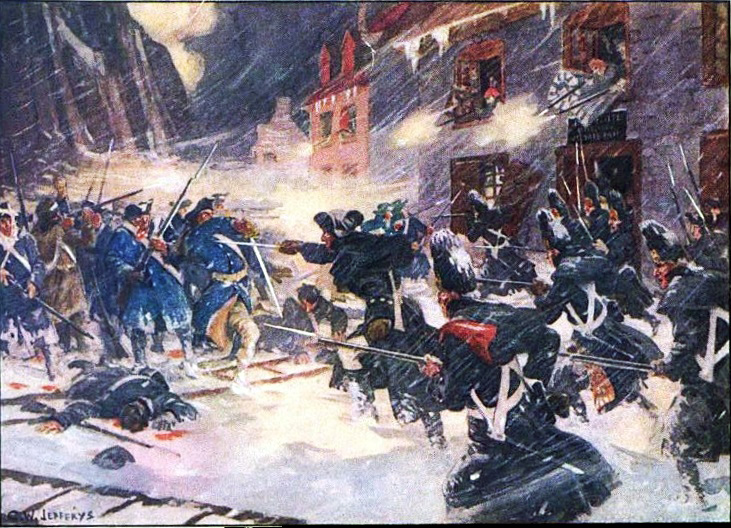
Montgomery’s column arrived on December 5, and the Americans commenced setting up his mortars and artillery outside of Quebec. The Americans finally attacked during a snowstorm in the early morning darkness of December 31, but their force numbered only 950 men. Arnold’s column came under fire as it moved toward the ramparts of Quebec, and a musket ball struck Arnold taking him out of action. Although Morgan was not the senior officer, the others insisted that he take command, having seen actual combat which they had not. Morgan later noted that this “reflected credit on their judgment.” At Morgan’s order, his riflemen rushed to the front, armed with both their Pennsylvania rifles and a spontoon for the assault while some carried ladders to storm the walls. They quickly drove a small force of British away and closed in on the walls.
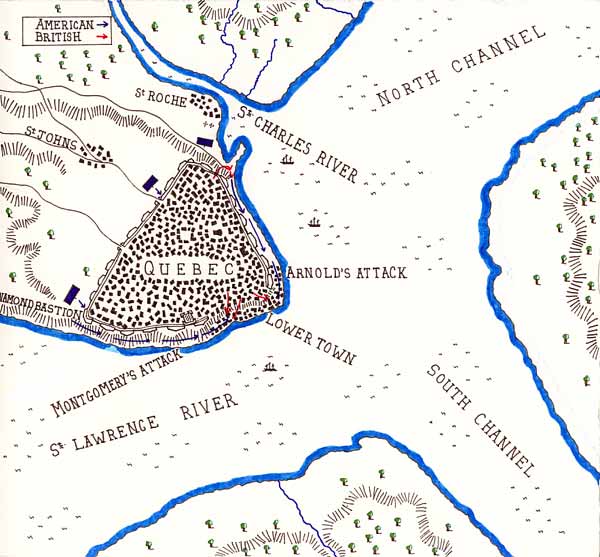
Map of Battle of Quebec, 1775 (courtesy of British Battles)
Morgan ordered the men up the ladders and first one gingerly began the climb. Morgan sensed his hesitancy, pulled him down and scaled it himself, shouting, “Now boys, Follow me!” The men instantly complied, and Morgan reached the top of the wall where a volley of musketry exploded, knocking him back to the snow-covered ground. The burst burnt his hair and blackened his face; one ball grazed his cheek and another pierced his hat; but Morgan was otherwise unhurt. Stunned he laid motionless on the ground for a moment, and the attack stopped, his men thinking him dead. But he soon stirred and clambered up the ladder to the cheers of his men who followed suit. This time he stopped before reaching the top, and hurtled himself over the rampart into the midst of the enemy. He landed on a cannon and injured his back and found British bayonets levelled at him from all directions. While the British focused on Morgan, his riflemen poured over the wall and came to his rescue, driving off Morgan’s would-be impalers. Morgan kept up a close pursuit of the British who offered weak resistance to the attacking riflemen. Although Morgan had broken into Quebec, the main body of Arnold’s division failed to follow the riflemen over the wall and exploit the opportunity at hand. Morgan captured much of the lower portion of Quebec with only two companies of his riflemen. He later described the breakdown that occurred:
“Here, I was ordered to wait for General Montgomery, and a fatal order it was. It prevented me from taking the garrison, as I had already captured half of the town. The sally port through the (second) barrier was standing open; the guard had left it, and the people were running from the upper town in whole platoons, giving themselves up as prisoners to get out of the way of the confusion which might shortly ensue. I went up to the edge of the upper town with an interpreter to see what was going on, as the firing had ceased. Finding no person in arms at all, I returned and called a council of war of what few officers I had with me; for the greater part of our force had missed their way, and had not got into the town. Here I was overruled by sound judgment and good reasoning. It was said in the first place that if I went on I should break orders; in the next, that I had more prisoners than I had men; and that if I left them they might break out and retake the battery we had just captured and cut off our retreat. It was further urged that Gen. Montgomery was coming down along the shore of the St Lawrence, and would join us in a few minutes; and that we were sure of conquest if we acted with caution and prudence. To these good reasons I gave up my own original opinion, and lost the town.”
Montgomery never arrived; he had been killed in the first blast of musketry against his column, and his command broke. As time went on, the British regained their composure and pushed back against Morgan’s command. Morgan went back and brought up 200 New Englanders who joined the riflemen as they attempted to renew the attack. Now, the previously undefended point, was well manned, and daylight illuminated the paucity of Morgan’s numbers. Nevertheless, Morgan pressed them back further into the town to an interior fortification. A brave British officer led a counterattack, but Morgan personally shot him dead and disrupted the assault. Nevertheless, the time for action had passed. The British had become aware that Morgan’s was the only active American force in the city and closed in around him. In the meanwhile, additional British forces reoccupied the gates Morgan had initially taken and trapped him in the city. Morgan had no choice but to surrender his small command.
One artist’s depiction of the Battle of Quebec, 1775. Both forces are wearing blue overcoats. (courtesy of British Battles)
Morgan and the other officers enjoyed a liberal captivity with generous quarters in a seminary. The British officers visited them often and remained on friendly terms with the Americans. Morgan developed a dislike for some of his fellow officers whom he regarded as dishonest and scheming, and his fighting skills were brought to bear on at least one occasion when several men teamed up against big Dan Morgan. The imprisonment ended when the British returned the American officers on September 24, 1776, in New Jersey. Morgan returned to his wife and two daughters at his home outside of Battletown or Berryville, where he awaited his proper exchange. While there, he named his home “Soldier’s Rest,” as he recuperated from the trials of the taxing expedition to Quebec. The war was still young, and the Continental Army would soon be calling upon his services again. A special command of riflemen was being organized and Morgan would be its commander.
Join us this Sunday, December 14th at 7pm as we return LIVE for this Rev War Revelry on the Canadian Campaign of 1775. We will discuss Arnold, Montgomery, Morgan and others on America’s attempt to capture Montreal, Quebec and create a “14th state.” From Arnold’s arduous march to Quebec through the wilds of Maine to Montgomery’s capture of Montreal, our historians Alex Cain and Mike Cecere will cover the entire campaign and answer the question “was the capture of Canada possible?”
This fall and winter mark the 250th anniversary of the campaign and the battles of Montreal and Quebec, and both of our speakers have taken part in the commemorative events. Grab a drink and watch live on our Facebook page, also add questions in the chat.
War Without Mercy: Liberty or Death in the American Revolution by Mark Edward Lender and the late James Kirby Martin is an enlightening and innovative look at violence and norms during the American Revolution. The authors waste no time getting to the point: they want to know why the war reached a point in which seemingly boundless levels of violence were embraced by all sides without regard to emerging standards of international law nominally intended to govern the use of force in warfare, collectively referred to as jus in bello, a Latin phrase essentially referring to the legal conduct of a war or justice in war. (Jus ad bellum refers to the legality of initiating a war. Collectively, they are key components of just war theory. Lender and Martin focus on jus in bello, particularly as it refers to legal or moral constraints on violence.)
War Without Mercy lays out the basic concepts of jus in bello as it was understood in the late 18thcentury. While historians often attribute the origins of modern international law to Hugo Grotius, Lender and Martin take Emer de Vattel’s landmark 1758 work “The Law of Nations” as the baseline text relevant to the American Revolution. Vattel offered limits on the conduct of military operations, clearly delineating concepts such as combatants, non-combatants, and proportionality. In general, he tried to narrow the scope of war so that it remained the domain of organized governments and outside the domain of broader society. Elites on both sides of the Atlantic had often read Vattel’s work, or were at least familiar with the ideas it contained, and War Without Mercy demonstrates that many of them sought to honor its principles, for moral, professional, and practical reasons.
That said, Lender and Martin argue that violence committed outside of the purview of elite-led revolutionary governments and the Continental Army (usually) characterized the war. The vast majority of fighting during the American Revolution occurred in small battles, skirmishes, and raids that resembled mob and gang violence directed at people out of uniform more than organized martial conduct. In that context, it routinely violated concepts of jus in bello. In addition to outlining earlier studies making that case, War Without Mercy examines the war in New Jersey, the western theater, the New York frontier, and the south. While those regions saw significant battles or campaigns, the day-to-day war was fought between small units of militia or irregulars with an occasional admixture of regulars or Continentals. In each case, Lender and Martin examine the escalation of events over the course of the war and the reasons each side tended toward “existential warfare,” essentially, war to the death in which the alternative to victory was total destruction. Given such high stakes, any constraints on means were self-defeating. No combatants could run the risk of losing the war by being charitable towards their enemies. Outrage sparked outrage. Thus, violence escalated like a ratchet as each side retaliated for perceived wrongs. It was a possibility several prominent patriots recognized before the fighting began. Indeed, James Lovell predicted it in his 1771 speech commemorating the Boston Massacre. War Without Mercy attributes the beginning of the cycle to the rebels, who quickly turned to intimidation, the threat of violence, and outright violence to silence loyalists and establish local political control as British colonial government collapsed.
One chapter examines Benedict Arnold’s raid on New London, CT. Lender and Martin consider the offensive and the Battle of Groton Heights, as the assault on Fort Griswold defending the River Thames was known, in the context of jus in bello. In general, despite the destruction of New London and the bloody results at Fort Griswold, they find the raid consistent with Vattel’s law of war. As a major privateering base, New London made itself a legitimate target of war and Arnold strove to limit damage to private property that did not contribute to the American war effort. The bloodletting at Fort Griswold was more the result of the fog of war, weak command and control, and the natural challenges of suddenly attempting to restrain men in the midst of intense combat. The New London raid, however, does demonstrate the blurring of lines between combatant and non-combatant, legitimate and non-legitimate objects of military operations, under the doctrine of jus in bello, as the war progressed and intensified. Lender and Martin liken it to the difficult decisions facing RAF Bomber Command during World War II, when it shifted from ineffective attempts to bomb specific targets to area bombing.
War Without Mercy is a must read. Revolutionary War library shelves are rife with biographies, battle studies, and political narratives. Fewer books place the American Revolution in the wider study of warfare and its evolution. By considering the war in the context of emerging principles of jus in bello and the rapid escalation to existential warfare, Lender and Martin are bringing a new analytical perspective to the study of the American Revolution. It’s a vital interpretation of the war’s nature.
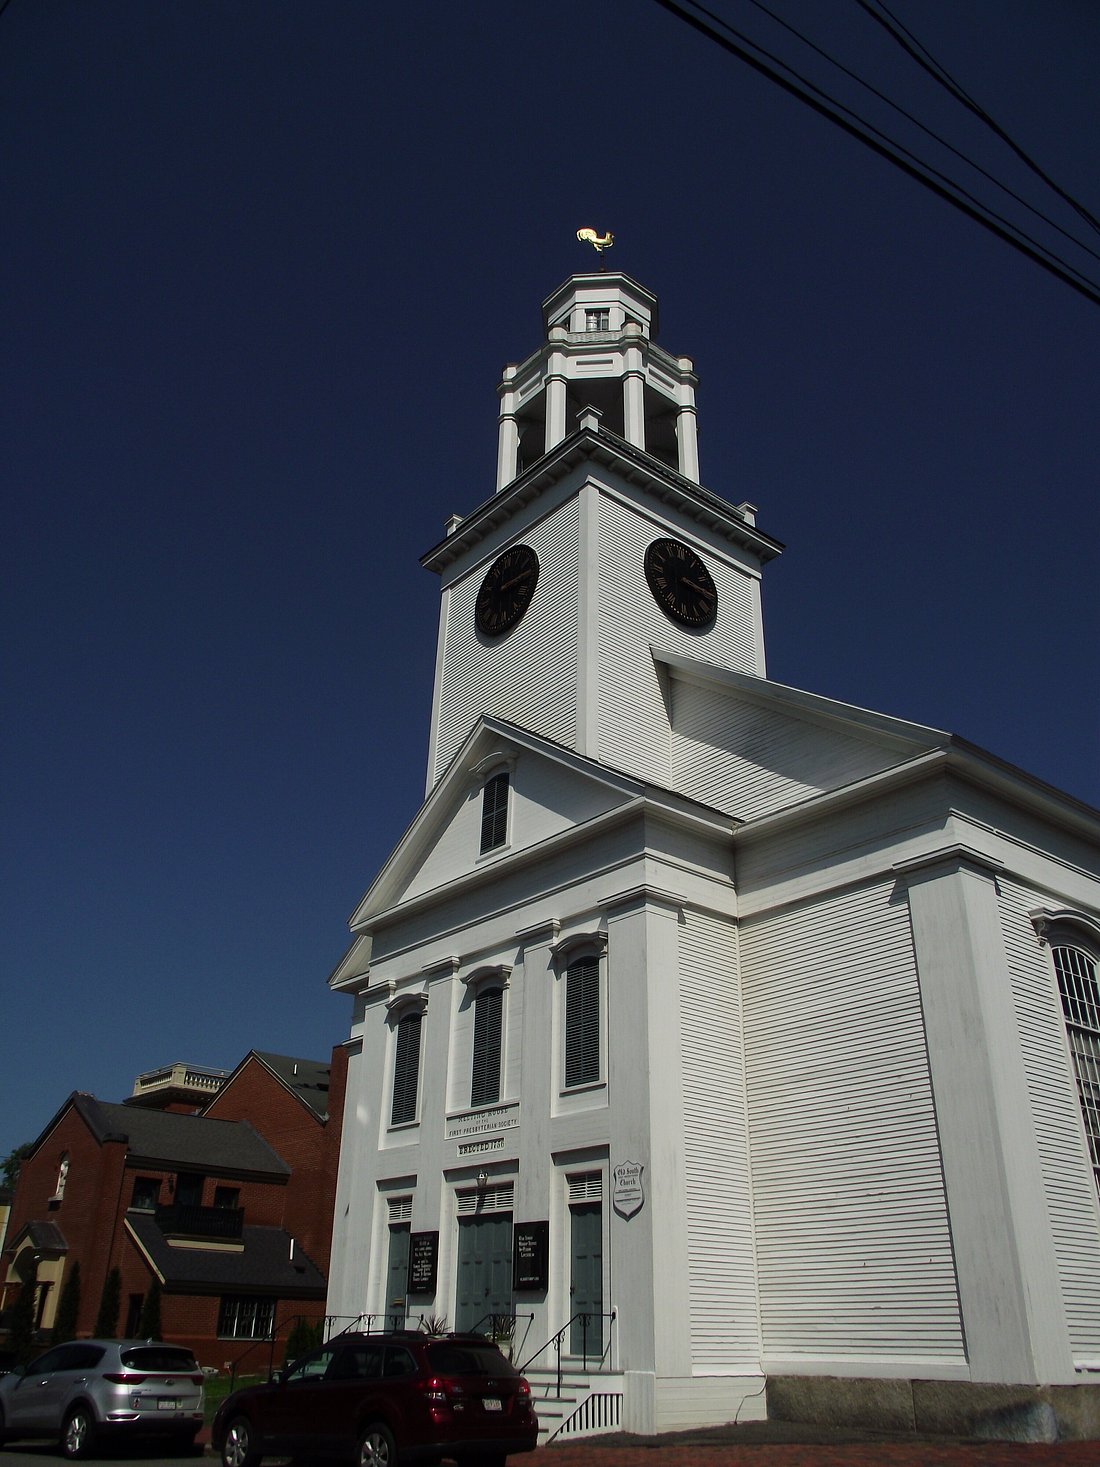
Modern view of the “Old South Presbyterian Church, Newburyport, MA
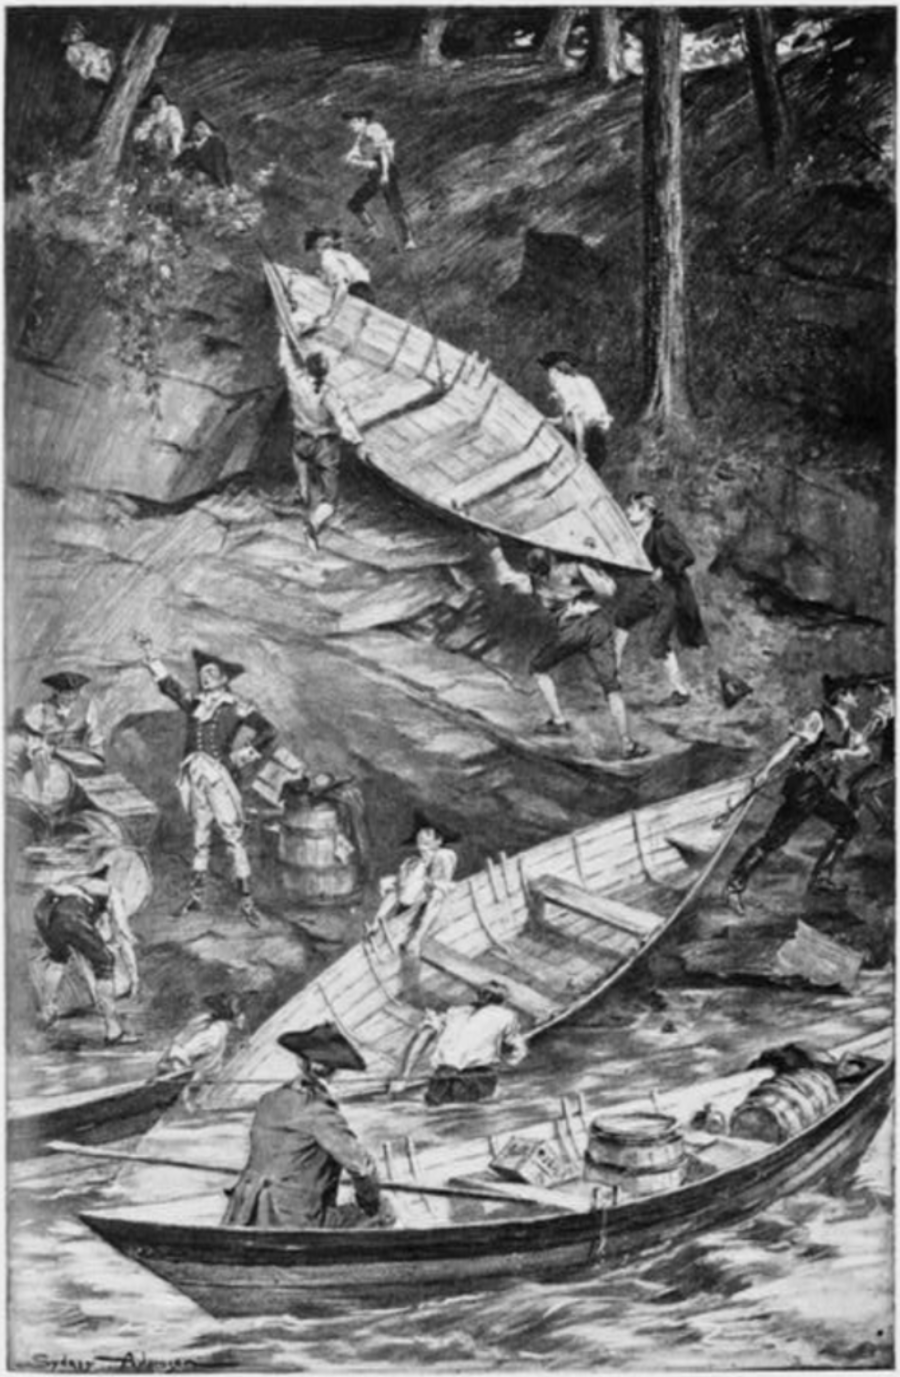
As Benedict Arnold assembled his small army of 1,100 men in Newburyport for his bold cooridinated strike on Canada (with General Richard Montgomery attacking via Montreal), there was one last stop before the men boarded the boats in the Merrimack River. From here they would hug the coast on their way to Maine, then overland to Quebec. It was a bold strategy for the inexperienced army and army commander. Though the was just started in April, and peace was still spoken by many political leaders, Washington approved this first American offensive. Strike the British forces in the Canadian colonies, with the hope of encouraging their northern colonial neighbors to join their cause.
Arnold felt it was appropriate that his mission have the blessing of God, so hundreds of men squeezed into the First Presbyterian Church (now called Old South Presbyterian Church). One of the largest churches in the city, it was the spiritual home of the Great Awakening in New England. Here, evangelist preacher George Whitefield, preached from when the church was built in 1756 until his death in 1770. Whitefield was buried in the crypt of the church. His fame was well known to Arnold and others, Whitefield is considered one of the founders Methodism and a great public speaker.
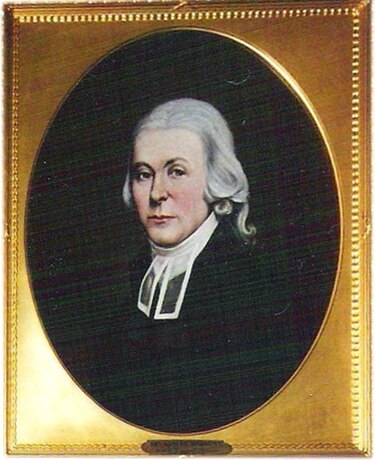
What men could not fit into the church pressed up against the doors and windows. Today’s service, held on Wednesday, September 20, was a dedication service. To bless the men and their task at hand. Reverand Samuel Spring, a popular orator in his own right, and he was now to serve as chaplain of Arnold’s small army on its way to Canada.
The scene was recounted in J. T. Headley’s, 1864 “The Chaplains and Clergy of the Revolution“:
Reverand Samuel Spring
“There sat the fearless Arnold, the bold rifleman, Morgan, and a host of other brave men, who, notwithstanding their dauntless courage, felt that the perils of the untrodden, mysterious wilderness, they were about to penetrate, might be too great for human energy and endurance, and the hour come, that their only hope would rest in the God whose spirit the chaplain [Samuel Spring] invoked as their guide and stay. The citizens, who crowded the gallery, never forgot that sermon. It became the talk of the place, and was the cause of his eventually settling over them as their pastor.”
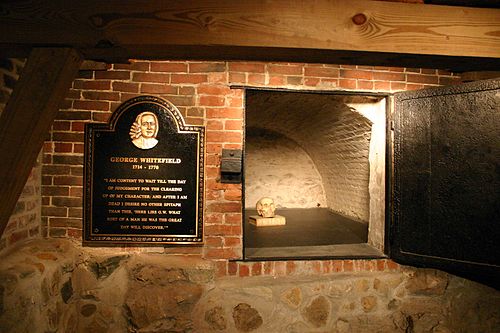
After the sermon, a surreal experience took place. Soon, someone on Arnold’s staff wanted to go to the crypt and see the tomb of Whitefield. Headley quoted Rev. Spring:
“I preached over the grave of Whitefield. After the service the general officers gathered around me. Some one requested a visit to Whitefield’s tomb. The sexton was hunted up, the key procured, and we descended to his coffin. It had lain in the tomb six years, but was in good preservation. The officers induced the sexton to take off the lid of the coffin. The body had nearly all returned to dust. Some portions of his grave-clothes remained. His collar and wristbands, in the best preservation, were taken and carefully cut in little pieces, and divided among them.”
A modern view of the crypt of Rev. George Whitefield
Headley continued; “The chaplain, with the haughty Arnold, the chivalrous Morgan, and group of officers, gathered in the dark vault around the tomb of Whitefield, formed a scene worthy of a painter. The clank of steel had a strange sound around the sainted sleeper, while the hallowed atmosphere filled all hearts with solemn awe and reverence.”
Now, with their good luck token from the grave of Whitefield, Arnold and his staff made their way to the shore where his men were boarding their boats in the Merrimack River. Arnold and his men saw their mission blessed by God, and wanted to tie their cause with that of the Great Awakening. They believed their cause was right and just. The process of visiting a tomb and taking pieces of a dead man’s clothing may seem a tad bit of “macbre” to us today, to Arnold it was a way to bless his mission. One that he believed would bring him and his men glory.
After years of political unrest between Great Britain and her North American colonies, tension finally boiled over into armed conflict on April 19, 1775, at Lexington and Concord. The British expedition to capture arms and munitions held by the colonists at Concord disintegrated into a panic-ridden retreat to Boston as local militias struck the column as it moved through the Massachusetts countryside. As often happens in war, seeds planted during a battle often sow the next.
Rather than enter march through Boston Neck British officers diverted to Cambridge and proceeded to the Charlestown Peninsula. Bordered by the Charles and Mystic Rivers, the peninsula jutted out into Boston Harbor northeast of the city. As darkness settled in, exhausted British soldiers made their way onto 110-foot high Bunker Hill. This eminence, commanded Charlestown Neck, a narrow sliver of land connecting to the mainland, along with the surrounding landscape.
That night, Lt. Gen. Thomas Gage, the British Commander-in-Chief met with Vice Admiral Samuel Graves, head of the North Atlantic Squadron. Among other suggestions, Graves urged Gage to burn Charlestown and occupy Bunker Hill. Graves likely knew that his ships in the harbor could not elevate their artillery to reach the high ground. Additionally, Bunker Hill was out of range of the Copp’s Hill Battery located in the city’s North End.
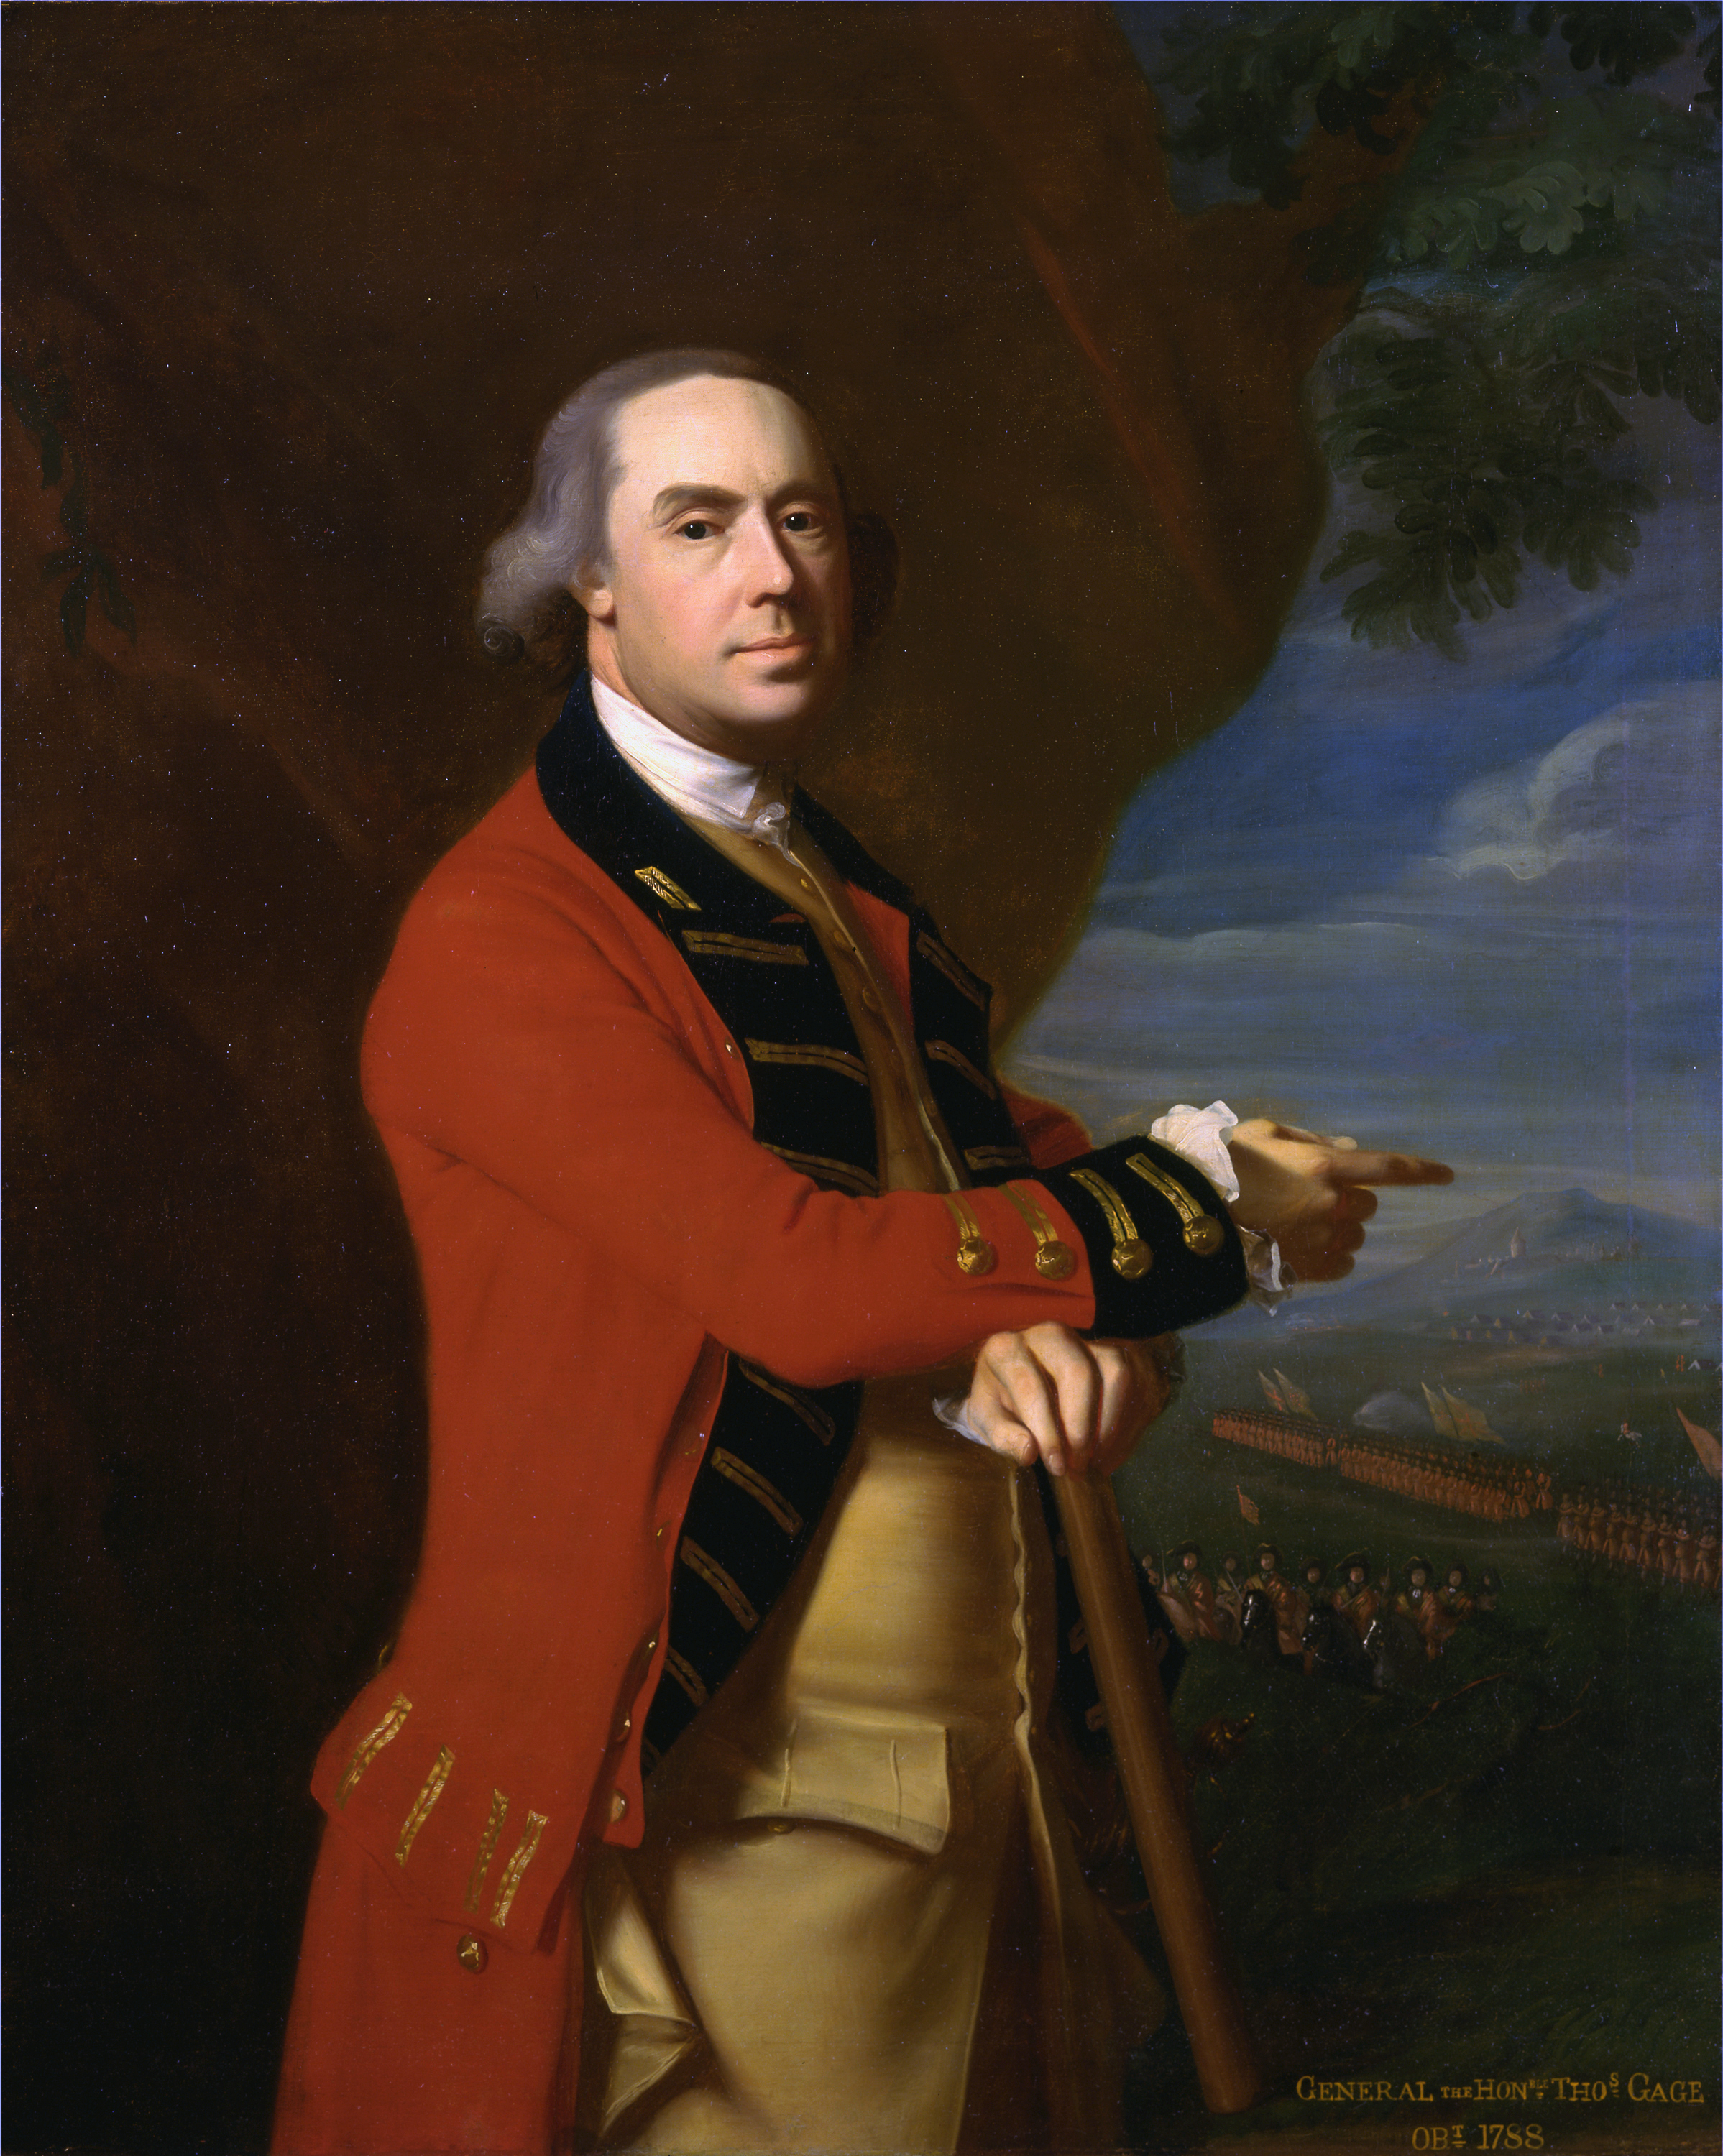
Thomas Gage
Gage recognized the long-simmering pot would eventually boil over with the colonists. “If you think ten thousand men sufficient, send twenty; if one million thought enough, give two; you save both blood and treasure in the end,” he wrote the previous fall to his superiors in London. Now, seemingly distant from the tactical situation on the ground, the survivor of the Monogahela rejected Graves’ proposal, claiming “the weakness of the army.” One must wonder if this was a decision Gage came to privately regret.
The arrival of reinforcements at the end of May, along with Maj. Gens. John Burgoyne, Henry Clinton, and William Howe may have buoyed Gage’s spirits. He soon began making plans to break out of Boston. In consultation with his subordinates, Gage formulated a plan to strike first across Boston Neck to capture Dorchester Heights, which commanded the southern end of the city. A second attack would capture Charlestown then move the three miles to Cambridge to hopefully destroy the Massachusetts army. The offensive was slated to take place on June 18.
Unfortunately, Boston leaked like a sieve and Gage failed to maintain what is known today as operational security. His plans were soon known in Cambridge where the Massachusetts Committee of Safety authorized their own effort to occupy Bunker Hill ahead of the British. On the night of June 16, colonial units led by Col. William Prescott marched out of Cambridge toward Charlestown. Rather than follow his orders, Prescott moved to the 60 foot high Breed’s Hill, located slightly to the southeast of Bunker Hill. Prescott’s decision remains one of the great mysteries surrounding the battle. His men began construction of a redoubt.
Another question surrounding the engagement rests with Henry Clinton. Sometime on the evening of June 16, Clinton wrote he conducted a reconnaissance and claimed he witnessed Provincial activity. He did not, however, explain where he went nor reported the type of actions he saw. Additionally, visibility would be difficult in the growing dusk. Clinton further stated he reported his findings to Gage and Howe but Gage elected to wait for daylight.
Sunrise revealed Prescott’s men atop Breed’s Hill, hard at work on the redoubt, which threatened the northern end of the city. Gage and his officers quickly convened at his headquarters at the Province House. Howe, the senior officer, would be in command. Some thought was given to sail up the Mystic to land on Charlestown Neck well in the rear of the redoubt. This plan was quickly nixed for fear the force could be isolated and cut off by reinforcements from Cambridge and militia on Breed’s Hill. It was eventually decided Howe would land below and out of range of the redoubt. Orders soon went out for the mustering of the “ten oldest companies” the flank and grenadiers, each – along with several regiments to prepare for the operation.
Each British regiment consisted of ten companies, eight line, with two flank and grenadier companies. The flank companies consisted of men who were often the shortest and fastest, who could operate in open order tactics, moving quickly to engage and skirmish with the enemy. The grenadiers, identified by their bear skin hats, were often the tallest men in the regiment and were used as the shock troops during an attack. By the time of the American Revolution, they were no longer carrying hand grenades but the name remained. Oftentimes these companies were separated from their regiments and placed in their own battalions.
Howe disembarked from Long Wharf, going over himself in the second wave, that afternoon. The British landed at Moulton’s Hill, near the modern Navy Yard. Stepping ashore, Howe observed his objective. “On first view it was clearly seen that the rebels were in forced and strongly entrenched upon their right in the Redoubt that had been seen from the town at daybreak,” he reported. “Their left and center were covered by a breastwork which reached from the Redoubt to the Mystick, the space from the Redoubt to that river being about 380 yards, and the whole extent they occupied about 600 yards”. The extent of the defenses compelled Howe to call for reinforcements.
Toward the middle of the day, the British launched their assault. Although Howe’s second in command, Brig. Gen. Robert Pigot was present and directed the left of the line, Howe also decided to take a stronger role and led the center himself on foot. Howe directed his light infantry to advance along the beach of the Mystic, likely with the hope in mind of getting behind the redoubt. This attack was met and repulsed by New Hampshire militia under Col. John Stark. So too were Howe’s and Pigot’s attacks. Watching his men come stumbling back after the failed attempt prompted Howe to later write “it was a moment I had not felt before.”
In the second assault, Howe attempted to further squeeze off the redoubt, pulling the light infantry from the beach to augment his center. At the same time, Pigot sent the 1st Marine Battalion and the 47th Regiment of Foot to get between Charlestown and the redoubt. During the assault, which also failed, the light infantry fired into the rear of the grenadiers, inflicting casualties.
Once again, the British lurched forward, determined to overwhelm the redoubt by a sheer force of numbers. This time, luck was with them as the militia were running out of ammunition. Francis, Lord Rawdon, an officer in the 5th Regiment of Foot who would go on to distinguish himself in the Southern Campaigns recalled “our men grew impatient, and all crying Push on, Push on, advanced with infinite spirit to attack the work with their small arms. As soon as the rebels perceived this, they rose up and poured in so heavy a fire upon us that the oldest officers say they never saw a sharper action. They kept up this fire until we were within ten yards of them…there are few instances of regular troops defending a redoubt till the enemy were in the very ditch of it.”
The British infantry swarmed into Prescott’s redoubt. Somewhere in the maelstrom was British lieutenant and adjutant of the 1st Marines, John Waller. “Nothing could be more shocking than the carnage that followed the storming of this work,” he wrote “We tumbled over the dead to get at the living who were crowding out of the gorge of the redoubt…’twas streaming with blood and strewed with the dead and dying men, the soldiers stabbing some and dashing out the brains of the others.” The colonials managed to retreat across Charlestown Neck, the British too exhausted to give chase.
Bunker Hill became the first of many pyrrhic victories for the British over the course of the American Revolution. Still, there were a number of shortcomings. Howe, rather than oversee the attacks from Moulton’s Hill, led the assaults himself. Perhaps he needed to inspire his men or he recognized the importance of the situation but he reverted to being a battalion commander. One must wonder whether the initial attacks could have been more effective had he delegated authority and used more of a guiding hand. Howe’s experience that day may have influenced him for the remainder of the war. Rather than rely on frontal assaults, he utilized flanking maneuvers such as those at Long Island and Brandywine. The friendly fire casualties can be attributed to inexperience amongst the ranks. Gage, along with his subordinates also share, the blame for not maintaining operational security and letting their plans slip out of Boston. Additionally, Gage failed to heed the advice of Graves and secure Charlestown Peninsula in April when he had the opportunity. The result nearly two months to the day resulted in over 1,000 British soldiers killed and wounded, a high cost of blood and treasure, in a war that would lead to the independence of the United States.
We reshare a post from 2018 about the Salem Alarm also known as “Leslie’s Retreat.” As we approach the 250th anniversary of this important event (February 26, 1775), we will share primary source accounts of the event. This event set the kindling for the spark that lit a war in Lexington a month later.
As events quickly spiraled out of control in the winter and spring of 1774-1775 around Massachusetts, several armed confrontations between local “Patriots” and the British army heightened tensions. On many occasions, both sides adverted open confrontation and were able to diffuse the situation. Understanding these events and how they made an impression on both sides helps explain what happened on the Lexington Common on April 19, 1775.
As soon as British General Thomas Gage arrived in Boston in the spring of 1774, he set about enforcing the newly passed “Coercive Acts.” In response to these new laws that restricted many of the rights the people of Massachusetts had grown accustomed too, local groups began to arm themselves in opposition to British authority. Even though Gage was once popular in the colonies, he soon became an enemy to those around Boston who believed the Coercive Acts were an overstep of British authority. Continue reading ““If you Fire, You’ll all be dead men” The Salem Alarm”→
We are excited to announced our FIFTH annual ERW bus tour will be on November 7-9, 2025 and will cover the 1777 Philadelphia Campaign.
Author and historian Michael Harris will join us as we cover the fall of 1777 campaign. The British Army under Gen. William Howe made a concerted effort to take the American capital of Philadelphia. George Washington and the Continental Army fought major actions at Brandywine and Germantown in an effort to hold and take back the city. The tour will cover sites associated with the Philadelphia Campaign, such as Brandywine, Germantown, Paoli and others.
Tickets are $250 per person and will include Friday night lecture at the host hotel, all day bus tour on Saturday and half day bus tour on Sunday. A lunch is included for Saturday.
Our host hotel is the Holiday Inn Express and Suites – King of Prussia. Lodging is NOT included in the registration fee. A room bloc has been established under the name of “Emerging Revolutionary War.” A link will be provided in the future for hotel lodging.
Join us for our FIFTH annual tour as we take on the beginning of the American Revolution just a few months before the 250th anniversary. Learn about the dramatic events that led to some of the bloodiest days in the American Revolution. There is no better way to experience history than to stand in the footsteps of where it happened!