Immediate: Concord (MA) Museum Signs Historic Agreement to Operate the Wright Tavern

On Wednesday, June 8, a signing ceremony marked the beginning of an agreement between First Parish in Concord, owner of the Wright Tavern, and the Concord Museum. Starting this fall, the Concord Museum will provide educational programming to school groups in the Wright Tavern and open the historic building to the public for commemorative events in October and April each year. On hand for the signing were representatives of the Concord Museum and First Parish as well as members of the Wright Tavern Exploratory Committee (WTEC), appointed last fall to develop a sustainable, strategic plan to showcase the Wright Tavern as a National Historic Landmark.

IMG_0075
Plaque on the Wright Tavern (ERW collection photo)

“Opening the historic Wright Tavern to public and educational access will provide a true sense of place when learning about the historical events of the American Revolution,” said Mel Bernstein, member of WTEC and Chairman of the American Revolution Round Table of the Minute Man National Historical Park.

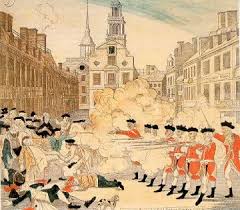
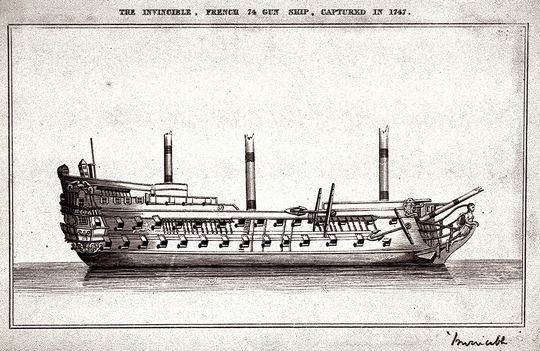
No building in this historic community was of greater consequence to the beginnings of the American Revolution than the Wright Tavern, built in 1747. The First Provincial Congress met in Concord at the Wright Tavern in October 1774, electing John Hancock as the Congress’s president and making provision for the collection of taxes. The Second Provincial Congress met there again in March and April 1775. Presided over by John Hancock with Samuel Adams and Dr. Joseph Warren in attendance, the Provincial Congress met in defiance of Royal and Parliamentary authority — creating a Massachusetts army, raising taxes, and performing other roles necessary to form its own government, independent of British authority.  Then, in the early hours of April 19, 1775, Concord’s Minute Men assembled in the Wright Tavern before setting off to repel the advancing British troops at the North Bridge.

Since 1886, First Parish in Concord has owned and maintained this historic structure. “The Wright Tavern is certainly one of the most important Revolutionary War-era buildings in Concord,” explained Tim Jacoby, Chair of the First Parish Trustees of Parish Donations. “Although the building is owned by the church, we truly feel it belongs to the people of Concord and to the American people. This agreement with the Concord Museum will establish greater public accessibility to the Tavern.”

In 1961, the Wright Tavern was designated a National Historic Landmark by U.S. Secretary Fred Seaton, declaring it “an historical site of exceptional value in commemorating and illustrating the history of the United States.”

Margaret Burke, Executive Director of the Concord Museum, said: “The Museum is thrilled with this partnership to bring the importance of the Wright Tavern to the fore. Concord is home to invaluable historical and cultural resources, and this is a wonderful example of how organizations within the town are working together to promote this history and make it relevant to residents and visitors.”

Leah Walczak, the Concord Museum’s Director of Education and Public Programs, explained the role the Wright Tavern will play in educating visiting school groups:  “The Museum currently provides specialized programming to over 10,000 school children each year. Along with hands-on history education using objects from the Museum’s collections, this agreement will allow us to provide programs within the setting of one of the finest historic buildings in Concord.”

This partnership was brought about through the work of the Wright Tavern Exploratory Committee, which convened from September 2015 through January 2016.  Members included:  John Boynton, Chair of the Exploratory Committee and a First Parish Trustee; Doug Baker, Sacristan and Curator of First Parish; Mel Bernstein, Chair of the American Revolution Round Table of Minute Man National Historical Park; Jim Cunningham, Project Manager for Barrett Farm Restoration, and Treasurer of Save Our Heritage; Sue Gladstone, Director of Development for the Concord Museum; Jayne Gordon, Public Historian for Robbins House, Thoreau Farm, and the Concord Museum; Tim Jacoby, Chair of the First Parish Trustees; Bob Morris, Chair of the Friends of Minute Man National Historical Park; and Tom Wilson, First Parish Treasurer.

A generous gift to the Museum from John and Johanna Boynton is funding this historic partnership.

*About the Concord Museum
The Concord Museum is where all of Concord’s remarkable past is brought to life through an inspiring collection of historical, literary, and decorative arts treasures.  Renowned for the 1775 Revere lantern and Henry Thoreau’s Walden desk, the Concord Museum is home to a nationally significant collection of American decorative arts, including clocks, furniture, and silver. Founded in 1886, the Museum is a gateway to historic Concord for visitors from around the world and a vital cultural resource for the town and the region.  Visit www.concordmuseum.org.*

*For More Information, contact:

Barbara Rhines, Director of Marketing and Public Relations
978-369-9763, ext. 229
Email: brhines@concordmuseum.org

Part 2: The Defense in Depth as a Revolutionary War Battlefield Tactic

For part one, click here

Brig. Gen. Daniel Morgan, the “Old Wagoner,” as he was known, commanded a light infantry corps assigned to Maj. Gen. Nathanael Greene’s southern army. Morgan met with Greene in Charlotte, North Carolina on December 3, 1780.  Implementing a Fabian strategy, Greene split his army to harass the British while buying time to recruit additional soldiers. Greene ordered Morgan to use his 600-man command to forage and harass the enemy in the back country of South Carolina while avoiding battle with Lt. Gen. Charles Lord Cornwallis’ British army.

Once Cornwallis realized what was going on he dispatched Lt. Col. Banastre Tarleton’s British Legion to track down Morgan’s command and bring it to battle. Tarleton commanded a combined force of Loyalist American troops. The Legion consisted of fast-marching light infantry and dragoon units. At its peak strength, the Legion numbered approximately 200 infantry and 250 dragoons. It was known for its rapid movements and for its ruthless policy of giving the enemy no quarter. Patriot forces feared Tarleton and his Legion, and for good reason.

By January 12, Tarleton’s scouts had located Morgan’s army in the South Carolina back country, and Tarleton began an aggressive pursuit. Morgan hastily retreated to a position at the Cowpens, a prominent crossroads and pasturing grounds for cattle. The field was about 500 yards long and about as wide, dotted with trees, but devoid of undergrowth, which served as a food source for grazing battle.

Once Morgan learned that Tarleton was pursuing him, he spread the word for local militia units to rendezvous with him at the Cowpens. Through the night, South Carolina militiamen drifted into camp. Morgan visited their camps, encouraging them to stand and fight. Morgan’s words were particularly effective; the grizzled veteran knew how to motivate these men. They would need to be prepared, because they faced a stern task the next day.

January 17, 1781 dawned clear and very cold. After his scouts reported Tarleton’s approach, Morgan rode among his men, crying out, “Boys, get up! Benny’s coming!” Morgan designed a defense in depth that was intended to draw the British Legion in and then defeat them by pouncing on their exposed flanks. He knew that his militia had a reputation of being unreliable, and his ability to maneuver was limited, so he elected to design and implement a defense in depth that took advantage of the terrain features of the Cowpens.

Banastre Tartleton, British commander at Cowpens

Tarleton was overconfident. He believed that Morgan’s command was hemmed in by the nearby Broad River and also believed that the cleared fields of the Cowpens were ideal ground for his dragoons, and concluded that Morgan must be desperate to fight in such a place.

Morgan had prepared three defensive positions. Selected sharpshooters out front and hiding behind trees manned the first line. They picked off a number of Tarleton’s dragoons as they advance, specifically targeting officers. Traditional accounts indicate that they downed 15 of Tarleton’s dragoons this way. Confused, the dragoons retreated.

Having accomplished their initial goal, the sharpshooters then fell back about 150 yards or so to join the second line, which consisted of Brig. Gen. Andrew Pickens’ militiamen. Morgan asked these men to stand long enough to fire two volleys, after which they were to fall back to the third—and main line—manned by Col. John Eager Howard’s Continentals, another 150 yards or so in the rear of the second line. Thus, Morgan had designed a textbook example of a defense in depth.

Andrew Pickens, commanded some of the South Carolina militia at Cowpens

Some of the militia got off two volleys and then most of the militia fell back to a spot behind the third line. Tarleton orders his dragoons to pursue the retreating militiamen, and as the dragoons bore down on them with their sabres drawn, Col. William Washington’s Continental cavalry suddenly thundered onto the field, seemingly from nowhere. They routed the surprised Loyalist dragoons, who fled the field with heavy losses.

The infantry then engaged. With their drums beating and their fifes shrilling, the British infantry advanced at a trot. Recognizing that the moment of crisis had arrived, Morgan cheered his men on, rode to the front and rallied the militia, crying out, “form, form, my brave fellows! Old Morgan was never beaten!”

William Washington, commander of American cavalry at Cowpens and a distant relation to George Washington

Tarleton’s 71st Highlanders, a veteran unit made of Scotsmen, which had been held in reserved, now charged the Continental line, their skirling bagpipes adding to the cacophony of battle. Howard ordered his right flank to face slight right to counter a charge from that direction, but in the noise and chaos, was misunderstood as a call to retreat. As other companies along the line began to pull out, Morgan rode up to ask Howard if he had been beaten. Howard pointed at the orderly ranks of his retreat and assured Morgan that they had not been beaten. Morgan then put spurs to his horse and ordered the retreating units to face about and, on his order, to fire in unison. Their deadly volley dropped numerous British soldiers, who, sensing victory, had broken ranks in a determined charge. The combination of this volley and a determined bayonet charge by the Continentals turned the tide of battle in favor of the Americans.

At the moment, the rallied and re-formed militia and Washington’s cavalry attacked, leading to a double envelopment of the British, who began surrendering in masses. Tarleton and some his men fought on, but others refused to obey orders and fled the field in a panic. Finally, Tarleton realized that he had been badly beaten and fled down the Green River Toad with a handful of his men. Racing ahead of his cavalry, William Washington dashed forward and engaged Tarleton and two of his officers in hand-to-hand combat. Only a well-timed pistol shot by his young bugler saved Washington from the upraised saber of one of the British officers. Tarleton and his remaining forces escaped and galloped off to Cornwallis’ camp to report the bad news.

And bad news it was: Tarleton’s Legion lost 110 dead, over 200 wounded and 500 captured. By contrast, Morgan lost only 12 killed and 60 wounded. His perfectly designed and perfectly implemented defense had worked even beyond the Old Wagoner’s wildest dreams and highest hopes.

Knowing that Cornwallis would pursue him, Morgan buried the dead and then withdrew to the north to live and fight another day. Morgan reunited with Greene’s army and the combined force headed for North Carolina. Morgan, whose health was fragile, soon retired from further duty in the field, but he had left his mark. Cowpens was his finest moment, and set a precedent for Greene to follow two months later at Guilford Courthouse.

Battle of Cowpens (Courtesy of Campaign 1776/CWT)
Battle of Cowpens
(Courtesy of Campaign 1776/CWT)

*Suggestions for additional reading: for a superb book-length microtactical treatment of the Battle of Cowpens, see Lawrence E. Babits, A Devil of a Whipping: The Battle of Cowpens (Chapel Hill: University of North Carolina Press, 1998). This book is the primary resource consulted in drafting this article.

The Defense in Depth as a Revolutionary Battlefield Tactic

Part One of Four 

As a general statement, most people don’t think of the Revolutionary War as a testing ground for battlefield tactics. That assumption would not be correct. In fact, the Revolutionary War proved beyond doubt that traditional European set-piece battlefield tactics were largely ineffective against a determined enemy that was not bound by the traditional rules of war.  As just one example, the extremely effective hit and run tactics used by the Minutemen to harass and deplete the British forces that marched to Lexington and Concord that were based on the tactics used by Native American fighters prove this beyond doubt. The British Regulars had no experience or training in dealing with these tactics, and they suffered as a result.

Also, in the European model, wherein gentlemen fought wars and assiduously avoided civilian casualties, it was considered impolite and improper to target the other side’s officers during the course of battle. American forces refused to comply with these rules, causing serious losses among the ranks of British officers, and the British had to adapt to these tactics also.

Another tactic adopted by American officers proved to be incredibly effective during the campaigns in the South in 1781. Brig. Gen. Daniel Morgan and Maj. Gen. Nathanael Greene, in particular, made extremely effective use of the defense in depth in carrying out their Fabian strategy during the Southern Campaigns of the Revolutionary War.

A Fabian strategy—named for its most famous practitioner, the Roman dictator, Quintus Fabius Maximus Verruscosus—avoids pitched battles and frontal assaults in favor of wearing down an opponent through a war of attrition and indirection. While avoided decisive battles, the side employing a Fabian strategy harassed the enemy through skirmishes to inflict losses, disrupt supply, and affect enemy morale. Typically, the employment of this strategy suggests that the side adopting it believes that time is on its side. George Washington was absolutely convinced that a Fabian strategy would ultimately wear down the British, and he was right.

unnamed (1)
General Nathanael Greene, who mastered the Fabian strategy in the Southern Campaign of 1781

His protégé, Greene, also believed that a Fabian strategy was the way to defeat the British. Faced with the task of defending a large swath of the South with a small army, he had little choice. His subordinate, Brig. Gen. Daniel Morgan, a rough but extremely effective amateur soldier, pioneered the use of a defense in depth at the Battle of Cowpens in January 1781, and Greene then used it on a larger scale at the Battle of Guilford Courthouse about sixty days later. That two untrained amateur soldiers could develop and use such a tactic so effective demonstrates their genius.

A defense in depth, also known as a deep or elastic defense, seeks to delay, rather than prevent, the advance of an attacker, buying time and inflicting additional casualties by trading time for space. Instead of facing an attacker with a single, strong defensive position, a defense in depth relies upon the tendency of an attack to lose momentum and cohesion over time as it covers a larger area. Thus, a defender can yield lightly defended territory in an effort to outstrip an attacker’s logistics or spread out a numerically superior attacking force. Once that attacker has lost momentum, or has become spread out to hold territory, well-planned and well-placed counterattacks can be directed at the attacker’s weak points, with the objective of causing attrition warfare or driving the attacker back to its original starting position.

A conventional defensive strategy concentrates all of a defender’s military resources in a well-defended front line, which, if breached by an attacker, would expose the remaining troops in danger of being flanked, cut off, and surrounded, and leaving lines of supply, communications, and command vulnerable to being cut.

By contrast, a defense in depth requires that defenders deploy their resources, such as prepared fortifications, earthworks, and additional forces at and well behind the front line. Once an attacker breaches the weaker initial position, it continues to meet resistance as it presses on. As the attacker penetrates further, its flanks become vulnerable, and if the advance stalls, the attacking force can find itself completely surrounded and subject to being destroyed or forced to surrender. Thus, a defense in depth is particularly effective against an attacker that can concentrate its force to attack a small number of places along an extended defensive position.

In a well-designed and properly implemented defense in depth, the defending forces fall back to a succession of prepared positions designed to inflict a heavy price on the advancing enemy while minimizing the risk of being overrun or outflanked. By delaying the enemy’s advance, a defense in depth neutralizes manpower advantages and the element of surprise, and buys time for additional forces to be readied for well-timed counterattacks. A well-designed defense in depth will use its forces in mutually supporting positions and in appropriate roles. In this scenario, poorly trained soldiers—such as militiamen—can be used in static positions at the front line, while more experienced and better-trained soldiers can form a mobile reserve, or man the ultimate defensive position to be defended.  Further, a well-designed defense in depth will make good use of the natural advantages offered by terrain features and other natural obstacles such as streams, ponds, etc.

DanielMorgan
General Nathanael Greene, who mastered the Fabian strategy in the Southern Campaign of 1781

There are disadvantages associated with the defense in depth. For one thing, constantly retreating can take a toll on the morale of defending forces. Further, these forces also require a high degree of mobility to accommodate those retreats, and also the space to do so.

Morgan designed and implemented a very effective defense in depth at Cowpens that proved so effective that Greene adopted that tactic and, while he lost the Battle of Guilford Courthouse, the heavy losses his army imposed on Lord Cornwallis’ army prompted Greene to note that the British, “have met with a defeat in a victory.”

Dorchester Heights

On a recent trip to Boston, I was shown by fellow Emerging Revolutionary War historian Rob Orrison, Dorchester Heights. One of my favorite quotes of the entire American Revolutionary War was in reference to the Continental Army’s move to fortify the very heights at Dorchester.

IMG_0093

“My God, these fellows have done more work in one night than I could make my army do in three months.” Uttered by General William Howe the morning after the Americans had used the night to build an entire fortification network on the commanding hillsides of Dorchester.

This move, conducted in the secrecy of the night, led to the British evacuation of Boston, after an aborted offensive by the British do a providential snowstorm. Less than two weeks after that influential night, on March 17, 1776, the British evacuated Boston, never to return.

I did not get to spend too much time on the heights but I was able to snap a few pictures, shown below. But, I did have the great fortune to be on the heights at night, looking out over Boston, which has grown just slightly since 1776. A few moments of silence ensued, where I had the chance to mull over what that view must have looked like and what the soldiers who hurriedly dragged the fascines and gabions, and shoveled dirt that night must have worried about as they feverishly tried to finish their duties.

IMG_0101
Stone monument marking the spot where the cannon that Henry Knox brought from Fort Ticonderoga to Boston stood. You can see the lights of Boston in the background with the reflection of the lights on the water past the first row of houses in the foreground.

The cannon that bore down on Boston from the heights of Dorchester Heights were a product of one of the greatest feats of the entire war. Former Boston bookseller turned artillerist extraordinaire had brought the heavy armament on an arduous trek, through the late stages of winter from upstate New York to the Continental Army besieging Boston.

Henry Knox was the man behind the delivery and he would serve as George Washington’s Chief of Artillery before the war was over. Afterwards, Knox would become the first Secretary of War in Washington’s Administration.  At Dorchester Heights, with Washington’s planning and Knox’s delivery the city of Boston was liberated without firing a shot.

IMG_0096
A view of the monument


The heights retained its military importance through the end of the War of 1812. By the end of the 19th century, in 1898, the General Courts of Massachusetts had commissioned a monument to stand on what remained of the heights. The white marble Georgian revival tower that stands 115 feet, commemorates that night in 1776 that American soldiers did what British soldiers would take months to complete. By 1978, after a listing on the National Register of Historic Places, the monument and remaining hill site was handed to the National Park Service by the city of Boston. Dorchester Heights became part of Boston National Historical Park which was established in 1974.

When planning a visit to Boston National Historical Park and to Dorchester Heights, which is open to visitation, both during the day and at night please consult the website for the national park here. That way you can familiarize yourself with the regulations and how to make the most of your visit.

IMG_0092


Campaign 1776 Presents….The Revolutionary War Animated Map

campaign-1776-logo-220Debuting yesterday, the Campaign 1776, an initiative by the Civil War Trust, released an animated map that covers the “entirety of the American Revolution,” according to Civil War Trust Communications Manager Meg Martin.

At eighteen minutes in length, the video is a “succinct and engaging” access to gaining an overview of the entirety of the American Revolution, from the first shots in Massachusetts at Lexington and Concord to the culmination of the Siege of Yorktown in 1781. The video even includes a segment entitled “The Twilight Years” which explains the two years the war continued on after the victory at Yorktown; from 1781 to 1783. One can also jump to different parts, as the video has subheadings at the bottom to break the eighteen minute video into segments.

The video combines modern photography,with “live-action footage, 3-D animation, and in-depth battle maps” to give the viewer a sense of what the American Revolution, the pivotal event that “shaped America” was like.

To check out the video, click here.

Furthermore, “The Revolutionary War” animated map is part of a larger series of animated battle maps of battles on Civil War battles, which can be found here.

This animated map may be the first in the series of American Revolution and War of 1812 battles that the Campaign 1776 and Civil War Trust team is contemplating doing. We will all have to stay tuned and find out.

Yet, this animated map, of the entire American Revolution, is a great beginning introduction, so sit back, dedicate eighteen minutes, and learn about this defining moment in American history.


*Emerging Revolutionary War would like to thank Meg Martin of the Civil War Trust for the information about this release.*

Reflections of April 19, 1775

On this date, 241 years ago, the first salvo of what would become the American Revolutionary War, was fired on Lexington Green and North Bridge in Concord.

Historian John Galvin once wrote about the Battles of Lexington and Concord that they were the “least known of all American battles.” I never really understood what Galvin meant, as I had read extensively about April 19, 1775 and thought I understood the details of that day in history.

Yet, until this past weekend, when I spent the better part of four days touring the sites and walking the trails, talking to the historians around the towns, I did not realize how much more there is to what actually happened on that April day.

For starters, did you realize that Paul Revere did not go town-to-town calling out, “The British are Coming” to homesteads and roadside taverns? Instead, he was the catalyst that started a chain reaction of messengers and runners to different towns throughout the countryside that cast the alarm in a wide net.

He also would have told farmsteads and meetinghouses along the way that the “Regulars are Coming,” since the colonists still thought of themselves as British.

Or that the unofficial birth of the United States Army is attributed to the militia that followed Colonel James Barrett and Colonel John Buttrick down the hill toward the British at the North Bridge?

IMG_6903
The field where the militia under Colonel James Barrett and Colonel John Buttrick began their advance from toward the North Bridge. The militia would be coming toward us to descend toward the span.

That was the first time that men, formed in regiments with officers, made an advance against what they perceived as an enemy force, and did so in a “very military manner.”

What prompted the various militia companies, which came from other towns than just Concord, to sally forth from the hill toward the now infamous North Bridge? The main reason was what was happening in Concord was the mistaken reason behind the smoke emanating from the town?

In the town, the British were burning military supplies and the wooden gun carriages found in the hamlet. Sparks landed one of the nearby dwellings and British soldiers actually put down their muskets to form a bucket brigade, with civilians, to help put out the flames. The smoke that billowed from the doused fires is what prompted the militia and minutemen response.

With water being dumped on the flames, smoke billowed up, which prompted milita Adjutant Joseph Hosmer to ask the officers; “Will you let them burn the town down?” That prompted the forward movement of the militia down the hill and against the British.

Or did you realize that some of the militia, from the nearby town of Acton, suffered some of the first casualties at North Bridge, including their militia captain, Isaac Davis, who was one of the first killed in the engagement?

IMG_0087
View of the Old Manse, built in 1770 for Reverend William Emerson. View from the Concord River/North Bridge direction.

Somewhere in the midst of the action in Concord was Reverend William Emerson, the grandfather of Ralph Waldo Emerson who would later write that the action on April 19, would be known as the “shot heard round the world” years later.

These are just a few of the interesting tidbits that I picked up this past weekend. Altogether, they reinforce the historic events that I knew unfolded on this day in American History. However, along with reflecting on what transpired in my visit to Massachusetts, these new tidbits of valuable information underscore the important stories and accounts that shape this spring day that are beckoning to be told.

There is so much to be gained by walking the grounds, talking to the historians and historical enthusiasts of the area, and just taking time to appreciate what this day, April 19th, meant to the future of the United States and the era it was leaving behind as part of the British Empire.

The Greatest Leaders of the American Revolution You Have Never Heard Of

When a historian, author, or student of the American Revolutionary War mentions the following three words, “Green Mountain Boys” there is usually one name that comes to the forefront.

Seth Warner is usually not that name. Yet, he is one of the two names that should be forever linked with the great history of the “Green Mountain Boys.”

For those that are drawing a blank, the other name usually associated with this famous unit is Ethan Allen.

aseth
Seth Warner Statue (courtesy of The Monument & Markers of Vermont; http://historicsites.vermont.gov/)

Warner, born in hilly Woodbury, Connecticut on May 17, 1743, the fourth of ten children to Dr. Benjamin Warner and Silence Hurd Warner. The young Seth was a product of the western frontier, growing up on the fringes of the English world, and thus learning from an early age to live and survive in the woods, rivers, and hills of Connecticut and what would become Vermont.

He did attend what limited schooling was available and from his father, rudimentary medical practice. In an 18th century biography, Warner was remembered to have vast information on the nature and uses of indigenous plants.

During the French and Indian War, Warner served two summers fighting in the cause of the British and would serve as a captain in the “Green Mountain Boys” following the French and Indian War. One biography states that Warner was part of the famous ranger outfit known as Major Roger’s Rangers, yet there is no primary evidence that supports this biographical claim.

With war on the horizon following the action at Lexington and Concord, Warner was elected third in command, with Ethan Allen being elected in top command, on May 8, 1775 for the task of capturing Fort Ticonderoga in western New York.

Born where Native American still threatened the westward-minded colonists, with the training during two summers in the last major war on the American Continent, Warner would now play a major role in the upcoming American Revolution.

With that, Seth Warner and the “Green Mountain Boys” marched off to help make the dream of American independence a reality. Following Ethan Allen, Warner found himself embroiled in the first campaign outside the environs of Boston when on May 10, 1775 he took part in the American capture of Fort Ticonderoga in western New York. Following up the next day, Warner, serving as second-in-command, attacked and captured the British garrison at Crown Point, approximately 13 miles away from Fort Ticonderoga.  When news broke of the exploit, the “Green Mountain Boys” and subsequently Warner quickly became a household name for the patriot cause.

With the turn of the season to summer, Allen and Warner appeared in Philadelphia to appeal directly to the Continental Congress. Their aim was to achieve recognition as a regiment for the “Green Mountain Boys.” On June 23, 1775, the day the two men appeared in front of the governing body of the American cause, the Congress agreed and sent the endorsement to the state of New York. After some debate in provincial Congress of the Empire State, the endorsement was finally agreed upon.

With the ensuing vote of officers, surprisingly, Allen was not elected as commander, but Warner survived in an officer capacity, garnering 41 of 46 votes for lieutenant colonel. No reason or notes from this convention, held on July 6, 1775 has ever surfaced.

Before 1775 was out, Warner, who would lead the command, found themselves on the way to Canada. Initially stationed along the St. Lawrence River on the way to Montreal and near the end of October, Warner’s men repulsed an amphibious landing and attack by Sir Guy Carleton, the British Governor-General of Canada. With the repulse, at the Battle of Longeuill led to the surrender of Fort St. John on November 3, 1775.

Ten days later Montreal fell to the American forces and Warner and his “Green Mountain Boys” entered the fallen city later that same day. The American commander, General Richard Montgomery wanted this crack unit to continue with him by canoe to Quebec but because of the lack of winter clothing, the command was forced to head south, for supplies.

Not to stay in a support role for long, Warner’s men marched north shortly after the turn of the year in January 1776 to reinforce the Americans laying siege to Quebec. While there Warner showed the depth of his concern for the welfare of his men. With the smallpox epidemic ravaging the American ranks–in fact more American soldiers would die of that disease than any single other cause–Warner allowed his men to be inoculated, which was not not akin to what inoculations are like today.

Click this link, courtesy of Mount Vernon, on what smallpox inoculation was like in Colonial America.

After the return from Canada, on July 5, 1776, Warner was elevated to the rank of colonel and tasked with raising another regiment from the New Hampshire Grants (the area now comprising Vermont). Yet, it was one year and one day later that Warner showed how valuable his role as a general officer was.

During the Battle of Hubbardton, Warner oversaw the rearguard of General Arthur St. Clair’s retreating American forces. Outside this frontier settlement, Warner’s men suffered more casualties and eventually yielded the field to the British, but the toll extracted from the British (over 200 killed, wounded, and captured) was high enough to cause the British to stop their pursuit of the retreating American army.

A month later, on August 16, 1777, Warner played another critical role in the American victory at Bennington. Under the overall command of General John Stark–another of the fiery, yet competent, and overlooked American general officers–Warner provided invaluable assistance because of his familiarity with the region. His home was a scant few miles from where the engagement would unfold.

Warner would oversee the left wing of the American assault and have as his goal the “Tory Redoubt” that fell on the east side of the Walloomsac River, which would be a dominant feature in the ensuing battle.

benington
Battle of Bennington (courtesy of British Battles)

The Americans routed the German, British, and Loyalist forces, even halting a 600-man reinforcement column under German Lieutenant Colonel Heinrich Breymann who arrived on the field in the latter stages.

Stark reported to Congress that Warner showed “superior skill in the action.”

Unbeknownst to Warner at the time, the campaign that culminated with British General John Burgoyne’s surrender at Saratoga, was the defining moment in Warner’s American Revolutionary War career. Warner would stay in the service, reaching the rank of brigadier general, bestowed upon him in 1778 by the new state of Vermont courtesy of the state legislature. That made him the only brigadier general in the newly formed state. On September 6, 1780 Warner received his only wound of the war, in an ambush by Native Americans outside Fort George in New York.

Unfortunately for the old “Green Mountain Boys” commander, the years after his retirement in 1780 were not kind. He fell out of favor with his former commander, Ethan Allen which led Warner to confront him in 1781 about contact with the British when Allen was a prisoner-of-war. This was all in conjunction with some contact Vermont had with British Canada about possible negotiations in reunifying Vermont with the British Empire. The extent of the negotiations and the seriousness of the idea has been in question by historians ever since.

Regardless, Warner, in failing health in 1784, returned to Woodbury, where he died on December 26, 1784, at the age of 41. Warner’s remains lay in Roxbury, Connecticut.


*For more information on the campaigns of New York in which Warner played a role in, consult Michael O. Logusz’s two-volume “With Musket and Tomahawk” series published by Savas Beatie LLC. at http://www.savasbeatie.com*

The Boston Massacre

The night was chilly, snow laid on the streets and walks of Boston, and the cold air kept people bundled up around the port town of Massachusetts colony.

Yet, the cold air could not dampen was the seething resentment a growing number of Bostonians were feeling toward the occupying British military. Minor brawls and exchanges had taken place in the various taverns and around the bustling harbor; common places where alcohol and/or hard work created short tempers.

However, on this night, March 5, 1770, outside the Custom House on King Street a British redcoat infantrymen, the sentry, kept his post. Private Hugh White, whose shift it was to stand guard, would have noticed the approach of Edward Garrick, who had come calling for a British officer who owed Garrick’s boss money for his wig services. Unbeknownst to Garrick, the apprentice, the debt had been paid, so no response from the field officer was forthcoming.

old state house
Old State House (Custom House) scene of the Boston Massacre on March 5, 1770

A response from White was forthcoming, who admonished the young man to have a more respectful tone when speaking to an officer in His Majesty, the King’s service. Garrick did not take too kindly to this tone and responded with an insult of his own toward White.

This prompted White to leave his post and literally knock some sense into Garrick by way of a musket strike to the side of the head. Garrick yelped in agony and a companion took up the verbal barrage toward the British soldier.

The cacophony created by the yelling of insults and as the colonial version of a game of telephone spread the message about what was transpiring at the Customs House. Church bells were rung, a telltale sign that something was afoot, led to the crowd surging past 50 in number by the evening.

White, prudently, had left his post and retreated up onto the steps of the Customs House summoned a runner (messenger) to race to the local barracks for extra manpower.As was custom, there was an officer of the watch, in this case, Captain Thomas Preston and seven soldiers responded.

En route, Henry Know, destined to become chief of artillery for the Continental Army in the American Revolution urged Preston, “For God’s sake, take care of your men, if they fire, you must die.”

Against this sage advice, shouts of “Fire” were emanating from the crowd, which had also resorted to throwing snowballs and spitting in the direction of the red-coated soldiers. Other derogatory names for British soldiers, like “lobsterbacks” which took into account the red uniforms adorned by the British infantry were also heard being shouted.

The British soldiers, with loaded muskets, and Captain Preston reached White’s station, the British officer ordered the large crowd to disperse. Preston had taken a position in front of his soldiers and had told a member of the crowd that his soldiers would not fire unless ordered.

No order was ever given.

Shortly after Preston spoke those words to a Bostonian, a foreign object hurtled toward Private Hugh Montgomery and knocked the infantryman off his feet. His musket clattered onto the steps. Standing up, Montgomery reportedly yelled “Damn you, fire!” and pulled the trigger of his musket. The accompanying “bang” reverberated in the square.

download
Copy of the lithograph by Paul Revere on the Boston Massacre

And then there was a pause of an uncertain length.

This silence was broken by the staccato of other muskets being fired. A few rounds belched forth from the British soldiers. Screams and shouts along with deafening echo of the discharge of black-powder muskets in an enclosed city square mixed with the sickening thud of lead impacting bone and body.

All told, eleven colonists were hit from the volley fire. Three were killed outright; Samuel Gray, James Caldwell, and Crispus Attucks. One more, Samuel Maverick, who was struck by a ricocheting round would die later that same evening. One more, a recent immigrant from Ireland, Patrick Carr, would succumb to his wounds a fortnight later.

CrispusAttucks-portrait3
Early portrait of Crispus Attucks (courtesy of http://crispusattucks.org/)

In the immediate aftermath, Preston would call the majority of his unit, the 29th Regiment of Foot to the scene. With the mob spilling out of the Customs House Square, Governor Thomas Hutchinson, the acting governor, was able to temporarily restore a semblance of tranquility with the promise that a fair trial of what transpired that March 5th evening would happen.

The trial would be a major event for the city of Boston, but, that was in the near future. With the shots fired and the citizens struck, the burgeoning independence movement had a rallying point. Lives were lost that night, but, the events that followed would, to the proponents of American independence, make them martyrs for the cause.


HMS Invincible

A good friend, knowing my interest in military history brought me a very unique artifact, which led me to discover more about where this piece of history originated from. Here is what I discovered.

Launched in 1741 by the French as L’Invincible, this 74-gun French ship of line was captured by the British during the First Battle of Cape Finisterre on May 14, 1747.

The engagement during the War of the Austrian Sucession, was a five-hour engagement in the Atlantic Ocean, off the coast of northwest Spain. The British admiral, George Anson struck the 30-ship convoy of the French, which was under the command of Admiral de la Jonquiere and captured four ships of the line. One of those ships of the line was the L’Invincible.

The L’Invincible sacrificed itself to allow some of the convoy to escape and tried in vain to fend off six British warships.

L_Invincible_vaisseau_de_74_canons_capture_en_1747
A depiction of L’Invincible after being captured by the British in 1747

Given its more Anglicized name; HMS Invincible, the ship’s design was larger than the usual 74-gun vessels of the time. Her greater draft and lower center of gravity allowed her to carry much more sail. This allowed the ship to gain more speed.

Altogether her design helped revolutionize British warship making as she was the first 74-gun ship in the British Navy. By the time of the crucial Battle of Trafalgar in 1805, over three-fourths of the entire British Navy were line ships toting 74-guns.

In February 1758 while part of a large sailing of warships and transports, the HMS Invincible that left from St. Helens Roads near the Isle of Wight in England. The ship struck Horse Tail Sandbank and got stuck. Yet with the rising tide she was able to free herself.

Unfortunately, fate had it in for the ship, as the wind suddenly changed direction and increased in intensity and she dragged her anchor on the sandbank. A failed attempt to lighten her cargo and load of armament and putting her under full sail did not work either. She was marooned on the sandbar and began to take on water.

For the next three days, the majority of her cannons and stores were removed and on February 22, 1758 she rolled onto her side and was lost.

HMS Invincible laid wrecked, covered, and largely forgotten until the 20th century, when in May 1979 a local fisherman snagged his nets on the timbers. Local divers found more of the ship and has been investigated and parts recovered ever since.

One of the interesting finds was the experimental flintlocks of the cannons of the HMS Invincible. Rather large, the nicely knapped flints were believed to be used in the canon locks. Canon locks and subsequent flints among the gunnery stores were considered a “unique find.”

IMG_1669
A “Large Wedge Type Gun Flint” from the HMS Invincible (author collection)

Fore more information about the ship, the wreck, and the discovery, check out Brian Lavery’s The Royal Navy’s First Invincible. Link to the book via Amazon is here.

How Did They Communicate?

Emerging Revolutionary War welcomes guest historian Robert “Bert” Dunkerly to the blog as the author of this post. 

It is well known that German troops (commonly called Hessians) fought alongside the British during the war.  One of the more intriguing questions of the Revolution remains; how did they communicate?  At any given time, German units could comprise from one third to one half of the larger British armies. They were also present in equal numbers in smaller detachments.

French was a common language that many European officers would have known, and there is evidence that German and English officers communicated in French during campaigns.  The language barrier also impacted daily army operations.  For example, Georg Pausch of the Hesse-Hanau Artillery requested an English officer who spoke German for a court martial.   Yet most of that procedure was conducted in French.

Written orders from General Phillips in Montreal in 1777 to Hessian Artillery units were given in French, suggesting that this was commonly done in these calm, routine situations.

It wasn’t a perfect system but it worked well enough. Adjutant General Major Bauermister of Hesse-Cassel, for example, notes that the English spoke poor French, when communicating with them. Yet what about among small units like companies or battalions?

030_30[1]
Re-enactors portraying the Hesse Kassel Jaeger Korps
Would mediocre command of a language suffice for communication in combat situations?  Often small groups of British and German troops operated together on patrols or raids.  Marching to Freeman’s Farm (Saratoga) in 1777 was a column that included Germans on the left, English on the right, and English troops as flankers. Such situations required close coordination.

Other times they were side by side on battlefields, such as at the Battle of Guilford Courthouse in 1781, where the German Von Bose Regiment was aligned next to the British 71st Highland Regiment. Close coordination in these cases was essential.

Still another example is from Brandywine, where Captain Johann Ewald wrote that in the army’s advance, were 60 jaegers on foot, fifteen mounted jaegers, a company of Highlanders, and a company of British light infantry.  All these troops worked in tandem to protect the army from ambush and clear the way for the advance. Yet Ewald was silent on how they did so.

Captain Ewald, also wrote of his experiences in Virginia, where, in the advance on Richmond, small numbers of troops were interspersed.   They marched into the town in this order: Jaegers, British dragoons, more jaegers, and British Light Infantry.  There are dozens of other examples.

Despite the many instances of German and British units mingling, there is precious little documentary evidence of how officers, or the common soldiers, communicated.  Perhaps they used a combination of French, translators who spoke either English or German, and hand signals or other agreed- upon methods.

Timing and clarity are key in close quarters combat, there is no chance to second guess in an ambush or a raid. There were likely instances of misunderstanding that may have led to mistakes and even led to friendly fire incidents.

Of the many accounts this author has researched, only a few mention how they communicated. Perhaps it was something so mundane, or so well understood, that they saw no need to comment on it in their writings. It is hoped that further research will shed light on this question.