Christmas Night, 1776: How Did They Cross? The Horses:

Part II.

Part 1 of this article showed that a total of 23 ferry trips were required to move all of Knox’s artillery men, guns, horses, and carts across the Delaware River. In addition, there were other horses needed for the march to Trenton. Many of the likely 35 horses associated with senior officers and aids could fit in with the above 23 trips at a rate of a couple per trip, especially the ferry with only one cart. 

There were six ferries operating to move the Continental Army across the river at McKonkey’s ferry site. Each of the six ferries could likely carry a maximum weight of roughly 8,750 pounds. That weight estimate comes from the intelligence report from Capt. Losbiniere on 22 December 1776 concerning the “7 flat-bottom boats which may carry about 50 men each and two ferry Boats, which may carry the like number” that were with Col. Cadwalader at Bristol ferry.[i]  There is no reason to believe those ferries were different from those at used at McKonkey’s. If it is assumed a man weighed 150 pounds plus 25 pounds of musket and gear, then the weight for 50 men comes to 8,750 pounds. With those capabilities the Philadelphia Light Horse needed 3 ferries for their unit (8 horses and riders per ferry).

Possibly one more ferry trip for any leftover senior officers and aids horses was necessary.  That is 27 trips total needed. With six ferries working that is four trips for all with three additional trips required. Those five round trips by the ferries were estimated by Washington in his plan to require six hours; however, it actually took a nine-hour period (6 pm to 3 am). The additional hours required for the crossing was likely explained by the floating ice and the increased river current driving the ferries out of position.

The question was raised about how difficult it would have been to transport the horses across the river. The somewhat surprising answer may be that it was not as difficult as many assume. No doubt a few horses were a problem; however, the majority of the horses probably presented few problems. How we surmise this is as follows:

Firstly, we can safely speculate that at least some of the horses had participated in earlier ferry crossings during the army’s previous movements and retreats. Those horses would remember that nothing was amiss in the crossing.  Secondly, many of the farm horses transferred to pull guns had previous experience pulling carts and wagons across ferries to take produce to market. Thirdly, each team had a driver who knew the horses and he could strategically place the lead horse with a horse who had experience. As for the cavalry, each horse rider likely slowly leads his horse onto the ferry. Horses who see a previous horse move onto a ferry without incident generally lose their fear.

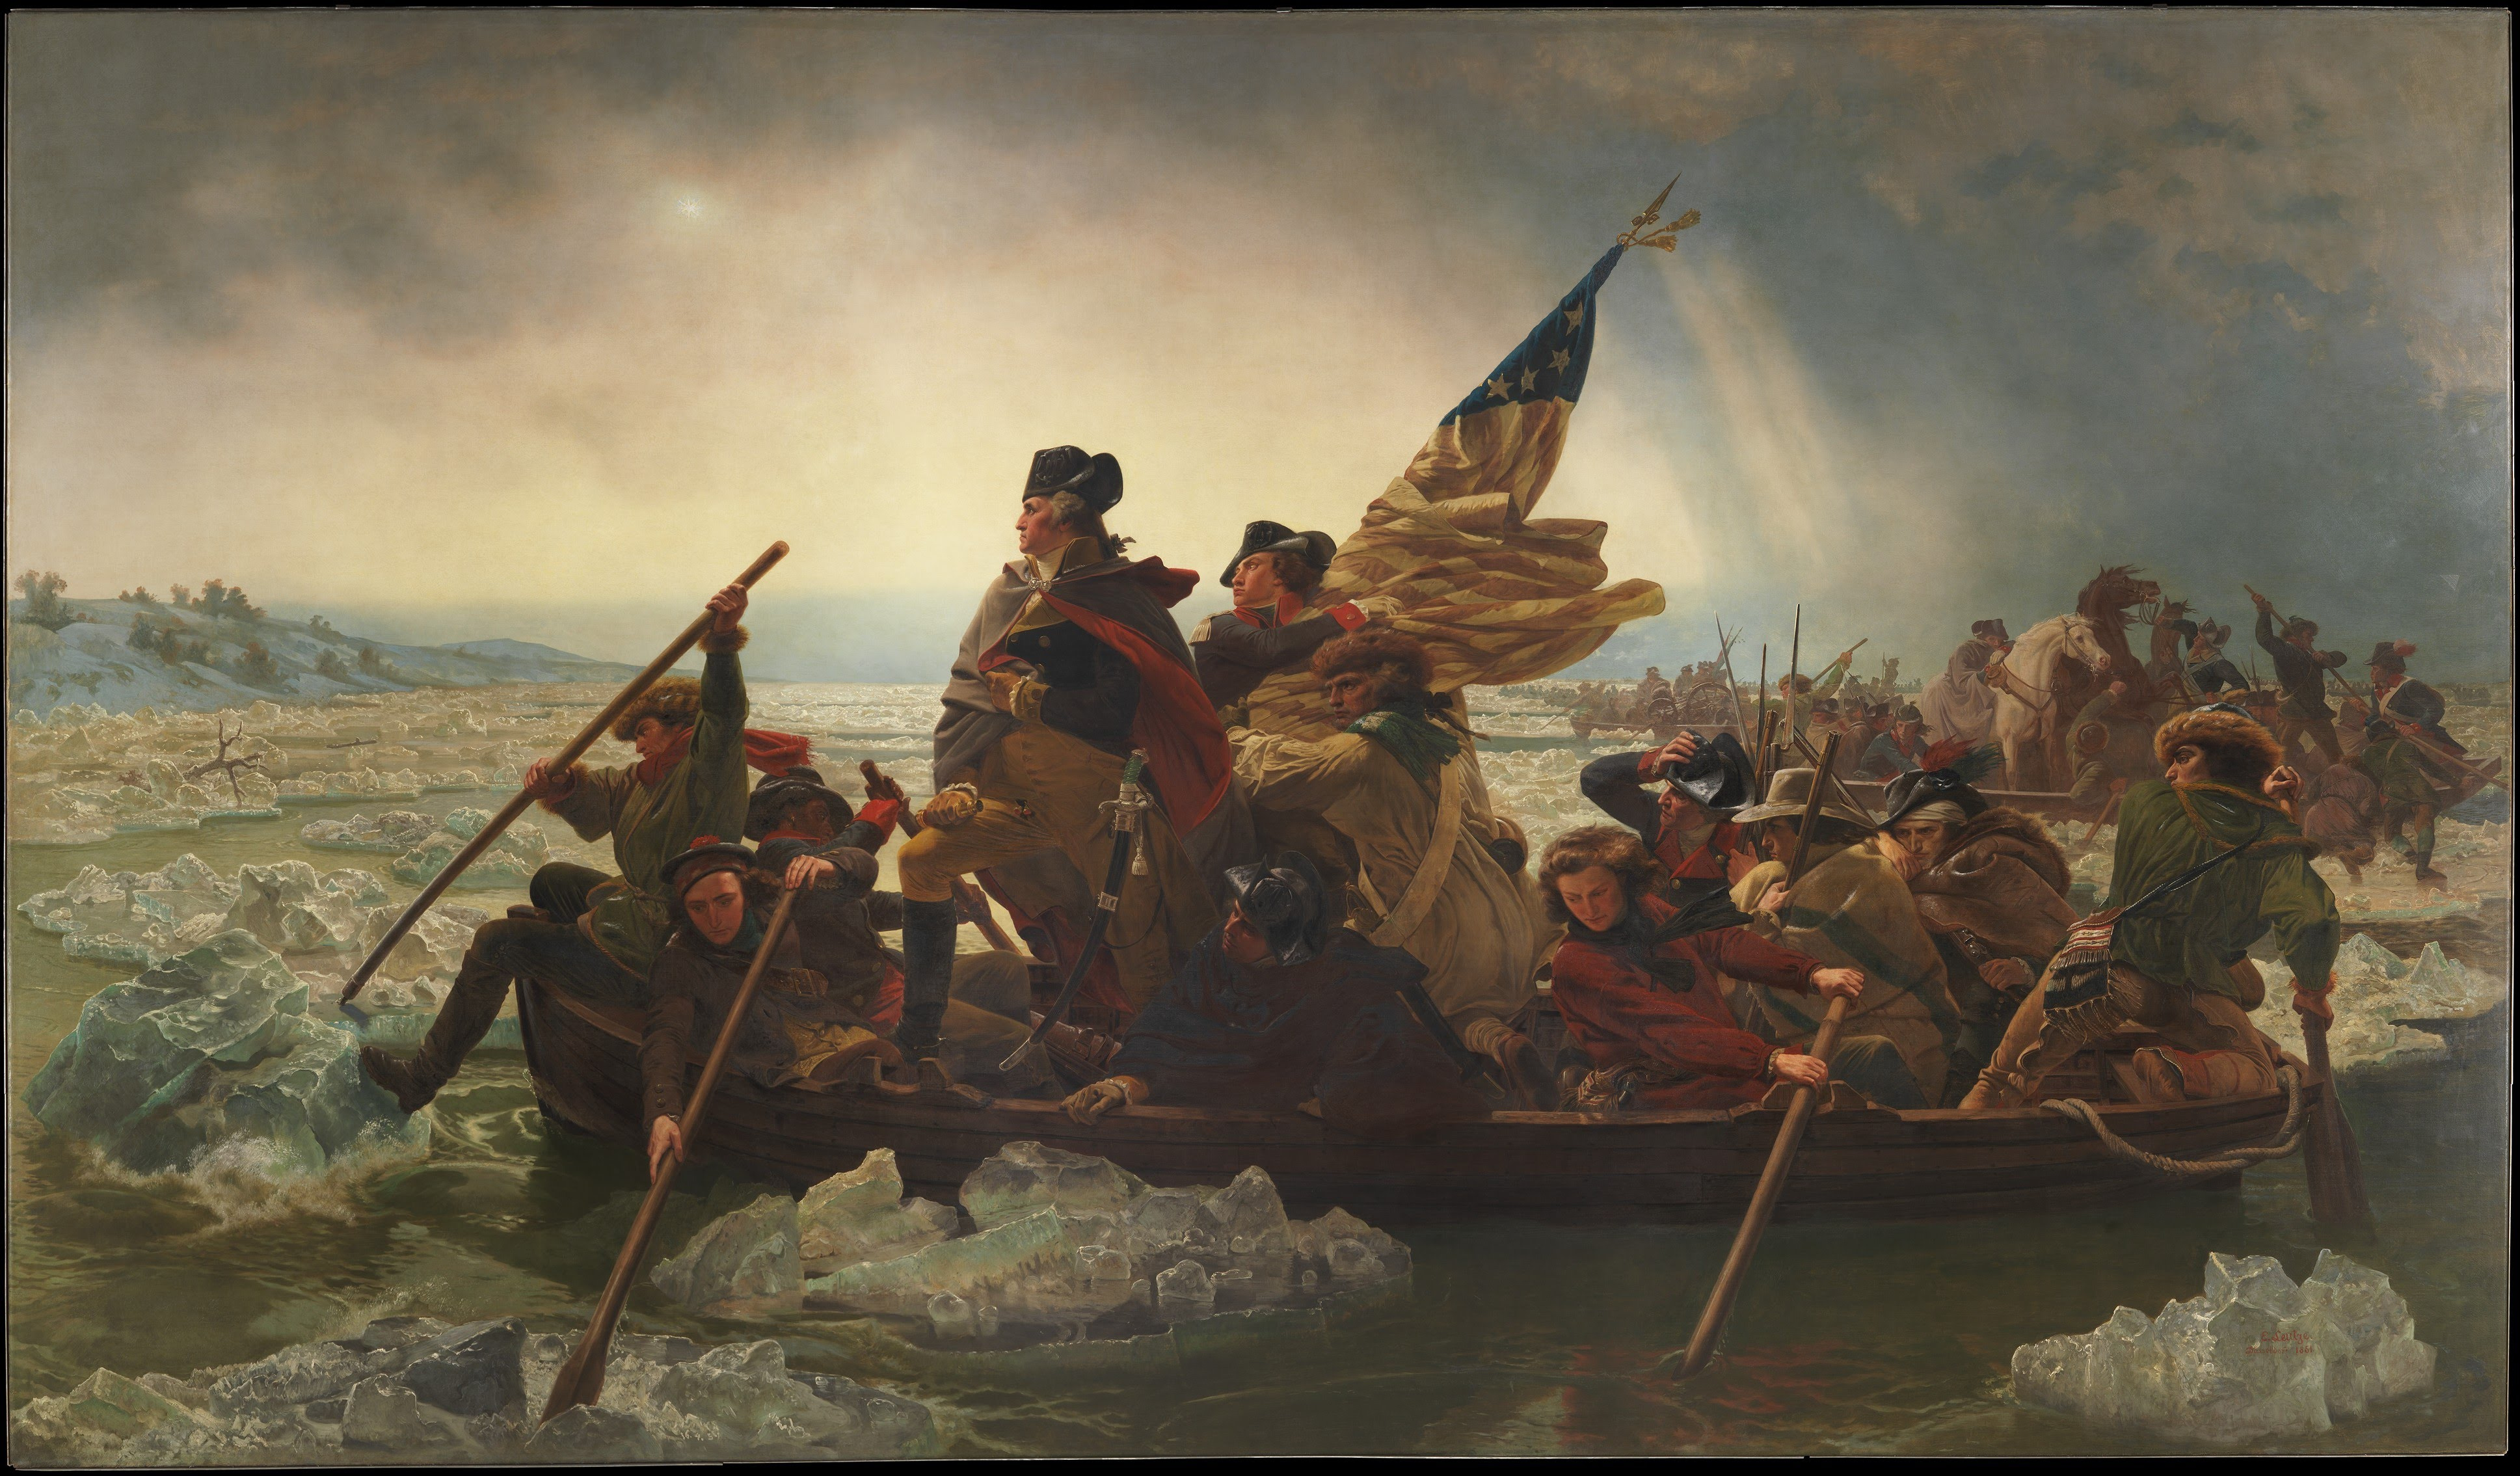
The following picture of a contemporary ferry crossing (1779) shows a typical crossing.[ii] This period ferry appears to measure about 48 feet long (without the two four-foot ramps) by eight feet wide. If one replaces the carriage in the painting with a field gun and limber then the person holding the reins would be the driver. Note the horses are in a pair; whereas, on a gun team there would be a thill horse in front of the limber and additional horse(s) in front of the thill horse.


Many of the campaigns and battles of the Revolutionary War are better understood if a study of horses was included in the analysis. Often, it was all about horses, or the lack thereof. Both General Burgoyne’s march south in the Saratoga campaign and General de Kalb’s march toward South Carolina show that the lack of horses was very important. As for the crossing of the Delaware, General Washington showed his skill in planning. More important, Washington was lucky. It was not the horses that drove the outcome but rather the bad weather and severe river conditions. These bad conditions set in place the delay that assisted the surprise attack.


[i] William S. Stryker, The Battles of Trenton and Princeton (The Riverside Press, Cambridge, 1898), 338

[ii] Camden County Historical Society, Drawing of the ferry done in 1779 in Lower Delaware River. Image retrieved https://www.living-in-the-past.com/ferry.html

Christmas Night, 1776: How Did They Cross? The Horses:

Emerging Revolutionary War welcomes guest historians Karl G. Elsea and William W. Welsch. Short bios of both historians are at the bottom of this part.

Part I:

The purpose of this article is to further investigate General George Washington’s Christmas night crossing of the Delaware River in December, 1776, with added emphasis on the role of the artillery and horses   This is the result of discussions and collaboration between the two authors.

In an earlier article published by The Journal of the American Revolution, the second author posed the question of just how difficult was the crossing.  Given the weather, the river conditions, the expertise of the crews, and available original sources, this remains an unanswerable conundrum.  However, new research is able to provide a better understanding of the challenges posed in crossing the cannons and horses.

In calculating the number of horses needed to move the artillery, authors have been initially tempted to use the numbers provided from John Muller’s Treatise on Artillery.  Muller (about 1757) wrote that “A 3 pounder requires but 1 horse, a 6 pounder 2, a 12 pounder 3 of the light [field artillery] sort.”  That quote assumed roads as they were in England and Europe, and relatively flat and firm, dry surfaces with well-fed and conditioned horses. Those conditions do not apply well for Revolutionary War America.[i]

There is a primary source that states a three-pounders was pulled by at least 2 horses. John Greenwood, a fifer in the 15th Continental, recorded “the ball … struck the fore horse that was dragging our only piece of artillery, a 3-pounder.”[ii] This was important information because a three-pounder gun could be pulled by a single horse according to Muller. Because the weather was rainy and sleety, with the ground becoming muddy, an extra horse was required. That Patriot three-pounder gun had at least two horses.

There were old expressions that give important insight into what a horse could pull. For example, “on flat, firm ground a horse or mule can pull its own weight ten hours a day, every day.” Also, “on rough ground a horse can pull half its weight with large wheels.”[iii]  While those expressions offer what a well-fed horse could accomplish, we have no way of assessing the condition of the army’s horses, given that forage was a constant problem.

There was another issue concerning horses pulling in harness. Not all of their effort can be applied to the load being pulled. If there was more than one horse pulling a gun, then they were harnessed in tandem in America. The horse between the shafts for the limber was called the thill horse. In tandem the horse in front of the thill horse only had 3/4 of its draught applied to the load. If there was a horse before that one, then only half of that horse had the draught apply to the load. If there was a fourth horse in tandem, then only 1/4 of the draught can be applied. More than four horses in tandem provided no gain in pull and might make pulling harder. For example, cresting a hill with the Fore horse on down side and the Thill horse on the rise side of the hill would result in the forces being against each other.

 There was another problem, if the ground was rough or muddy then one must reduce the draught for all the horses by half. If a horse had a rider, then that horse’s ability to pull a load was reduced by half.

A typical Colonial farm horse available for pulling battalion guns in Colonial America was probably between 14 and 15 hands tall and weighed between 850 and 1,000 pounds. Large draft horses like the Conestoga were not used on battalion guns, they were reserved for large wagons.

It seems very reasonable that each gun in Washington’s force had an extra horse added due to the conditions of the ground. With the information presented above, the following presents the math for a light six-pounder guns as used by Hamilton and Forest.

The “old” six-pounder (Armstrong design 1736) with carriage and limber and everything with which to utilize the gun weighted about 1,800 pounds. Adding 24 rounds of ready fixed ammunition adds 202 pounds for a grand total of 2002 pounds that must be pulled.[iv] The “old” six-pounder would normally be pulled by two horses according to Muller. The thill horse would provide about 1000 pounds of draught and the fore horse about 750 pounds for a total of 1750 pounds of draught with 2 horses. As the math suggests, there was a shortfall in draught (2002 vs 1750) which means that the horses would likely wear out in less than 10 hours of work. The shortfall noted could be significantly greater when the condition of the ground was considered. With the thill horse and two fore horses added as a pair, then an additional 750 pounds of draught was available (for a total of 2,500 pounds of draught). Because the army was moving by a road then the horses in front of the thill horse did not have to be in tandem and could be added as a pair. This calculation demonstrates the six-pounder likely had an additional horse. The calculations would be similar for the howitzers.  That means the six-pounders, the four-pounders, and the howitzers each had three horses and the three-pounders each had two horses.

A typical colonial period ferry (flat) designed to carry a large farm wagon to market, as would be case at McKonkey’s and Johnson’s ferries, would typically be about 48 feet long and 9 feet wide. A light six-pounder gun with three horses (fore horses in a pair) would be almost 40 feet long. Same for the 5.5-inch howitzer. The track of a six-pounder would be 4 feet, 8 inches leaving some room on the side(s). A three-pounder gun with 2 horses (thill and fore) would be about 35 feet long. With that information one can see that each gun would require a trip on the ferry, and there would be some space along the side(s) for some artillerymen and/or horses.

At least seven artillery ammunition carts had to be used – one for each artillery company. In addition, Forest’s artillery company needed an additional cart because he had two types of cannon, and thus a cart for each type of cannon. It may be that Moulder also required two ammo carts to carry adequate ammunition for his three guns. Each cart with horses would require about 24 feet, so two carts could be taken on a ferry.

Thus, Knox’s artillery would require eighteen ferry trips to move all eighteen cannons, one for each cannon and team.  Two trips required on a ferry for the four ammo carts (two carts per ferry) associated with Greene’s column (Forest, Hamilton, Bauman).  Three trips required on a ferry for the five ammo carts (two carts per ferry) associated with Sullivan’s column (Sargent, Neil, Hugg, Moulder).

CompanyNumber and Type CannonFerry Trips
ForestTwo 6-pounder guns Two 5.5-inch howitzers Two ammo carts2 2 2
HamiltonTwo 6-pounder guns One ammo cart2 1/2
BaumanThree 3-pounder guns One ammo cart3 1/2
SergeantTwo 6-pounder guns One ammo cart2 1/2
NeilTwo 3-pounder guns One ammo cart2 1/2
HuggTwo 3-pounder guns One ammo cart2 1/2
MoulderThree 4-pounder guns Two ammo carts3 1

[i] John Muller, A Treatise of Artillery the second edition (John Millan, Whitehall, London, 1768), 178.

[ii] John Greenwood, Revolutionary Services of John Greenwood of Boston and New York, 1775-1783, 40-41. “the first intimation I received of our going to fight was the firing of a 6- pound cannon at us, the ball from which struck the fore horse that was dragging our only piece of artillery a 3-pounder.” Retrieved from https://archive.org/details/revolutionaryser00gree/page/38/mode/2u

[iii] First author’s grandparents (paternal and maternal) farmed with horses in early 1900’s. Grandparent that farmed in Blue Ridge Mountain’s foothills and clay mud taught these expressions. The reader may find references to a horse pulling 1.5 times its weight on a road. That reference assumes roads with firm surfaces and includes, in its averaging of 1.5, roads with asphalt and concrete from more modern times.

[iv] Adrian B. Caruana, The Light 6-Pdr. Battalion Gun of 1776, (Alexandria Bay, NY: Museum Restoration Service, 1993), 14.

*Bios*

Karl G. Elsea graduated with a B.S. in Electrical Engineering from Va. Tech. and a MBA from UNCC. Son, daughter, and I participate in Revolutionary War reenactments. Have ridden horses most of my life. Was a coxswain in the U. S. Coast Guard and earned the Trident. Taught disadvantaged youth at a juvenile detention center. Own horses and pull a bronze four-pounder cannon and limber for living history.

William M. Welsch, a retired administrator at Montclair State University in New Jersey, is the current and founding president of the American Revolution Round Table of Richmond, and co-founder of the Congress of American Revolution Round Tables. He is a tour guide of Revolutionary War battlefields, frequent presenter and author of multiple articles on the Revolution. His interest areas include the Revolution in New Jersey, Pennsylvania and the generals of the Continental Army. Welsch served in the United States Marine Corps and is married with two daughters and five grandchildren.

Christmas 1776

In preparation for an upcoming publication by Emerging Revolutionary War’s historian Mark Maloy, I was doing some light reading about the Battles of Trenton and Princeton. That is when I came across the following quote by the late Albert Chestone;

“The great Christmas raid in 1776 would forever serve as a model of how a special
operation–or a conventional mission, for that matter–might be successfully
conducted. There are never any guarantees for success on the battlefield; but with a
little initiative and a handful of good Americans, the dynamics of war can be altered
in a single night.”

There is no doubt that the actions that followed the daring enterprise of crossing the Delaware was a turning point in the long road to independence of the American colonies. Yet, sometimes we overlook the entire operation as a fait accompli. Continue reading “Christmas 1776”

From Campaign 1776: Ten Crucial Days

Emerging Revolutionary War is pleased to share the following information from our friends at Campaign 1776 managed by the Civil War Trust. 

unnamed

“As many of you may know, this winter marks the 241st anniversary of the American victories at the battles of Trenton and Princeton. The Continental Army’s triumphs in the Ten Crucial Days campaign proved instrumental to rekindling Patriot morale and keeping the cause for American independence alive in the wake of early defeats. Continue reading “From Campaign 1776: Ten Crucial Days”

ERW Weekender: Museum of the American Revolution

On April 19, 2017, symbolic in American Revolutionary War history, the Museum of the American Revolution opened in Philadelphia, Pennsylvania. The weekend before, I had the chance, to get a “sneak peak” of the new museum.

IMG_1670
Museum of the American Revolution

I left thoroughly impressed as the museum fills in a critical need for telling this utmost important era in our nation’s history. Yet, the development of exhibits along with the myriad of learning styles and technology underscores the need in this 21st century to be approachable and inclusive to reach various levels of interest that the visitor may have.

Greeting visitors as they approach are a few murals depicting well-known scenes of the American Revolution–including the symbolic “Crossing of the Delaware” and the “Signing of the Declaration of the Declaration.” Along with one of the most important sections of the Declaration of Independence.IMG_1651 (1)

After entering the museum the exhibit area is on the second floor, beginning with the build-up to the war and ending with a nod to the upholding of the revolutionary ideals. Broken up into four segments, the exhibits cover the period of the “Road to Independence” from 1760-1775, “The Darkest Hour” 1776-1778, “A Revolutionary War” 1778-1783, and ending with “A New Nation” 1783 to present-day. A must-see is the short 15-minute film that is centered on George Washington’s command tent, which is shown behind the screen at the conclusion of the film.

Yet, do not shirk the exhibits, which include the a portion of the last remaining “Liberty Tree” from Annapolis, Maryland that fell during a hurricane a few years back. Small movie theaters dot the exhibit area depicting different aspects of the war and history. The Oneida Native Americans, the first allies of the United States are also prominently–and rightfully–highlighted as to their contributions.

IMG_1661
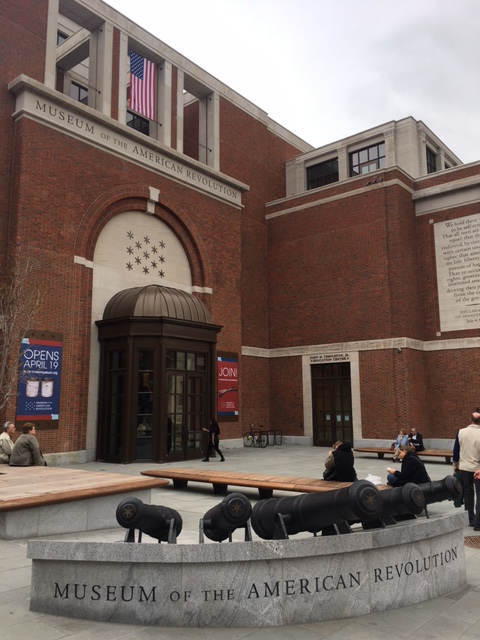
Another of the interesting components of the museum is the use of interpretive questions, including “Why were they called Hessians?” with an accompanying multi-dimensional map that shows the different German principalities that contributed troops to the British war effort. Another interesting panel discusses the first use of acronym “USA.”

The museum’s display collection of artifacts is also truly amazing. From a few of the first flags carried by units in the war, to the aforementioned “Liberty Tree”, to a portion of the famous North Bridge, in Concord, Massachusetts.

Combined with the interactive displays, the chance to walk onto a privateer ship, and the assortment of artifacts on display, the museum exhibit area caters to all levels of enthusiasts and can definitely absorb a few hours of your time.

IMG_1653
North Bridge segment

With the museum main attractions situated on the second floor, the first floor of the museum is free to house the orientation film, a cafe, and the gift shop. If you have never been to Philadelphia, the museum is another highlight to add to your bucket list itinerary. If you have ventured to the “City of Brotherly Love” before, the museum provides an excellent reason to journey back.

For information on the museum, including programs, exhibits, and the admission fee, click here.

The Greatest Leaders of the American Revolution You Have Never Heard Of

A fisherman by trade before the war, the savior of the American Continental Army during the war on two occasions, and returned to civilian life with personal, physical, and economic hardships because of the war.

John Glover
John Glover

That one line could simply sum up John Glover of Marblehead, Massachusetts. Unfortunately, Glover has received scant attention; a few lines here, a page in this publication, or a reference in passing when talking about the engagements around New York or the Crossing of the Delaware.

Daniel Glover is more than well deserving of the epithet, “one of the greatest leaders of the American Revolution you have never heard of.”

Born on November 5, 1732 in what is now Danvers, Massachusetts, where he lived until the death of his father when he was just four years old. His mother Tabitha Bacon Glover moved young Daniel to Marblehead, on the coast of Massachusetts where he would apprentice, when he came of age, as a shoemaker. He eventually looked toward the sea and made a living as a merchant.

Daniel became well-entrenched in Marblehead society, he joined the local militia in 1759 and entered politics, aligning himself with the Whig party in 1760. By the time of the first shots on the Green of Lexington and the North Bridge at Concord, Glover was a colonel of militia in the Marblehead Regiment.

Although his regiment made the march to Boston and took part in the siege, Glover was away on detached duty when the Battle of Bunker (Breed’s Hill) was fought. When George Washington rode into Cambridge, Massachusetts and assumed command of the American forces, Glover lost his headquarters. A product of Glover’s fine taste, the Marblehead sailor had picked the home of a loyalist as his own command post. Washington chose the mansion, which now is a national historic site, as his own. Yet, a company of Glover’s Marblehead soldiers was also chosen to be the guard of Washington’s new headquarters.

Showing his importance and marshaling his background in shipping, Glover donated one of his own ships, the Hannah, named after his spouse, to build a hodgepodge navy for use by the Americans. One of the ships that made this volunteer navy actually captured a British ship, the brig HMS Nancy in which held as its cargo, 2,000 muskets, 30,000 rounds of artillery ammunition, and one brass mortar amongst other crucial military supplies much in need by Washington’s army.

After the siege of Boston was lifted with the evacuation of the British, Glover, with the rest of the Continental Army, headed south to New York City where another campaign and another chance to show his worth to the cause awaited.

On the night of August 29 and into the early morning hours of August 30, Colonel Glover and his able Marblehead regiment sailed the majority of Washington’s forces from Brooklyn across the East River to safety. Altogether, approximately 9,000 soldiers, plus artillery and supplies escaped from under British General Sir William Howe’s command. With Marylanders under Lord William Stirling launching ferocious rear-guard suicidal charges, Glover’s men saved Washington’s army that late August night.

A month and a half later, on October 18th, Glover’s Brigade of Massachusetts soldiers held off a large contingent of British and Hessian mercenaries as Washington’s army retreated to safety. With approximately 750 men at his disposal, Glover’s rearguard action held over 4,000 enemy soldiers from threatening the retreat of the American forces.

glover rock
Glover’s Rock, commemorating the action at Pell’s Point

Showing his humility, Glover would write about seeing the enemy come ashore before the engagement at Pell’s Point, that his first inkling was to give “a thousand worlds to have General [Charles] Lee or some other experienced officer present.” Luckily for the Americans, Glover did not get his wish and led admirably.

Glover’s command stuck with Washington’s forces during their retreat across New Jersey and into Pennsylvania and eventually to the banks of the Delaware River. In the prelude to the pivotal “Crossing of the Delaware” the former Marblehead sailors and their 43-year old commander would prove crucial.

To complete the surprise, Washington had to get his men across the ice-clogged Delaware River and to Trenton, New Jersey. Washington laid his eyes on Glover and outlined his thoughts and the big issue at hand; how to ferry his men across?

The response to his commander in chief was simple; to “not be troubled about that, as his boys could manage it.” Another primary account said that Glover and his command showed “perseverance…accomplished what at first seemed impossible.”

With Washington’s daring plan and Glover’s practicality, the “impossible” happened and the Americans scored a cause rallying victory at Trenton on December 26, 1776 and another equally important victory at Princeton, New Jersey on January 3, 1777.

After these winter battles, Glover went home to care for his gravely ill wife, Hannah, but there was nothing he could do. After a year long struggle, Hannah died on November 13, 1778 leaving John with eight children, including the oldest John who was a captain in his father’s Marblehead regiment.

While at home, George Washington petitioned the Continental Congress to promote Glover to brigadier general. Congress agreed and on February 21, 1777 the former Marblehead merchant became a general in the Continental Army.

When Glover returned to active duty, he was given the task of escorting the British and Hessian prisoners captured at the Battle of Saratoga and also took part in the unsuccessful attempt to expel the British from Newport, Rhode Island in 1778.

The end of the war saw him still in service in the Hudson Highlands where most notably he was on the board of officers that sentenced British spy Major John Andre to death. At the very end of the war, on September 30, 1783, Glover received a brevet to major general.

800px-Glover-statue Boston
John Glover Statue Commonwealth Avenue, Boston

With the war over, Glover and his second wife, Francis Fosdick resided in Marblehead. However, Glover’s health and family were devastated by the war. Glover’s health was impaired by years of hard campaigning, including struggling with malaria in 1777. He lost his first wife Hannah during the war and his oldest son, John, disappeared as a prisoner-of-war while being transported over the Atlantic Ocean. Even his pre-war career, as a merchant, was greatly impacted by the seven-year conflict.

Glover rebounded as best he could and did serve in a few political positions, including in the Massachusetts State Legislature and as a Selectman for Marblehead.  One highlight of the post-war years was when President George Washington stopped over in Marblehead and was entertained by his former subordinate.

On January 30, 1797, Glover passed away from hepatitis at the age of 64 and became one of the greatest leaders of the American Revolution you have never heard of.


James Monroe at the Battle of Trenton

Washington Crossing the Delaware, by Emanuel Gottlieb Leutze The Metropolitan Museum of Art, http://www.metmuseum.org
Washington Crossing the Delaware, by Emanuel Gottlieb Leutze
The Metropolitan Museum of Art, http://www.metmuseum.org

One of the iconic images of the Revolutionary War is Emanuel Gottlieb Leutze’s 1851 painting, Washington Crossing the Delaware.  It is the night of December 25, 1776.  The Continental Army is being transported across the Delaware River to attack a Hessian garrison at Trenton, New Jersey, some nine miles to the south.  In the foreground, anonymous men (and possibly one woman) of varying nationalities and races row an overloaded boat across the river, pushing great slabs of ice out of the way.  Two of the boat’s occupants are not anonymous: General George Washington, standing resolutely near the bow, and young Lieutenant James Monroe, holding the stars and stripes.

Leutze’s painting is glorious–and wrong in almost every detail.  The river resembles the Rhine more than the Delaware; the boat is too small and of inaccurate design; there is too much light for what was a night crossing; Washington did not cross standing up; the stars and stripes had not yet been adopted by the Continental Congress; and James Monroe was not holding the flag, not in the boat, and not even present with the army.

He was already across the river, and he was busy.

Washington’s plan for a surprise attack on Trenton was a risky attempt to reverse the sagging fortunes of the Patriot cause. During the summer of 1776 British forces, including Hessian mercenaries, had driven the Continental Army from New York across New Jersey and into Buck’s County, Pennsylvania.  Expired enlistments and outright desertion had thinned the American ranks, and many of those who remained were despondent.  Washington gambled that a successful attack against an isolated British outpost would boost the army’s morale and stiffen the resolve of Congress and the people.

Three Hessian regiments, comprising about 1,400 men, were stationed at Trenton under the command of Colonel Johann Rall (also spelled Rahl).  Washington planned to bring 2,400 Continental soldiers across the river overnight at McKonkey’s Ferry, march to Trenton, and attack before dawn.  Two other elements of the army were part of the plan.  A 1,900-man force under Colonel John Cadwalader would make a diversionary attack against British troops at Bordentown, New Jersey.  General James Ewing would lead 700 men across the Delaware at Trenton Ferry, control the bridge over Assunpink Creek, and intercept any Hessian troops retreating from Trenton.  Bad weather prevented both of these deployments, meaning that everything would depend on the main body’s effort.  The army’s password for the evening was “Victory or Death.”

Washington’s plan included sending a small detachment of troops over the Delaware first to secure the army’s route of march.  James Monroe was with this contingent.  In his autobiography (written in the third person late in life and not completed before his death), Monroe described the mission:

The command of the vanguard, consisting of 50 men, was given to Captain William Washington, of the Third Virginia Regiment . . . Lieutenant Monroe promptly offered his services to act as a subaltern under him, which was promptly accepted.  On the 25th of December, 1776, they passed the Delaware in front of the army, in the dusk of the evening, at [McKonkey’s] ferry, 10 miles above Trenton, and hastened to a point, about one and one-half miles from it, at which the road by which they descended intersected that which led from Trenton to Princeton, for the purpose, in obedience of orders, of cutting off all communication between them and from the country to Trenton.

Monroe noted that the night was “tempestuous,” and that snow was falling.  While manning their post, the detachment was accosted by a local resident who thought the Continentals were British troops.  Describing the incident many years later at a White House dinner during his presidency, Monroe recalled that the man, whose name was John Riker, was “determined in his manner and very profane.”  Upon learning that the soldiers were Americans, he brought food from his house and said to Monroe, “I know something is to be done, and I am going with you.  I am a doctor, and I may help some poor fellow.”  Dr. Riker proved remarkably prescient.

Battle of Trenton map courtesy George Washington’s Mount Vernon

The main army’s river crossing and march to Trenton took longer than planned, meaning that the attack would occur well after sunup.  Outside the town Washington divided his force, sending a division commanded by Major General Nathaniel Greene to attack from the north while the other, led by Major General John Sullivan, attacked from the south.  At 8:00 AM the assault began, and here we return to Monroe’s account from his autobiography:

Captain Washington then moved forward with the vanguard in front, attacked the enemy’s picket, shot down the commanding officer, and drove it before him.  A general alarm then took place among the troops in town.  The drums were beat to arms, and two cannon were placed in the main street to bear on the head of our column as it entered.  Captain Washington rushed forward, attacked, and put the troops around the cannon to flight, and took possession of them. Moving on afterwards, he received a severe wound and was taken from the field. The command then devolved upon Lieutenant Monroe, who attacked in like manner at the head of the corps, and was shot down by a musket ball which passed through his breast and shoulder. He was also carried from the field.

The Capture of the Hessians at Trenton December 26 1776, by John Trumbull (Yale University Art Gallery) (James Monroe lies wounded on the ground at left center)
The Capture of the Hessians at Trenton December 26 1776, by John Trumbull (Yale University Art Gallery)
(James Monroe lies wounded on the ground at left center)

Monroe was brought to the same room where William Washington lay, and their wounds were dressed by the army’s surgeon general and Dr. John Riker.  Riker’s prediction of helping “some poor fellow” came true as he repaired a damaged artery in Monroe’s shoulder. What neither man realized at the time was that the intrepid physician had saved the life of a future president.

George Washington’s gamble in initiating the Battle of Trenton paid off.  The victory was complete, and came at a surprisingly small cost in terms of American casualties.  Two enlisted men froze to death during the nighttime march, and two were wounded in combat.  The only losses among officers were the nonfatal wounds sustained by William Washington and James Monroe.  Washington followed up his success at Trenton with another at Princeton on January 3, 1777, where the Continental Army proved that it could prevail over regular British troops.

The best commentary upon James Monroe’s performance at Trenton, and his Revolutionary War service generally, comes from no less an authority than George Washington.  Writing to an acquaintance in 1779, Washington noted Monroe’s “zeal he discovered by entering the service at an early period, the character he supported in his regiment, and the manner in which he distinguished himself at Trenton, where he received a wound.”  The general concluded that James Monroe had “in every instance maintained the reputation of a brave, active, and sensible officer.”

Scott H. Harris is the Executive Directors of the James Monroe Museum in Fredericksburg, Virginia. Harris became director of the James Monroe Museum and Memorial Library in July 2011, following ten years as director of the New Market Battlefield State Historical Park (administered by Virginia Military Institute).  From 1988 to 2001, Scott was the first curator of the Manassas Museum and later director of historic resources for the City of Manassas, Virginia.  Prior to his work in Manassas, he was a consulting historian with the Association for the Preservation of Virginia Antiquities in Richmond and an historical interpreter with the Colonial Williamsburg Foundation.  He has been a board member of the New Market Area Chamber of Commerce, Prince William County/Manassas Convention and Visitors Bureau, Shenandoah Valley Travel Association, and Virginia Civil War Trails, Inc.  He is a past president of the Virginia Association of Museums and serves as a peer reviewer for the Museum Assessment and Accreditation programs of the American Association of Museums.

Scott received his BA with honors in History and Historic Preservation from the University of Mary Washington in 1983.  In 1988, he received an MA in History and Museum Administration from the College of William and Mary. Scott is also a graduate of the Seminar for Historical Administration, the nation’s oldest advanced museum professional development program.

James Monroe at War

RevWarWednesdays-header


Part One

Emerging Revolutionary War is honored to welcome guest historian Scott H. Harris, Director of the James Monroe Museum.

It is one of the great exploits of the American Revolution.  On the night of December 25, 1776, General George Washington led the Continental Army across the icy Delaware River to attack a Hessian garrison at Trenton, New Jersey.  Young Lieutenant James Monroe held the flag behind Washington as they were rowed across the freezing river (standing up).

Emanuel Gottlieb Leutze, Washington Crossing the Delaware.  Oil on canvas, 1851.  Only two figures in this fictitious image are identified—General George Washington and Lieutenant James Monroe (holding flag).
Emanuel Gottlieb Leutze, Washington Crossing the Delaware. Oil on canvas, 1851. Only two figures in this fictitious image are identified—General George Washington and Lieutenant James Monroe (holding flag).


Except, that’s not what happened.

Continue reading “James Monroe at War”