I was recently reading the superb book by Patrick O’Donnell on Washington’s Immortals, which brought me back to a talk I did about the same Marylanders in the American Revolution a few years back. Below is an excerpt of that talk and highlights the second last stand for a regiment with a tradition of being steadfast when deadly duty called.
On March 15, 1781, approximately 20 men stood in the 1st Maryland Continental Regiment staring at the an eerie and familiar scene. It must have seemed that history was cruelly repeating itself once again. These men had survived the forlorn assault in New York in 1776, the ugly repulse at Camden in 1780, and now stood on third line of General Nathanael Greene’s defense at Guilford Court House.
Famous painting of the 1st Maryland at the Battle of Guilford Court House by H. CHarles McBarron, Jr.
Besides the 20 men who could be traced back to that fateful day in New York, the men that shouldered muskets in line with them were all veterans of indefinite periods of service as well.
The 1st Maryland and the men they confronted, 2nd Guards Battalion of Guards, were very similar, according to historian Lawrence Babits, who states that “the 1st Maryland was arguably one of the finest regiments produced by the Continental Army.
What ensued next was the defining moment of the battle and in essence the campaign. As the Guards officers gathered their men into a new line, the Marylanders came on at a rush. The Guards responded largely without specific commands…facing the oncoming Continentals, who fired several platoon volleys as they came. At a range of less than 12 yards, both lines fired again, so close that muzzle flashes overlapped into a wide sheet of flame and the heat from the volley could be felt.
Casualties mounted and at close range the musket balls shattered bone and even passed through the bodies of their targets.
Modern view from the location of Greene’s Third Line which the 1st Maryland held. Coming up the slight rise toward the photo was how the British approached.
The two sides then resorted to the bayonet and Williams recounted “the first Regiment embraced the opportunity…bayoneted and cut to pieces a great number of the British.”
Although the melee only lasted a few minutes, the Marylanders had checked the advance and with the dragoons of William Washington, allowed for Greene to begin to pull back and start the retreat. In another important position, Williams helped lead the rear-guard away from Guilford C.H. The Marylanders lost 15 killed, 42 wounded and 97 missing. Most of the missing could have came from the 2nd Maryland which broke in disorder on the left flank of the 1st Maryland.
Not only did the Marylanders suffer on that fateful March day in 1781, they did so with a lack of, well, everything. According to one inventory report, the entire regiment, numbering little over 300 men had not a single jacket, two-thirds were without proper footwear, and every man was destitute of a full complement of clothing. In addition, the men had served, fought courageously, and bled tremendously, without receiving one cent as pay.
A remarkable “band of brothers” that “held the line for independence.”
Which, in case you were wondering, was the name of the talk.
*Guilford Court House National Military Park is now preserved by the National Park Service, to plan your visit, click here.
*For information on Mr. O’Donnell’s book, click here.
Emerging Revolutionary War is honored to welcome guest historian Zach Whitlow. Zach’s biography is at the bottom of this post.
August marks the 202nd anniversary of the Burning of Washington. On the heels of their astounding victory at Bladensburg, a British incursionary force under Major General Robert Ross and Rear Admiral George Cockburn occupied the American capital for about 24 hours on August 24th & 25th, 1814. Besides a small ambush at the Sewall House on Capitol Hill, in which two corporals and General Ross’ horse was killed, the British encountered no resistance in the city whatsoever. The Union Jack was triumphantly raised: Washington had fallen. Soon it would burn.
The burned out shell of the White House following the British occupation of Washington. (The President’s House, by George Munger, 1814-1815)
What followed were events that literally burned themselves into the American psyche. To remember this bleak moment in history, rangers from the National Mall & Memorial Parks are leading a series of walking tours in the month of August. Beginning at the newly designated Belmont-Paul Women’s Equality National Monument (the site of the ambush), visitors walk a total of 2.5 miles and retrace the British advance down Pennsylvania Avenue. Through the program, the rangers will sift through the modern paved environment and tell the stories of long gone places, such as the newspaper offices of the National Intelligencer and Barbara Suter’s tavern. The tour will also feature some of the surviving remnants of that time, such as the Octagon Museum.
The walking tour begins at Belmont-Paul Women’s Equality National Monument (144 Constitution Ave NE, Washington, DC 20002) every Saturday in August at 3:00 pm. There will also be programs on Wednesday, August 24th and Thursday, August 25th at 3:00 pm. Please bring comfortable shoes and plenty of drinking water.
*Zach Whitlow has an M.A. in Museum Studies from the George Washington University, a B.A. in History from California State University, Long Beach, and three A.A. degrees from Fullerton College. A lifelong historian, he currently works for the National Park Service at the National Mall & Memorial Parks in Washington, DC and the Office of Historic Alexandria in Alexandria, VA. Prior to this, Zach worked at the National Archives, George Washington’s Mount Vernon, and the Queen Mary in Long Beach, CA. He currently lives in Alexandria, VA with his girlfriend Teresa and their two cats, Max and Lizzie.
At the end of last month and the beginning of this, I was in Britain marking the centennial of the Battle of Jutland, World War I’s largest naval battle. My great-grandfather was there as part of the Royal Navy, and it was meaningful in the extreme for me to be present at the commemorations.
The National Museum of the Royal Navy interpreted Jutland as “The Battle that Won the War,” and based its argument on the fact that the battle’s outcome led directly to German resumption of unrestricted submarine warfare, which in turn brought the United States into the war, with all the resulting titanic effects. In other words, a naval battle which didn’t feature a single American had a profound impact on U.S. history.
If that sounds familiar to Revolutionary War scholars, that’s because the same description applies to the 1781 Battle of the Virginia Capes. Let me explain.
On Wednesday, June 8, a signing ceremony marked the beginning of an agreement between First Parish in Concord, owner of the Wright Tavern, and the Concord Museum. Starting this fall, the Concord Museum will provide educational programming to school groups in the Wright Tavern and open the historic building to the public for commemorative events in October and April each year. On hand for the signing were representatives of the Concord Museum and First Parish as well as members of the Wright Tavern Exploratory Committee (WTEC), appointed last fall to develop a sustainable, strategic plan to showcase the Wright Tavern as a National Historic Landmark.
Plaque on the Wright Tavern (ERW collection photo)
“Opening the historic Wright Tavern to public and educational access will provide a true sense of place when learning about the historical events of the American Revolution,” said Mel Bernstein, member of WTEC and Chairman of the American Revolution Round Table of the Minute Man National Historical Park.
No building in this historic community was of greater consequence to the beginnings of the American Revolution than the Wright Tavern, built in 1747. The First Provincial Congress met in Concord at the Wright Tavern in October 1774, electing John Hancock as the Congress’s president and making provision for the collection of taxes. The Second Provincial Congress met there again in March and April 1775. Presided over by John Hancock with Samuel Adams and Dr. Joseph Warren in attendance, the Provincial Congress met in defiance of Royal and Parliamentary authority — creating a Massachusetts army, raising taxes, and performing other roles necessary to form its own government, independent of British authority. Then, in the early hours of April 19, 1775, Concord’s Minute Men assembled in the Wright Tavern before setting off to repel the advancing British troops at the North Bridge.
Since 1886, First Parish in Concord has owned and maintained this historic structure. “The Wright Tavern is certainly one of the most important Revolutionary War-era buildings in Concord,” explained Tim Jacoby, Chair of the First Parish Trustees of Parish Donations. “Although the building is owned by the church, we truly feel it belongs to the people of Concord and to the American people. This agreement with the Concord Museum will establish greater public accessibility to the Tavern.”
In 1961, the Wright Tavern was designated a National Historic Landmark by U.S. Secretary Fred Seaton, declaring it “an historical site of exceptional value in commemorating and illustrating the history of the United States.”
Margaret Burke, Executive Director of the Concord Museum, said: “The Museum is thrilled with this partnership to bring the importance of the Wright Tavern to the fore. Concord is home to invaluable historical and cultural resources, and this is a wonderful example of how organizations within the town are working together to promote this history and make it relevant to residents and visitors.”
Leah Walczak, the Concord Museum’s Director of Education and Public Programs, explained the role the Wright Tavern will play in educating visiting school groups: “The Museum currently provides specialized programming to over 10,000 school children each year. Along with hands-on history education using objects from the Museum’s collections, this agreement will allow us to provide programs within the setting of one of the finest historic buildings in Concord.”
This partnership was brought about through the work of the Wright Tavern Exploratory Committee, which convened from September 2015 through January 2016. Members included: John Boynton, Chair of the Exploratory Committee and a First Parish Trustee; Doug Baker, Sacristan and Curator of First Parish; Mel Bernstein, Chair of the American Revolution Round Table of Minute Man National Historical Park; Jim Cunningham, Project Manager for Barrett Farm Restoration, and Treasurer of Save Our Heritage; Sue Gladstone, Director of Development for the Concord Museum; Jayne Gordon, Public Historian for Robbins House, Thoreau Farm, and the Concord Museum; Tim Jacoby, Chair of the First Parish Trustees; Bob Morris, Chair of the Friends of Minute Man National Historical Park; and Tom Wilson, First Parish Treasurer.
A generous gift to the Museum from John and Johanna Boynton is funding this historic partnership.
*About the Concord Museum The Concord Museum is where all of Concord’s remarkable past is brought to life through an inspiring collection of historical, literary, and decorative arts treasures. Renowned for the 1775 Revere lantern and Henry Thoreau’s Walden desk, the Concord Museum is home to a nationally significant collection of American decorative arts, including clocks, furniture, and silver. Founded in 1886, the Museum is a gateway to historic Concord for visitors from around the world and a vital cultural resource for the town and the region. Visit www.concordmuseum.org.*
*For More Information, contact:
Barbara Rhines, Director of Marketing and Public Relations
978-369-9763, ext. 229
Email: brhines@concordmuseum.org
Brig. Gen. Daniel Morgan, the “Old Wagoner,” as he was known, commanded a light infantry corps assigned to Maj. Gen. Nathanael Greene’s southern army. Morgan met with Greene in Charlotte, North Carolina on December 3, 1780. Implementing a Fabian strategy, Greene split his army to harass the British while buying time to recruit additional soldiers. Greene ordered Morgan to use his 600-man command to forage and harass the enemy in the back country of South Carolina while avoiding battle with Lt. Gen. Charles Lord Cornwallis’ British army.
Once Cornwallis realized what was going on he dispatched Lt. Col. Banastre Tarleton’s British Legion to track down Morgan’s command and bring it to battle. Tarleton commanded a combined force of Loyalist American troops. The Legion consisted of fast-marching light infantry and dragoon units. At its peak strength, the Legion numbered approximately 200 infantry and 250 dragoons. It was known for its rapid movements and for its ruthless policy of giving the enemy no quarter. Patriot forces feared Tarleton and his Legion, and for good reason.
By January 12, Tarleton’s scouts had located Morgan’s army in the South Carolina back country, and Tarleton began an aggressive pursuit. Morgan hastily retreated to a position at the Cowpens, a prominent crossroads and pasturing grounds for cattle. The field was about 500 yards long and about as wide, dotted with trees, but devoid of undergrowth, which served as a food source for grazing battle.
Once Morgan learned that Tarleton was pursuing him, he spread the word for local militia units to rendezvous with him at the Cowpens. Through the night, South Carolina militiamen drifted into camp. Morgan visited their camps, encouraging them to stand and fight. Morgan’s words were particularly effective; the grizzled veteran knew how to motivate these men. They would need to be prepared, because they faced a stern task the next day.
January 17, 1781 dawned clear and very cold. After his scouts reported Tarleton’s approach, Morgan rode among his men, crying out, “Boys, get up! Benny’s coming!” Morgan designed a defense in depth that was intended to draw the British Legion in and then defeat them by pouncing on their exposed flanks. He knew that his militia had a reputation of being unreliable, and his ability to maneuver was limited, so he elected to design and implement a defense in depth that took advantage of the terrain features of the Cowpens.
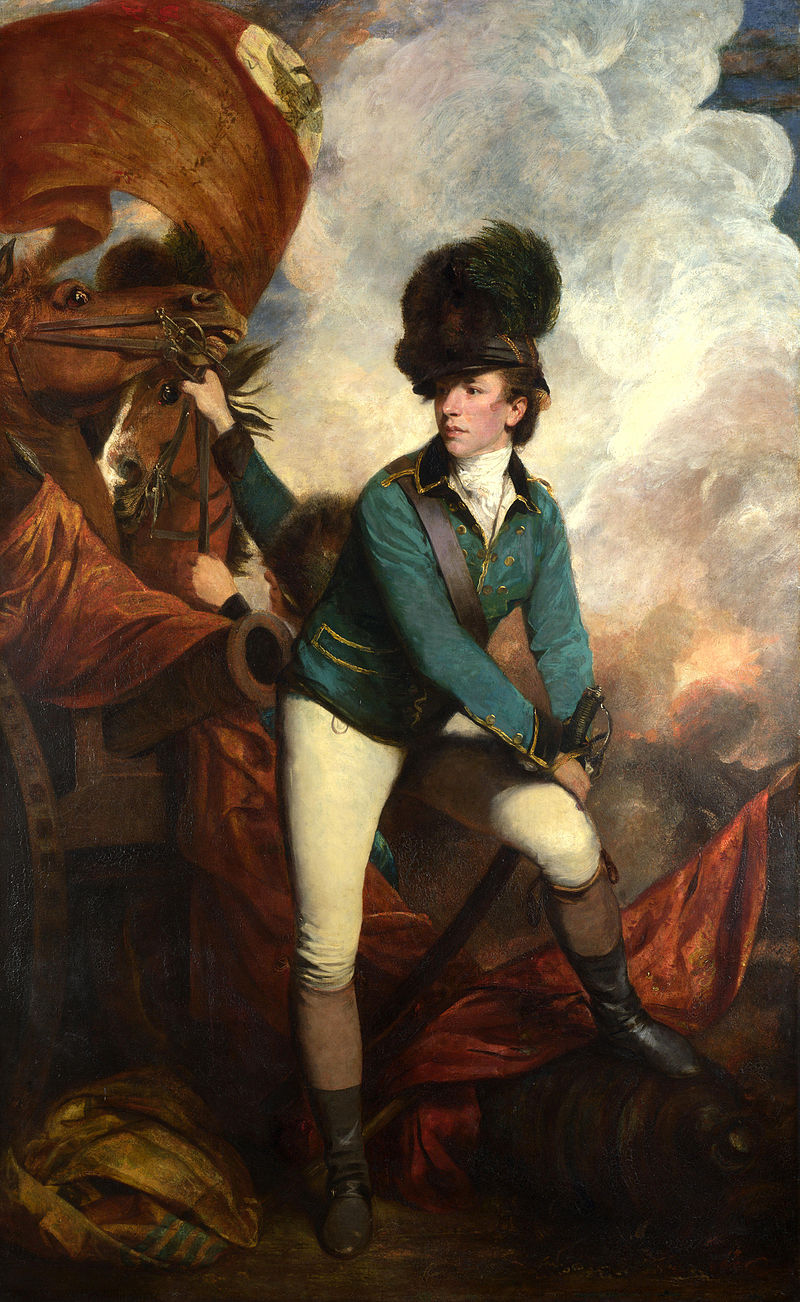
Banastre Tartleton, British commander at Cowpens
Tarleton was overconfident. He believed that Morgan’s command was hemmed in by the nearby Broad River and also believed that the cleared fields of the Cowpens were ideal ground for his dragoons, and concluded that Morgan must be desperate to fight in such a place.
Morgan had prepared three defensive positions. Selected sharpshooters out front and hiding behind trees manned the first line. They picked off a number of Tarleton’s dragoons as they advance, specifically targeting officers. Traditional accounts indicate that they downed 15 of Tarleton’s dragoons this way. Confused, the dragoons retreated.
Having accomplished their initial goal, the sharpshooters then fell back about 150 yards or so to join the second line, which consisted of Brig. Gen. Andrew Pickens’ militiamen. Morgan asked these men to stand long enough to fire two volleys, after which they were to fall back to the third—and main line—manned by Col. John Eager Howard’s Continentals, another 150 yards or so in the rear of the second line. Thus, Morgan had designed a textbook example of a defense in depth.
Andrew Pickens, commanded some of the South Carolina militia at Cowpens
Some of the militia got off two volleys and then most of the militia fell back to a spot behind the third line. Tarleton orders his dragoons to pursue the retreating militiamen, and as the dragoons bore down on them with their sabres drawn, Col. William Washington’s Continental cavalry suddenly thundered onto the field, seemingly from nowhere. They routed the surprised Loyalist dragoons, who fled the field with heavy losses.
The infantry then engaged. With their drums beating and their fifes shrilling, the British infantry advanced at a trot. Recognizing that the moment of crisis had arrived, Morgan cheered his men on, rode to the front and rallied the militia, crying out, “form, form, my brave fellows! Old Morgan was never beaten!”
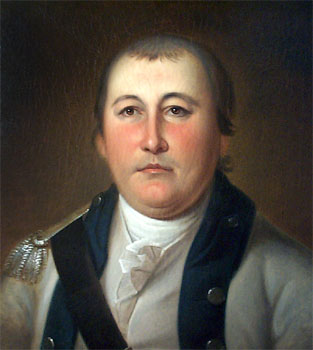
William Washington, commander of American cavalry at Cowpens and a distant relation to George Washington
Tarleton’s 71st Highlanders, a veteran unit made of Scotsmen, which had been held in reserved, now charged the Continental line, their skirling bagpipes adding to the cacophony of battle. Howard ordered his right flank to face slight right to counter a charge from that direction, but in the noise and chaos, was misunderstood as a call to retreat. As other companies along the line began to pull out, Morgan rode up to ask Howard if he had been beaten. Howard pointed at the orderly ranks of his retreat and assured Morgan that they had not been beaten. Morgan then put spurs to his horse and ordered the retreating units to face about and, on his order, to fire in unison. Their deadly volley dropped numerous British soldiers, who, sensing victory, had broken ranks in a determined charge. The combination of this volley and a determined bayonet charge by the Continentals turned the tide of battle in favor of the Americans.
At the moment, the rallied and re-formed militia and Washington’s cavalry attacked, leading to a double envelopment of the British, who began surrendering in masses. Tarleton and some his men fought on, but others refused to obey orders and fled the field in a panic. Finally, Tarleton realized that he had been badly beaten and fled down the Green River Toad with a handful of his men. Racing ahead of his cavalry, William Washington dashed forward and engaged Tarleton and two of his officers in hand-to-hand combat. Only a well-timed pistol shot by his young bugler saved Washington from the upraised saber of one of the British officers. Tarleton and his remaining forces escaped and galloped off to Cornwallis’ camp to report the bad news.
And bad news it was: Tarleton’s Legion lost 110 dead, over 200 wounded and 500 captured. By contrast, Morgan lost only 12 killed and 60 wounded. His perfectly designed and perfectly implemented defense had worked even beyond the Old Wagoner’s wildest dreams and highest hopes.
Knowing that Cornwallis would pursue him, Morgan buried the dead and then withdrew to the north to live and fight another day. Morgan reunited with Greene’s army and the combined force headed for North Carolina. Morgan, whose health was fragile, soon retired from further duty in the field, but he had left his mark. Cowpens was his finest moment, and set a precedent for Greene to follow two months later at Guilford Courthouse.
Battle of Cowpens (Courtesy of Campaign 1776/CWT)
*Suggestions for additional reading: for a superb book-length microtactical treatment of the Battle of Cowpens, see Lawrence E. Babits, A Devil of a Whipping: The Battle of Cowpens (Chapel Hill: University of North Carolina Press, 1998). This book is the primary resource consulted in drafting this article.
As a general statement, most people don’t think of the Revolutionary War as a testing ground for battlefield tactics. That assumption would not be correct. In fact, the Revolutionary War proved beyond doubt that traditional European set-piece battlefield tactics were largely ineffective against a determined enemy that was not bound by the traditional rules of war. As just one example, the extremely effective hit and run tactics used by the Minutemen to harass and deplete the British forces that marched to Lexington and Concord that were based on the tactics used by Native American fighters prove this beyond doubt. The British Regulars had no experience or training in dealing with these tactics, and they suffered as a result.
Also, in the European model, wherein gentlemen fought wars and assiduously avoided civilian casualties, it was considered impolite and improper to target the other side’s officers during the course of battle. American forces refused to comply with these rules, causing serious losses among the ranks of British officers, and the British had to adapt to these tactics also.
Another tactic adopted by American officers proved to be incredibly effective during the campaigns in the South in 1781. Brig. Gen. Daniel Morgan and Maj. Gen. Nathanael Greene, in particular, made extremely effective use of the defense in depth in carrying out their Fabian strategy during the Southern Campaigns of the Revolutionary War.
A Fabian strategy—named for its most famous practitioner, the Roman dictator, Quintus Fabius Maximus Verruscosus—avoids pitched battles and frontal assaults in favor of wearing down an opponent through a war of attrition and indirection. While avoided decisive battles, the side employing a Fabian strategy harassed the enemy through skirmishes to inflict losses, disrupt supply, and affect enemy morale. Typically, the employment of this strategy suggests that the side adopting it believes that time is on its side. George Washington was absolutely convinced that a Fabian strategy would ultimately wear down the British, and he was right.
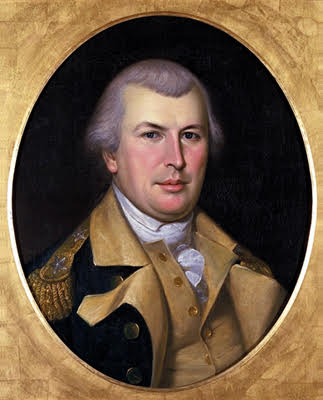
General Nathanael Greene, who mastered the Fabian strategy in the Southern Campaign of 1781
His protégé, Greene, also believed that a Fabian strategy was the way to defeat the British. Faced with the task of defending a large swath of the South with a small army, he had little choice. His subordinate, Brig. Gen. Daniel Morgan, a rough but extremely effective amateur soldier, pioneered the use of a defense in depth at the Battle of Cowpens in January 1781, and Greene then used it on a larger scale at the Battle of Guilford Courthouse about sixty days later. That two untrained amateur soldiers could develop and use such a tactic so effective demonstrates their genius.
A defense in depth, also known as a deep or elastic defense, seeks to delay, rather than prevent, the advance of an attacker, buying time and inflicting additional casualties by trading time for space. Instead of facing an attacker with a single, strong defensive position, a defense in depth relies upon the tendency of an attack to lose momentum and cohesion over time as it covers a larger area. Thus, a defender can yield lightly defended territory in an effort to outstrip an attacker’s logistics or spread out a numerically superior attacking force. Once that attacker has lost momentum, or has become spread out to hold territory, well-planned and well-placed counterattacks can be directed at the attacker’s weak points, with the objective of causing attrition warfare or driving the attacker back to its original starting position.
A conventional defensive strategy concentrates all of a defender’s military resources in a well-defended front line, which, if breached by an attacker, would expose the remaining troops in danger of being flanked, cut off, and surrounded, and leaving lines of supply, communications, and command vulnerable to being cut.
By contrast, a defense in depth requires that defenders deploy their resources, such as prepared fortifications, earthworks, and additional forces at and well behind the front line. Once an attacker breaches the weaker initial position, it continues to meet resistance as it presses on. As the attacker penetrates further, its flanks become vulnerable, and if the advance stalls, the attacking force can find itself completely surrounded and subject to being destroyed or forced to surrender. Thus, a defense in depth is particularly effective against an attacker that can concentrate its force to attack a small number of places along an extended defensive position.
In a well-designed and properly implemented defense in depth, the defending forces fall back to a succession of prepared positions designed to inflict a heavy price on the advancing enemy while minimizing the risk of being overrun or outflanked. By delaying the enemy’s advance, a defense in depth neutralizes manpower advantages and the element of surprise, and buys time for additional forces to be readied for well-timed counterattacks. A well-designed defense in depth will use its forces in mutually supporting positions and in appropriate roles. In this scenario, poorly trained soldiers—such as militiamen—can be used in static positions at the front line, while more experienced and better-trained soldiers can form a mobile reserve, or man the ultimate defensive position to be defended. Further, a well-designed defense in depth will make good use of the natural advantages offered by terrain features and other natural obstacles such as streams, ponds, etc.
General Nathanael Greene, who mastered the Fabian strategy in the Southern Campaign of 1781
There are disadvantages associated with the defense in depth. For one thing, constantly retreating can take a toll on the morale of defending forces. Further, these forces also require a high degree of mobility to accommodate those retreats, and also the space to do so.
Morgan designed and implemented a very effective defense in depth at Cowpens that proved so effective that Greene adopted that tactic and, while he lost the Battle of Guilford Courthouse, the heavy losses his army imposed on Lord Cornwallis’ army prompted Greene to note that the British, “have met with a defeat in a victory.”
Propaganda, imperial ambitions, and one small ear caused a flare-up in the New World between the European powers of Great Britain and Spain. In one of the most comical, bewildering, and interesting causes for war, the conflict known as the War of Jenkins’ Ear began eight years after the incident itself. The connections that this conflict would have with the successful outcome of the American Revolutionary War is what is most striking. Continue reading “War of Jenkins’ Ear and the Washington Connection”→
Emerging Revolutionary War is honored to welcome back historian Robert “Bert” Dunkerly.
During a trip to Mobile, Alabama for some Civil War research, I came across a fascinating and lesser-known aspect of the American Revolution. When I travel, I always keep my eye out for unusual finds and hidden history. I was rewarded on my trip to Mobile with a great discovery.
Fort Conde (author collection)
One of the main historic sites in downtown Mobile is the reconstructed Fort Conde. This brick fort interprets the early history of Mobile and the region under the flags of France, Spain, and the United States. Just outside the fort is a marker discussing the battle of Fort Charlotte.
Mobile was originally the capital of the French Louisiana Territory until the close of the French and Indian War. As part of the settlement of that conflict in 1763, this French territory passed to the British. Fort Conde, built in 1723, was renamed Fort Charlotte by its new owners.
Map of Ft. Conde superimposed over modern Mobile streets, (photo by author)
Most of us know that the French were anxiously watching the American Revolution when the conflict broke out, hoping to score revenge against their English adversaries. Also watching with interest were the Spanish.
The British garrisons along the Gulf of Mexico coast (Pensacola, Mobile, Baton Rouge) were quite small and vulnerable. The Spanish had been providing material aid and funds to the Americans, but finally declared war on Britain in 1779. The Spanish were ambivalent about American independence, and unlike the French, did not recognize the United States, but did agree to help militarily.
Even before Spain’s entry into the war, New Orleans was a source of aid smuggled in for the American effort. The Crescent City, and all the land west of the Mississippi, had been awarded to Spain at the close of the French and Indian War. From here, supplies moved up the Mississippi to Fort Pitt at Pittsburgh, PA. And from New Orleans, Governor Bernardo de Galvez attacked British posts up the Mississippi and along the Gulf Coast.
General Bernardo de Galvez, (artist unknown)
A statue of the Spanish general who did much to wrest the Mississippi and Gulf coast areas away from the British stands near the World Trade Center in New Orleans. A gift from Spain to the city of New Orleans, the statue is a reminder of this important but neglected aspect of the war. A group known as Granaderos y Damas de Galvez are dedicated to preserving his memory and that of the Spanish role in the Revolution.
Oliver Pollock was a Philadelphia merchant with close ties in Cuba and New Orleans. When the war broke out, he used his connections to aid the Revolutionary cause from the Crescent City. In 1777 he was appointed “commercial agent of the United States at New Orleans” and used his fortune to finance American operations in the west, such as General George Rogers Clark. When Spain entered the war he served as an aide to General Bernardo de Galvez.
Moving up from New Orleans, a force under General de Galvez, that included Spanish troops, American volunteers, Acadian settles, and free blacks, attacked and captured the British outpost of Fort Richmond at Baton Rouge on September 21, 1779. Today a memorial with plaques and a cannon marks the site.
In February, 1780, Spanish troops and American volunteers under Governor Bernardo de Galvez laid siege to the 300 British in Fort Charlotte at Mobile. The siege lasted a month. The garrison’s surrender gave the Spanish control of this important site, and removed all English military forces from the Gulf region.
This was one of the few actions of the war in which Spanish and American troops fought side by side. Spain declared war on Britain but did not recognized the United States, their primary interest being to settle scores with the British.
For more information on these fascinating events, check the following websites:
Often the study of history can ground us and make us feel less “unique.” This allows us to hopefully put our own experiences into perspective and be able to hopefully learn from lessons of the past. Many today complain about how print and social media can distort facts to support a particular agenda. This is not a modern phenomenon. Many in the Sons of Liberty (such as Paul Revere) used print media to their advantage to promote resistance to and then independence from Great Britain.
Many pro-Patriot newspapers printed nothing less than propaganda pieces after the battles of April 19, 1775. Here is part of what was printed by the Massachusetts Spy on May 3, 1775.
“Americans! forever bear in mind the BATTLE of LEXINGTON! where British Troops, unmolested and unprovoked wantonly, and in a most inhuman manner fired upon and killed a number of our countrymen, then robbed them of their provisions, ransacked, plundered and burnt their houses! nor could the tears of defenseless women, some of whom were in the pains of childbirth, the cries of helpless, babes, nor the prayers of old age, confined to beds of sickness, appease their thirst for blood! – or divert them from the DESIGN of MURDER and ROBBERY!”
Obviously a historic study of the events on April 19, 1775 disputes much of what is claimed by the Massachusetts Spy. But when you have a point to make, an agenda to promote and a local population to rally to a cause…why should truth get in the way?! We have come a long way since 1775, but in many ways not much has changed.
The prints by Amos Doolittle of the events on April 19, 1775 did a lot to promote the Patriots cause in their “media war” war against the British.
Spring has not get touched the tree-covered hills to the east of Elmira, New York, but the Chemung River sparkles in quiet anticipation as it flows between them. The Newtown Battlefield State Park won’t open for another few days or so—it operates seasonally May through October—but I have stopped nonetheless to see what might be here.
“I am very apprehensive our Expedition will not appear in History,” wrote Lt. Obadiah Gore, Jr., of the Continental Army.
And indeed Gore’s worries seem to have played out just that way. I know almost nothing about this Revolutionary War battle, although I have driven by the battlefield for decades. In fact, for two full years not so long ago, as I was doing my Ph.D. at Binghamton University, I drove through the battlefield four times a week on my way from and to Saint Bonaventure University, where I work. I really need to stop sometime, I kept telling myself.
For years, the old State Route 17 passed through the battlefield with little more than a sign telling motorists they were passing through and an arrow pointing up a road that could have been someone’s driveway. The expansion of Route 17 into Interstate 86 now gives motorists the chance to whisk right on by even faster, giving even less notice, despite signs that still say I am passing through.


 Often the study of history can ground us and make us feel less “unique.” This allows us to hopefully put our own experiences into perspective and be able to hopefully learn from lessons of the past. Many today complain about how print and social media can distort facts to support a particular agenda. This is not a modern phenomenon. Many in the Sons of Liberty (such as Paul Revere) used print media to their advantage to promote resistance to and then independence from Great Britain.
 Spring has not get touched the tree-covered hills to the east of Elmira, New York, but the Chemung River sparkles in quiet anticipation as it flows between them. The